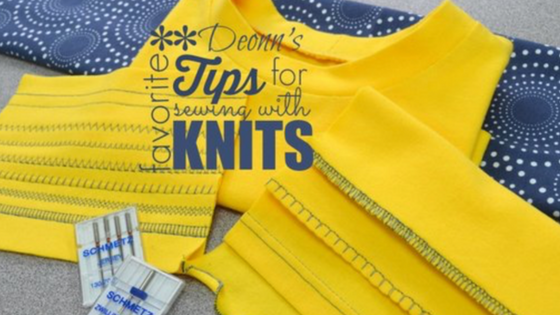
Sewing with knits can be fun! Especially if you are using
adorable RBD jersey knit prints, as featured in the recent
“Knit Love” Blog Tour. Knits are easy to sew, easy-care,
and are so comfortable to wear!
When I was a young mom, I used to sew lots of my kids’ clothes.
I made tons of t-shirts for my son, and when the triplets came along,
I loved to make matching outfits… yes, I was that Mom, lol!

Needless to say, I’ve had a lot of practice with knits.
Here are a few of my favorite tips for sewing with knits.
The Fabric:
PREWASH. If you are planning to wash and wear knit articles,
prepare the fabric before you cut into it! Knits will shrink.
Sometimes a lot! “Allow for shrinkage” = buy extra.
Plus you can use that extra fabric for ribbing or self-binding.
Machine wash warm. Non-chlorine bleach as needed. Tumble dry low.
Tools & Supplies:
MACHINE. Your sewing machine will need at least a zig-zag feature.
Most machines today come with a built-in stretch stitch or overcast
stitch options. A serger will stitch, overcast and trim the seam
at the same time, but you can achieve the the same seam finish
with a regular sewing machine.
NEEDLES. Use a ball-point sewing machine needle. Ball point needles

It will usually say “stretch” or “ball point” somewhere on the label.
A ball-point needle will part the knit fibers when making the stitch.
Try a double-needle for a nice finish (see example below).
Other supplies may include:
Glue-stick = very helpful in preparing edges and keeping
in place for a stitched finish.
Freezer paper = Iron waxy side to the back of knits for
stability when machine-stitching applique’.
Stitch using a satin stitch, then peel paper off.
Lightweight fusible knit interfacing = faced neck edges, collars,
cuffs. Pellon SK135 comes in black or white tricot.
Stitches:

If the fabric stretches, the seams must stretch too. Most machines
come pre-loaded with several stretch-stitch options. Do a test.
The most basic is a simple narrow zig-zag stitch. Set the stitch
length to 2 and set the width at 1. Then try the different overcast
stitches on your machine to see what works best. An overcast
or serged seam also allows the needed stretch.
Refer to your machine manual for suggested stitches.
Finishes:

RAW EDGES. Jersey knit does not fray. Unfinished edges will
have a slight curl, which is all the fashion today.
Stitch the skirt together and leave the hem unstitched.
It will curl on it’s own, or give a little tug to make it curl even more.

DOUBLE-NEEDLE. Fold the raw edge under once, measuring
between 1/2″ to 1″, then use a double-needle to top-stitch.
Use a washable GLUE STICK to keep hem in place as you
top stitch on the right side.


The single bobbin thread with double needle straight stitch
will also creates a stretch stitch.

Looks great for hems on sleeves, shirts and skirts.
OVERCAST. Serged or overcast seams can finish the edges nicely,
both inside or outside the garment as a decorative feature.
You don’t have to have a serger to achieve this look;
try different overcast stitches on your sewing machine.

SCALLOP EDGES. Use an overcast stitch on the machine. Fold the
edge over about 1/4″ and stitch, making sure the needle goes off the
edge to create the scallop. This finish works well on t-shirts or lingerie.

LETTUCE EDGE. Shorten the length and width of a zig-zag stitch
then pull the fabric to stretch the edge as it’s stitched.
This looks cute on kids’ clothing at the edge of sleeves and hemlines.

SELF-FINISH: Use a strip of cross-cut knit to create ribbing or binding.
The knit must stretch at least 50% in order for this technique to work well.
For a classic T-shirt neckline finish, measure the circumference
around the neckline. To determine the length of the
neckband strip to cut, reduce that measurement by about 15%.
Circumference x .85 = LENGTH
Determine the width of the strip by doubling the desired finished width
and adding two seam allowances (usually 1/4″).
Finished width x 2 + .5 = WIDTH
If my neckline measures 15 inches around, the length of my strip
will be about 12.75 inches. I want the finished size of the ribbing
to be 3/4″, so the cut width of the strip will be two inches.
I’ll cut a 2″ x 12 3/4″ strip on the cross-grain,
which has more stretch than the lengthwise grain.
With right sides together, join the short ends and stitch
using a 1/4″ seam allowance.

Open the seam, and fold the tube in half lengthwise, right side out.
Fold the neckband in half and quarters and mark with pins.
Repeat the steps on the raw edges of the neckline,
dividing into quarters and pinning to mark.

With the neck opening and neckband right sides together,
match the pins with the neckband seam at center back.

Align the raw edges, stretch to ease the neckband slightly and pin into place.

STITCH using 1/4″ seam allowance.

Zig-Zag or overcast the edges then give it a press. Perfect!

Use the same principle for cuffs. A 2″ finished cuff would need
about 4-1/2″ in width. Measure the circumference of the wrist
for the length.
Enjoy sewing with knits – I can’t wait to start sewing for
grandkids… someday! I hear they’re great… grandkids, that is.
Then I can make matching outfits for all of them too. *Ü*
And be sure to check out all the fabulous knit projects from the
RBD Knit Love Blog Tour.
For more “Sewing Basics” tips like these, join me here at Cutting Corners
on first Mondays. I’d love to have you stop by Quiltscapes for a visit
where you can download a sweet little seasonal applique’ pattern
to try on your next knit project: www.quiltscapesqs.com.
See you next time!


