
Welcome to Day 1 of the Comfort & Joy Fabric Tour! Comfort & Joy is Dani Mogstad’s latest collection designed around the symbols, from deer to snowmen, to beautiful evergreens, that truly do bring us comfort and joy during the holidays.

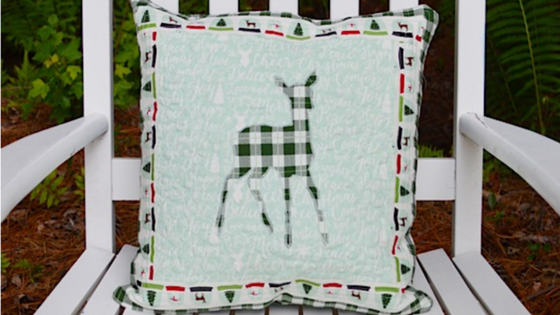
I was excited to have the opportunity to kick off this festive fabric tour, because this fabric line is so much fun to look at and to work with! I decided to make a super easy applique pillow.

I LOVE the Light Green Words fabric, and wanted to really show it off in this pillow, but I knew that Green Plaid would make an awesome silhouette, so I decided to put the two together for this fun little pillow.

To make this 16″ pillow, you will need:
*11.5″ square of Light Green Comfort Words
*(2) 2″ x WOF strips Cream Comfort Globes
*(2) 3″ x WOF strips Green Comfort Plaid
*6.5″ x 16″ Green Comfort Plaid for pillow back
*10.5″ x 16″ Green Comfort Plaid for pillow back
*Approximately 10″ square Comfort Plaid for silhouette
*Heat n’ Bond or any fusible adhesive
*Coordinating 16″ or larger zipper
*Deer Silhouette of your choosing
*Batting and optional fabric for underside of batting (will only be seen on the pillow interior)
**I am using a 1/4″ seam allowance unless otherwise noted.

To begin, you’ll need to do a quick internet search for a free deer silhouette. Your search will turn up hundreds of options. Just choose one you like. When I printed mine, I printed a few, changing the percentage or scale in the print options each time. I ended up with several different sizes, which allowed me to pick the one that best fit within my 11.5″ square.

This next step can be done 2 ways. Option #1: Cut a piece of the plaid fabric so that it is larger than your deer silhouette. Cut the same size fusible adhesive. Press the two together according to the directions on your fusible adhesive, making sure you are pressing the glue side of the fusible adhesive to the wrong side of the fabric. Pin the deer silhouette to the fabric/adhesive combo and cut out the sihouette.

Or option #2: (this is not as easy, but has less fabric waste) Pin the silhouette to the plaid fabric and to the fusible adhesive. Carefully cut all of the layers out. Press the adhesive (glue side up) to the wrong side of the fabric deer cutout.
At this point, you should have a plaid deer silhouette with the fusible adhesive pressed to the back of it. When it has cooled off a bit, peel off the paper backing and position it in the center of your 11.5″ square.

Once you have it positioned where you like it, press it into place.

Stitch around the edge of the silhouette using a narrow zigzag stitch.

Now it’s time to sew the snow globe border. I cut the snow globe border in 2″ strips, being careful to leave about 3/8″ above and below the snow globes. I wanted the row of snow globes to line up just right around the main center square. Taking the time to cut around an image (and not randomly cut through it) in order to feature that image is called “fussy-cutting.”
You’ll want two 11.5″ strips and two 13.5″ strips.

Sew the 11.5″ snow globe strips to each side of the square. Press. Sew the 13.5″ strips to the opposite sides of the square. Press.
Repeat these steps sewing the 3″ plaid strips. For the plaid. After you have sewn and pressed the plaid strips, trim your pillow front so it measures 16″ square.
Now it’s time to quilt the pillow front. Make a fabric sandwich: Pillow front + lightweight batting + optional fabric for pillow back. Machine or hand quilt according to your own preferences here.

For the pillow back, I quilted the two back pieces the same way I did the front. To attach the zipper, I pinned the zipper to the right side of the 16′ side of the smaller piece of fabric. Stitch the zipper to the fabric using a zipper foot. I made sure not to stitch too close to the zipper teeth because I wanted the mint color to show. Repeat this step to attach the other zipper half to the 16″ side of the larger back piece. Press and top stitch.
If your zipper is longer than 16″, you’ll want to trim the extra length now so it is flush with the fabric edge.
Unzip your zipper about halfway and pin your pillow front and back together, right sides facing each other. Sew them together, making sure to slow down and sew very carefully where the zipper is located. You don’t want to break a needle or worse, so use caution. I prefer to slowly hand-turn my sewing machine wheel here so that my needle goes around the zipper feet.
Turn your pillow right side out, and you are done!

You can check out Dani Mogstad’s complete Comfort & Joy fabric line HERE.