
Hello, friends! We are so excited today to help kick off Andrea Muller’s Vintage Kitchen Blog Tour! Vintage Kitchen is Andrea’s debut collection with Riley Blake Designs, and we couldn’t be more excited to have her on board!

Andrea is based near the wonderful city of Munich, Germany. She grew up in Australia and lived in Berlin before moving to Bavaria. Needless to say, she has been influenced by many different cultures and surroundings, which is reflected in her work. We love Andrea’s retro/eclectic/charming aesthetic and we certainly can’t get enough of this fun Vintage Kitchen collection!

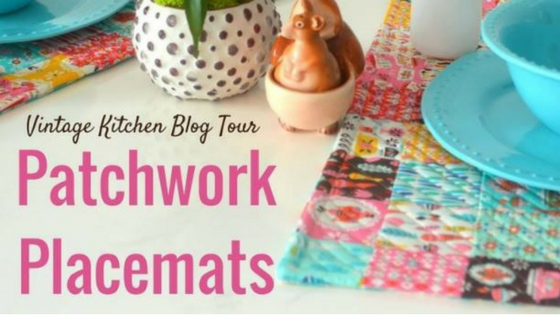
Because I couldn’t choose just one print from Vintage Kitchen to play with, I decided to use them all in these super quick and easy patchwork place mats. Aren’t they cute?
For 2 Place mats You Will Need:
108 – 2 1/2″ Squares
2 – 12 1/2″ x 20″ pieces of Kitchen Cat fabric for backing
2 – 12 1/2″ x 20″ pieces of Pellon Thermolam Plus (fusible fleece) or thin batting of your choice.
3/4 Yard Pellon #820 Quilter’s Grid

The secret to these easy-peasy placemats is this fusible Pellon Quilter’s Grid. Cut a piece of the Quilter’s Grid about 18″x24″. Locate the fusible side. It will be slightly bumpy compared to the non-fusible side. Now layout your squares. Because my squares are 2.5″, they don’t line up perfectly on the grid (which has 1″ markings), however, being able to line up the top and sides was all I needed for this smaller project.
Here are my squares a lined up and ready to press. At this point, double check you have everything arranged the way you like it. Now, using a hot iron with no steam, press (don’t iron) the squares into place. After you have pressed the squares into place, trim away the edges of the Quilter’s Grid. Here is where the fun begins! Hope on over to this blog for a fantastic set of instructions on sewing the rows together.
Now that your squares are all sewn, your place mat top is finished!

Layer your pieces as shown: Starting from the bottom, you will have 1 piece of the fusible fleece, your placemat top (facing up), and your placemat bottom (facing down).
Pin the three layers together.
Using a 1/2″ seam allowance, stitch around the edges, leaving a 4-5″ opening on one of the long sides of the place mat.
Clip the corners close to stitching.
Turn the place mat right side out. Press, making sure to press under the edges at the opening. *You want them to be folded and pressed even with the place mat edge so the opening becomes invisible after it is stitched closed.
After you have pressed the top and edges, pin the opening closed. Stitch 1/4″ around the edge of the place mat.
Now it’s time to quilt the place mat! How you quilt it is completely up to you. Here, I chose to sew 1/4 from each side of the seam going horizontally, and then repeating the same 1/4″ stitches going vertically.
I used vertical stitches between 1/4″ – 1/2″. I didn’t try to be precise. In fact, I tried NOT to be precise, which ironically is harder than it sounds!
For the second place mat, I used diagonal stitches. Again, I did these lines free form, trying to keep the stitches uneven in width. Imperfection was my goal. In the end, my kids each commented on the different stitching patterns. They each had a favorite.
There you have it – some serious Vintage Kitchen LOVE! Why not use this same technique to make a table runner, or wall hanging, or quilt? The possibilities are endless!
This promises to be a blog tour you won’t want to miss! Follow along with the schedule below to catch every single project coming your way!
|
3/7/2016 |
Julia – Riley Blake Designs |
|
|
3/7/2016 |
Andrea – Jolijou |
|
|
3/8/2016 |
Nina – Hedi |
|
|
3/8/2016 |
Anja – Nähkitz |
|
|
3/9/2016 |
Swafing Fabrics |
|
|
3/9/2016 |
Carrie Beri Bee Designs |
|
|
3/10/2016 |
Herzenssachen |
|
|
3/10/2016 |
Andrea – anlukaa |
|
|
3/11/2016 |
Emma – Frühstück bei Emma |
|
|
3/11/2016 |
einchen – doppelnaht |
|
|
3/14/2016 |
Anorina – Samelias Mum |
|
|
3/14/2016 |
Bev – Flamingo Toes |
|
|
3/15/2016 |
Amy – Diary of a Quilter |
|
|
3/15/2016 |
Julia – lillesol & pelle |
|
|
3/16/2016 |
Andy – A Bright Corner |
|
|
3/16/2016 |
Sabine – farbenmix |
|
|
3/17/2016 |
Simone – KaeptnStupsnase |
|
|
3/17/2016 |
Sarah – Mädchenkram |
|
|
3/18/2016 3/18/2016 |
Melissa Corry Emily Ann’s Kloset |
|
|
3/21/2016 |
Jessica Stewart |
|
|
3/21/2016 |
Bine Guellich |
|
|
3/22/2016 |
Lindsay Wilkes |
|
|
3/22/2016 |
Sandra – Flaupa |
|
|
3/23/2016 |
Amanda Niederhauser |
|
|
3/23/2016 |
Ina – pattydoo |
|
|
3/24/2016 |
Ruth Sodl-Warter |
|
|
3/24/2016 |
Marissa – Rae Gun Ramblings |