
Every now and then, a fabric line comes along that has the teenagers squealing in delight. JUST ADD SUGAR, designed by Simple Simon & Co., was exactly that!

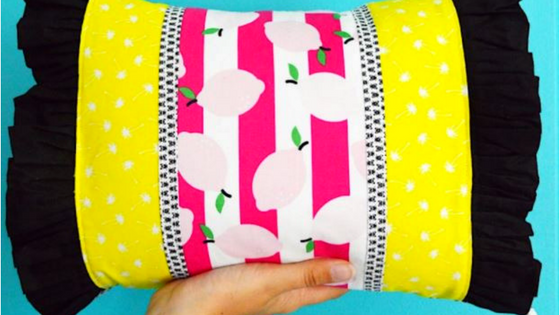
I knew right away I wanted to showcase the larger scale lemon prints by making a simple strip work lumbar pillow — perfect for bed decor or for supporting teenage backs as they study at their desks. The simplicity of this stripy pillow sham lets the fabrics speak for themselves without being overpowered by fussy patchwork.

I did add a fun, simple little ruffle on each end of the pillow. The touch of solid black fabric provides a visual anchor for the tiny, busy little black and white prints, and adds a bit of “edginess” for the teen who doesn’t like too much “frill.”

*All seam allowances are 1/4″ unless otherwise noted.
*WOF = Width of fabric
To make this pillow, you will need:
*11″ x 15″-16″ pillow insert (I prefer to use a down/feather-filled pillow because of the way they keep their shape over time)
*12″ black zipper
*5.5″ x WOF Pink “When Life Gives You Lemons”
*1″ x WOF Black “Uninvited Guests”
*3″ x WOF Yellow “Put the Lime in the Coconut”
*5.5″ x WOF Riley Black
*3″ x WOF White “Lemon Zest”
*For Pillow Back: 12″ x 18″ Black “Uninvited Guests”
Let’s Begin!
1. Cut the WOF fabric strips in half at the fold. This will give you two approximately 22″ strips of each print.

2. With right sides facing, match up the raw edges (lengthwise) of the pink lemon and the black fly fabrics. Stitch. Press seam toward the black fly print. Top stitch.
3. With right sides facing, match up raw edges (lengthwise) of the yellow palm tree and black fly fabrics. Stitch. Press Seam toward the black fly print. Top stitch.
4. Repeat steps 2 & 3 for the other side.

5. Now it’s time to sew the ruffle. Fold each of your Riley Black strips of fabric in half, lengthwise, and press. Use a ruffling foot or a gathering stitch to gather the edges, creating the ruffle.
6. Line up the raw edge of the ruffle to the raw edge of the yellow palm tree print and pin in place.
7. Stitch in place, making sure your stitch is just past the gathering stitch. I used a 3/8″ seam allowance here.
8. Now we are going to make a “ruffle sandwich.” Match up the raw edges of the little triangle, or “Lemon Zest” print to the stitched yellow palm tree & ruffle seam. You will have 3 raw edges: Yellow palm trees on the bottom, ruffle in the middle, and little black triangles on top. Pin in place. Stitch.

9. Press ruffle seam toward yellow palm tree print. Top stitch.
9. Your pillow sham top is finished and ready to trim to size. Your width should already measure 16″. Trim the height to measure 11.5″, so your finished pillow top will measure 11.5″ x 16″.

*I am going to show you how to make a zipper opening on the back. If you don’t want to do this, you can simply cut your back fabric to the same measurements as the front piece, “11.5” x 16″. Sew them, right sides facing, leaving an opening (about 6″). Turn right side out. Press. Insert the pillow form. Hand stitch the opening.
10. To make the zipper opening, cut your pillow back into 2 pieces. I cut mine at 6″ to create a 6″ x 12″ piece and an 11″ x 12″ piece.
11. For the pillow back, I did a very simple zipper insert. With right sides facing, pin the 12″ raw edge to the edge of your zipper tape. Using a zipper foot, align the foot with the raw edge and stitch. Press fabric away from zipper. Top stitch. Repeat on the other side of the zipper tape.
12. Now you’ll want to trim the back to measure 11.5″ x 16″. As long as the top of the pillow back (where the zipper pull is located) is straight, I leave that portion alone, and trim the bottom and sides. Don’t be afraid to carefully cut through the zipper bottom as you trim. The zipper bottom will be sewn into the seam and will be very secure.

13. Unzip the zipper halfway so you can turn the pillow right side out when the front and back are sewn together. With right sides facing, pin pillow back to pillow front, making sure the raw ends of the ruffles are pinned into the seam. Stitch. Clip corners, being careful not to touch the stitching. Turn right side out. Press.

14. Insert your pillow form, and you are done!
I love making projects that look “normal”, but upon closer inspection have a fun twist or surprise. This little fly print does just that for me. From a distance, it looks like a dot or geometric design. It isn’t until you look closely that you see the fun little flies. LOVE!

The subtle little white palm trees on the bright yellow background are another fun surprise. These fabrics are cheerful, fun and modern, and this pillow will no doubt get lots of love!

LoVe, lOvE, LOVE!