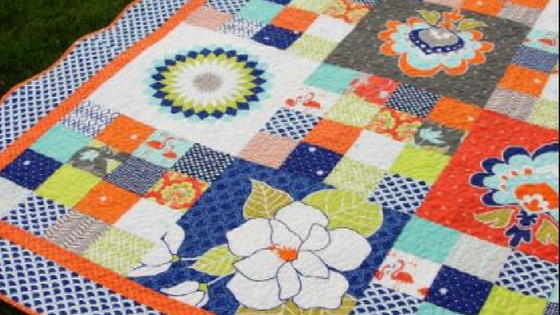
My name is Amy Smart and I blog about my quilting addictions at Diary of a Quilter. Today I’m sharing a quilt using Amanda Herring’s newest collection Lula Magnolia. I am in love with vibrant colors in this collection coming to stores in June. This collection of fabrics includes a gorgeous panel with four big graphic prints. Printed panels are such a great tool for making a dramatic statement in quilts without having to do a lot of intricate piece-work.
The Lula Magnolia panels come in 3 different colorways, but all coordinate with each other. I used three panels from two different colorways. This quilt was designed with these specific panels in mind, but could also be used for any 16″ x 16″ panels.
Finished Quilt: 60″ x 76″
Fabric requirements:
- six 16 1/2″ x 16 1/2″ panels. (The Lula Magnolia panels come 4 to a yard. You could get a yard and a half to get six panels. The panels measure 18″ x 20″ so you will need to square up each panel to 16 1/2″ x 16 1/2″.)
- 24 prints in 4 1/2″ x 20″ strips. (These could easily come from 1/8 yards or fat-eighths. Or you could use 96 charm squares and piece the 16-patch blocks just using the squares.)
- 3/8 yard inside border – cut six strips 2″ x 42″
- 1 yard outside border – cut seven strips 5″ x 42″
- 1/2 yard binding
- 3 5/8 yards backing
Cut twenty-four strips 4 1/2” x 20”. You can get two per 1/8 yard or use more fabrics if you want a bigger variety. I used a mix of Lula Magnolia prints as well as a few solids and Riley Blake basics to add more color and contrast. I like to change up the scale and busy-ness of the fabrics so that the fabrics coordinate but have contrast as well.
Sort the 24 strips into 6 sets of 4 fabrics. Sew the four strips together to create a 16 1/2” x 20” strip set.
Trim selvage edges from strip set.
Turn the strip set so that the newly squared-up edge is on your left. Place ruler 4 1/2” over the strip set and trim a 4 1/2” unit from the set.
Continue to cut three more 4 1/2” units from the strip set. Repeat this step with five remaining sets of four 4 1/2” x 20” strips. You will end up with twenty-four 4-block units.
Mix and match the 4-block units into six different sets. Before you sew them together, press seams in first and third unit going one direction and in second and fourth units going the other direction. This will help points match up and keep the block square when the opposing seams butt-up against each other as you sew the units together.
This will create six 16-patch-blocks measuring 16 1/2″ x 16 1/2″.
Lay out blocks into four rows of three blocks each, alternating the 16 1/2″ x 16 1/2″ panels and the scrappy 16-patch blocks. Press seams toward the panels. Sew four rows together and press seams all one direction.
Add borders. This is my favorite method for adding borders to a quilt. Quilt and Bind. These panels from the Lula Magnolia collection are useful for lots of other projects including bags and pillows.
Lula Magnolia will be arriving in stores in June!

