
How many of us remember chenille bedspreads from our childhood? How many of us are kicking ourselves for thrifting them when it was decided they were out of style, only to have them come back with a vengeance — a very expensive and hard-to-find vengeance! Yes, chenille is back, and I am going to show you how to make your very own up-to-date version.
*Our friend and Design Team Member, The Cottage Mama, was originally scheduled to post today, however due to the early arrival of their newest family member, who just couldn’t wait a day longer, she had to opt out of today’s blog post. I am filling in for her, but she promises to show off her projects with her brand new pajama pattern soon!
Let’s get started!
Blanket Supplies:
5 – 1 yard cuts of flannel fabric in prints/colors of your choice
4 yards purchased or handmade binding.
Olfa Chenille Cutter
Pillow Supplies:
4 – 20.5″ x 20.5″ pieces of flannel fabric in prints/colors of your choice
2 – 13″ x 20.5″ pieces of flannel for pillow back
1/4 yard fabric for piping
1.5 yards 1/4″ wide cotton or polyester cording for piping
Blanket Instructions:

Lay the back piece of your blanket face down on a flat surface. Arrange the 4 layers of fabric that will be used on the chenille-side of the blanket in any order you choose directly on top of the blanket back piece. Stack them on top of each other and align the edges of back piece and all 4 chenille fabrics. You will end up with a stack of 5 different fabrics – 4 facing Right Side Up – 1 facing Wrong Side Up.

Pin or safety pin through all 5 layers, all around the blanket, to prevent the fabric from shifting while sewing.

Your stack of fabrics, laid flat, measures approximately 36″ x 44″. Find the 45 degree angle on your fabric and draw a line, using a washable fabric marker or pencil. You can find the 45 degree angle by measuring 36″ on the long edge of your fabric and marking that spot. Draw a line from this spot, diagonally up to the opposite corner, as shown.
*Note – Stitching lines must be done at a 45 degree angle for the fabric to “tuft” and form the chenille look.

Stitch directly on your marked diagonal line. After the first row is completed, use the stitching line as a guide to sew parallel rows 1/2″ apart. You should be able to use the edge of a standard presser foot as a 1/2″ guide.

Continue sewing 1/2″ rows across the entire blanket. Don’t worry, this is the most time-consuming part of the process. It comes together pretty quickly after this!

In spite of your most diligent efforts at pinning the layers, you will probably still have uneven edges like these.

Go ahead and trim them off with your rotary cutter so you end up with nice, clean edges to work with.

Following the instructions on the Olfa Chenille Cutter, set the width at 1/2″ and begin cutting through the 4 chenille layers of fabric, leaving the back fabric piece alone. I found that the cutter worked best when I cut through the top 2 layers, then went back and cut through the next 2 layers. Again, be VERY careful not to cut through your bottom layer, as this is your quilt back.

You will end up with lots of gorgeous rows like this.

If you want to round the edges of the blanket, take a bowl or other round object, place it near the corner and trace the curve. Cut along your traced line.

If you are making your own bias tape, now is the time to do that. One of our instructors, Deonn, has put together a great bias tape tutorial here.

Attach the binding to the quilt. I won’t explain this step here, but here are a few tutorials:

Now is the fun part! Wash the blanket. It is fine to just run it through the rapid wash cycle here. After washing it, toss it into the dryer. As it dries, the cut channels will begin to tuft into these rows of super fluffy yummy softness.

You can see that the fabric hues become much more muted because the cut edge becomes more prominent as it curls upward, transforming the layers into understated hints of color.
Pillow Instructions:

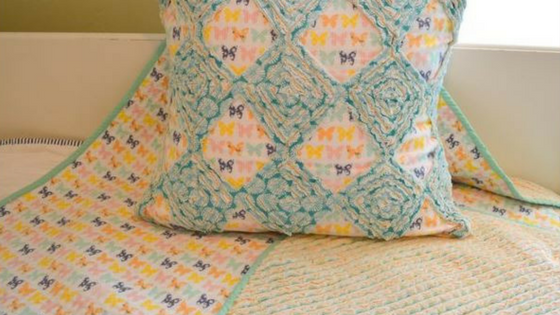
Layer your 4 – 20.5″ x 20.5″ squares of fabric on top of each other, all facing the SAME direction.

Pin all 4 layers together to prevent fabrics from shifting while you sew. Draw a template of the shape you want (this can be any shape, but should have diagonal lines. Remember that in order for the fabric to fray and tuft, the fabric will need to be cut on the bias, or close to it.) I chose a rough diamond shape for the example. Place your template on the BACK piece of fabric, and trace it. You can do a simple repeating pattern, or play around with various abstract designs here.

After I traced my shape, I marked the shapes I wanted to create the chenille effect in with a “ch”, and left the others blank.

After looking at what I had created, I decided to connect the chenille shapes with 2 small vertical lines.

Once you have your design drawn out the way you want it, you can begin sewing. Just like you did for the blanket above, start by sewing directly on the lines you drew. After that, sew 1/2″ channels. I used the outside lines of the diamond as my guide, and stitched several inner diamonds.

Here is the front of pillow. The red dashed lines indicate where I stitched on the back. Using a small, sharp pair of scissors, I carefully cut through 3 of the layers in between the 2 stitching lines. Do NOT cut through the very back layer.
Notice the diamonds I left blank on the back are now cut. I cut about 1/4″ from the stitching line, through the top 3 layers of fabric, to reveal the bottom fabric, which features these cute butterflies.

If you want to feature one of the other fabrics in the layers, just cut until you reach the one you want. You can show off multiple fabrics by cutting through just 1, 2 or all 3 in each different “window.”

For the piping, cut several 1.5″ strips of fabric. Sew the short ends together, forming one long strip. Press seams open.

Wrap the long end of the strip around the cording, and using your zipper foot, stitch close to the cording, as shown.

You now have a nice long strip of piping. Set aside.

Take one of the 13″ x 20.5″ pieces and fold over one of the long ends about 1/2″. Press. Fold over again. Top stitch close to edge. Repeat for second back piece. Set aside.

Now, place the pillow front on a flat surface, right side up. Pin the piping around the perimeter, aligning raw edges of piping and pillow. Clip corners, being careful not to cut the stitching. When you reach the 2 ends of the piping, overlap them so the ends extend about 1″ past the pillow edge, and pin in place.

Arrange one pillow back piece, face down, so that the right sides are facing the right side of the pillow front piece. The finished edge should be toward the center of the pillow. Pin edges. Repeat for the 2nd back piece. The hemmed edge should overlap with the 1st piece.

Stitch around edges as shown in the red dashed lines above.

You be sewing through 3 layers – the front piece, the piping, and the back pieces (which overlap in the middle) as shown in the above image.

Clip the corners close to, but not through stitching.

Turn right side out. Wash pillow. Again, it would be fine to simply run this through the rapid wash cycle.

After washing, toss in the dryer. As you can see, drying it causes the layers to curl and tuft up quite a bit. You won’t see quite as much tufting here as you do with the blanket because of the vertical lines throughout the design, but the effect is quite nice.

There you have it – Chenille 101. The only problem with attempting this is that everyone in the family will want one. Enjoy!
I hope you are enjoying this Blog Tour. As the weather starts cooling down, consider yourself armed with TONS of ideas and inspiration for cozy cold weather sewing projects & gift ideas!
9/5 Riley Blake Designs – Flannel Play Dress
9/9 Quiltscapes – Pajama Pants & Pillow
9/12 Fishsticks Designs – Reversible Button Bibs
9/19 The Stitching Scientist – Toddler Nightgown
9/23 Sassy Quilter – Patchwork Dog Bed
9/26 Simple Simon & Co. – Flannel Pajamas
9/30 Fabric Mutt – Seat Cushion
10/3 Just Let Me Quilt – Nightgown & Quilted Cape
10/7 Jedi Craft Girl – Baby Blanket & Burpers
10/10 Rose and Odin – Christmas Pillowcase
10/14 Sew We Quilt – Newborn Nightgown
10/17 Haberdashery Fun – HST Baby Blanket
10/21 Leigh Laurel Studios – Personalized Pet Bed
10/24 Riley Blake Designs – Chenille Baby Blanket & Pillow
10/28 Flannel Queen – City Gym Shorts in Flannel
10/31 Lucy Blaire – The Cora Dress