
Welcome to DAY 1 of the Stitch ‘n Kitchen Holiday Blog Tour! We have a jam-packed line-up of super talented bloggers ready to share their favorite holiday tutorials with you. And as a BIG BONUS, they will also be sharing their favorite holiday recipes! This is a blog tour you absolutely won’t want to miss!
To kick things off, I am going to show you how to make a super easy star ornament + my VERY favorite holiday recipe which is zero calories and requires no cooking: Stovetop Simmers!
Let’s get started:

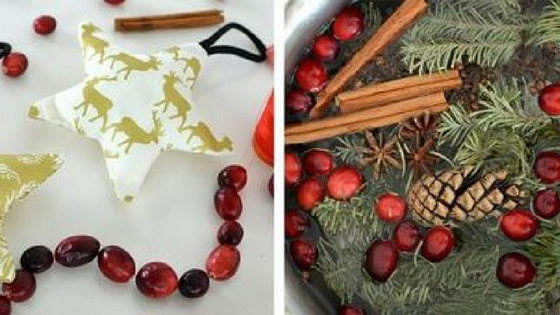
10 Minute Star Ornament
Prep Time: 10 Minutes
Making Time: 10 Minutes
Ingredients:
- Printable Star
- 2 – 6 1/2″ x 6 1/2″ fabric of choice (I used Gold Sparkle Deer and Gold Sparkle Damask from the Postcards For Santa Collection)
- 6 1/2″ length of cording or 1/8″ ribbon
- small amount of fiberfill for stuffing the ornament

Step 1. Using the printable Star Template, cut out your fabric star, cutting through 2 thicknesses, so you have a front and back. Here you can see, I cut 4 pieces using two different prints. I will be making 2 ornaments.

Step 2. Cut a 6 1/2″ length of cording or 1/8″ ribbon.

Step 3. Loop your ribbon as shown and baste it to the front of one of the fabric stars, with the loop facing toward the middle.

Step 4. Place the 2nd star shape on the basted shape, RST (right sides together) and stitch 1/4″ around the perimeter, leaving a 1″ opening for stuffing the star.

Step 5. Trim the corners close to the stitching. Clip the Be careful here, as you do not want to clip the stitching.

Step 6. Now reach in through the opening and take hold of the ribbon loop. Gently pull it out, turning the star inside out. With a pointy object like the handle end of a small paintbrush, poke the star tips so they are turned completely right side out.

Step 7. Press

Step 8. Stuff with fiberfill. I kept the stuffing very loose. You can stuff the stars as loose or tight as you want. With a needle and thread, stitch the opening closed.

That’s all there is to it! You can whip up a bunch of these cute ornaments in no time. If you have a specific color scheme for your tree, you can pick fabrics to match. Easy!

Now for my favorite holiday recipe – okay, it’s not actually food, but it smells amazing! Although I don’t spend a lot of time cooking, I still love for my kitchen and home to smell delicious and inviting. These simmers fit the bill.
Holiday Stovetop Simmers
Prep Time: 2 Minutes
Make Time: 2 Minutes

Ingredients:
You can mix things up to create whatever smell you like with what you have in your kitchen. Here are the basics that will give you a variety of simmers to try.
1. Fresh pine
2. Orange
3. Apple – I prefer to use a Granny Smith
4. Lemon
5. Fresh Cranberries
6. Bay Leaves
7. Star Anise
8. Cinnamon Sticks
9. Whole Cloves
Instructions:
Step 1. Start with the Simmer Base:
I typically use 1-2 Cinnamon sticks, 1-2 tbsp. whole cloves, and 2-3 of the Star Anise in all of my simmers. They create a heavenly holiday smell.
*Note: I would not recommend purchasing the spices in the spice section of your supermarket. You can find them in bulk for a fraction of the price on Amazon and from other online retailers.
Step 2. Add combination of ingredients to create your blend.
Cider Simmer Blend:
In the fall, I like to make my house smell like apple cider. In addition to the base, I will slice in half the granny smith apple. Sometimes I’ll throw in half an orange if I have it on hand.
Cinnamon Citrus Simmer Blend:
If I have extra oranges and lemons on hand, I like to make a citrus simmer. In addition to the base, I had a lemon and orange, sliced in half, and 2-3 bay leaves.
Christmas Tree Simmer Blend:
This one might be my favorite. As soon as Thanksgiving is done, it’s time for Christmas at our house! This simmer will have your home smelling like a freshly cut pine tree. If you have a plastic tree like I do, don’t spend a fortune on candles that don’t smell anything like a real tree – this is practically free and smells like the real deal!

In addition to the simmer base, I add some fresh cranberries if I have them, and some fresh pine. I had some fresh pine leftover from our Thanksgiving centerpiece which had dried out. Rather than waste it, I will simmer pieces of it throughout the holiday season. You can just as easily cut some small pieces from a pine tree, if you have them growing in your yard.
Step 3. Simmer & Enjoy!
After creating the simmer blend you want, bring it to a boil. I find that this is the fastest way to unlock the awesome aroma. As soon as it starts to boil, just turn it down to a simmer and enjoy!

Note: Each batch should last you 2-3 days. I save the cinnamon sticks from previous batches and reuse them multiple times before I throw them out.


Follow along with our blog tour for holiday project tutorials and favorite recipes!
12/1 – Riley Blake Designs
12/2 – Simple Simon
12/3 – Mode de Lis
12/4 – Emily Ann’s Kloset
12/5 – A Bright Corner
12/7 – Quiltscapes
12/8 – Life After Laundry
12/9 – Crafting Chicks
12/10 – Melly Sews
12/11 – Choo Choo Skadoo
12/12 – Jedi Craft Girl
12/14 – Polka Dot Chair
12/15 – Sew Like My Mom
12/16 – Sugar Bee Crafts
12/17 – Fort Worth Fabric Studio
12/18 – Messy Jesse
12/19 – Leigh Laurel Studios
12/21 – The Happy Housie
12/22 – The Flannel Queen
12/23 – Riley Blake Designs
12/24 – Riley Blake Designs
12/25 – Riley Blake Designs