
![]()
I remember as a little girl loving the Dick Bruna Miffy books and the cartoon which brought her to life on the screen. The bold primary colours and simplified illustrations perfectly crafted for young eyes. Miffy and her many friends, Poppy Pig and Grunty, Boris Bear and Snuffy Dog were a delight to behold.

![]()
image: www.miffy.com
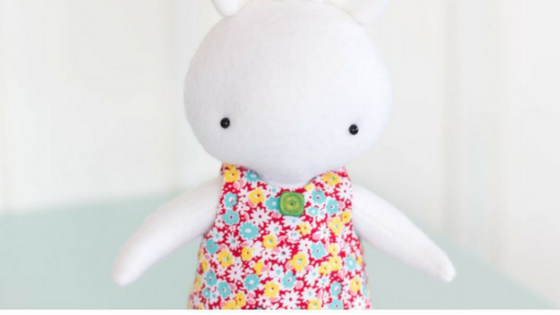
This year is the 60th year that Miffy has been delighting many all over the world and to celebrate I have designed ‘Sukie’ a small white rabbit. Sukie comes in a retro style reflecting Miffy’s own. She has a small A-line dress with vintage button, made in a beautiful Penny Rose fabric from the ’30’s minis’ range designed by Erin Turner. Sukie stands 19cm (7½”) tall from head to toe.

Hello my name is Simone Gooding of May Blossom designs and I am delighted to be part of the Penny Rose Fabrics Design Team.
SUKIE
Please read all instructions before beginning. Cut out all pattern pieces for sukie very carefully and lay them aside. A very tiny seam allowance is needed for sukie, approx. 3mm, this has been included on all pieces. A scant ¼” seam is used for the dress and has also been included. I highly recommend you use very high quality wool felt for sukie, poor quality synthetic/blend felt will not withstand the small seam allowance, tight turning of pieces and firm stuffing required.
You can download the pattern templates here.
head
1. Machine stitch around the head pieces leaving open where indicated at the neck.
2. Turn right side out, making sure to gently ease out all the curves. Stuff the head until very firm with toy fill.
face
1. Mark the position for the eyes with pins.
2. Attach the English glass eyes using Gutermann Upholstery Thread to match the felt. Cut a long piece of thread and thread it through the metal loop at the back of the eye.

3. Thread a long doll making needle with both ends of the thread, and push the needle through the front of the face at the position of the first pin and bring the needle out in the stuffing at the neck.

4. Take the needle off the thread and thread the needle again with only one length of the thread and push the needle up through the stuffing and out of the face right next to one side of the eye. Repeat with the remaining thread.

5. Take the two lengths of thread that are poking out on either side of the eye and tie a triple knot, pulling it tight so the knot is hidden behind the back of the eye.

6. Now thread the needle again with one of the lengths of thread and push the needle back in next to the eye and out through the stuffing in the neck.

7. Tie a triple knot in the stuffing in the neck a few times until the eye is secure. Repeat steps 1-6 again with the remaining eye.

body
1. Machine stitch all the way around the body pieces leaving open where indicated at the side.
2. Turn right side out through the opening in the side, making sure to gently ease out the curves legs. Stuff the body and legs until very firm with toy fill.
3. Make a little hollow in the stuffing in the head and push the top of the body inside the head opening quite firmly, Place pins in to hold tight while you stitch the head on to the body, stuff a little more as you stitch if needed so the head is firmly attached.
arms
1. Stitch the arms all the way around, leaving open where indicated, turn right side out and stuff the arms firmly, close the openings on the arms. Pin the arms to each side of the body just under the head and with two strands of matching upholstery thread and a long doll making needle, stitch right through one arm through the body and out the other side of the other arm, keep going through in this fashion many times until the arms are firm, fasten off.

ears
1. Place two ears together and machine stitch all the way around the ear, leaving open where indicated at the straight edge.
2. Turn the ear right side out and hand stitch the opening closed tucking in the raw edge as you stitch. Repeat both steps to make the remaining ear.
3. Pin the ears on top of the head with a small gap between them. Slightly curve each side of the ears in.
tail
1. Using matching thread to the felt gather by hand around the outer edge of the tail circle. Pull up the gathers so there is a small opening and fasten off but do not cut the thread yet. Stuff the tail until quite firm. Now stitch around the gathered circle again and pull the gathering until the opening is closed a little further. Stitch the tail to the back of the body.
dress
1. With right sides together, place the dress fronts together and machine stitch all the way around, leaving open where indicated along the bottom edge. Clip the corners and curves and turn right side out, hand stitch the opening closed and press well, stitch a vintage/novelty button to the centre front.
2. With right sides together, place two of the backs together and machine stitch all the way around, leaving open where indicated along the centre back edge. Repeat with the remaining two backs. Clip the corners and curves and turn right side out, hand stitch the openings closed and press well.
3. Place one shoulder edge of the front together with one of the backs and hand stitch in place.

4. Repeat with the remaining back on the other shoulder edge.

5. Hand stitch down both sides seams.

6. Place the dress on the rabbit and hand stitch closed at the back.


I hope you have enjoyed making wee sukie!
