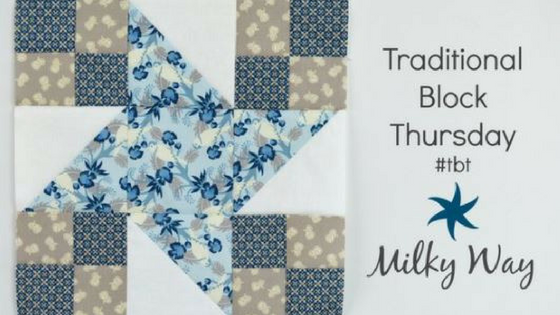

This week’s tutorial features the Milky Way block. We are going to make the version that looks good by itself. It is one of those quilt blocks that really only looks good as an entire quilt unless modified. The true block’s pattern is only revealed when multiple blocks are put together in a straight set. Then the beauty of the allover pattern of interlaced friendship stars is revealed and you can truly see how the myriad of stars would resemble our sky’s Milky Way galaxy. You’ll see what I mean at the end of the tutorial.

For this block, you will need the following pieces:
Color 1 (Cream): Two 5″ squares
Color 2 (Blue): Two 5″ squares, One 4 1/2″ square
Color 3 (Gray): One 2 1/2″ strip x width of fabric
Color 4 (Dark Blue): One 2 1/2″ strip x width of fabric
I used these gorgeous prints from Penny Rose’s ‘Forget Me Not’ collection.

Mark a diagonal line with a mechanical pencil on the back of two of the 5″ x 5″ color 1 squares.

Place a 5″ color 1 square on a 5″ color 2 square with right sides together. Stitch 1/4″ from the marked line. You can chain stitch and repeat for the other 5″ squares.

Turn squares around and stitch 1/4″ from the marked line on the opposite. Repeat for both squares.

Cut on the marked line. Repeat for both squares to make 4 half-square triangles.

Set the seam with a hot iron. Press the half-square triangle seams toward the darker fabric.

Using a ruler with a diagonal line, place the diagonal line of the ruler on the seam, making sure the block extends past the 4 1/2″ mark on the ruler. Trim the top and side.

Turn the block 180 degrees and line up the diagonal line of the ruler on the seam. You will also line up the two trimmed sides along the 4 1/2″ lines of the ruler. Trim the remaining two sides. Repeat for all four half-square triangles.

Now for strip piecing: stitch the 2 1/2″ strips of colors 3 & 4 together with the right sides facing each other.

Set the seam with a hot iron. Press the strip set toward the darker fabric.

Place the ruler with the line on the center seam, and trim off the selvedge edges.

Turn the strip set around and again place the ruler with the line on the center seam. Align the 2 1/2″ mark of the ruler on the edge of the strip set. Cut a 2 /12″ segment from the strip set. Repeat to cut eight 2 1/2″ segments.

Turn one segment upside-down to create a 4-patch, and butt-up or nest the seams to create a perfect corner. Stitch two segments together. Repeat to make four 4-patches. You can chain-stitch these through the sewing machine.

Press the 4-patch seams.

Lay out the block segments to create a Milky Way patch.

Stitch the block segments together to create three rows.

Press the rows so the seams go opposite from the adjoining rows. The arrows show how I pressed the rows – I chose to press the seams toward all of the 4-patches and toward the center square.

Butt-up the seams and stitch the rows together with a 1/4″ seam.

Press the seams. You can press in whichever direction you choose.

You’re done! You now have a beautiful Milky Way block!

If you were actually going to make a whole quilt out of the Milky Way blocks, you could add another row to each side and make a block that looks like this.

When you put them altogether, it would look like this. Isn’t that cool?

With the block that we made, we could do something like this by adding in sashing with four-patches in the corners.

And, of course, I have to have a scrappy layout! There are so many options with this block.
Until next time….keep piecing!

A special thank you to our sponsor, Baby Lock, makers of our very favorite sewing machines!