
Thanks for stopping by and visiting! My name is Kerri of Sew Deerly Loved, and I’m so excited to be apart of the amazing Project Design team! Today I have a sweet pillow to share with you. One of my favorite vintage items is cute vintage postcards. For the pillow I created an embroidery pattern from an adorable vintage deer in stocking postcard. Here are some simple instructions if you’d like to make one too~
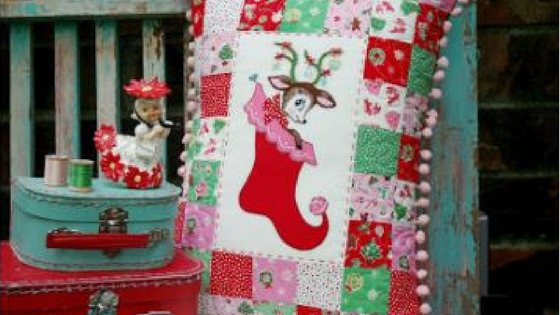
Vintage Deer & Stocking Pillow
Finished size: 14 X 18 inches

You will need:
One, 6 ½ X 10 ½ inch white/off white cotton solid by Riley Blake
Forty eight, 2 ½ inch squares, Little Joys cotton prints by Penny Rose
Vintage deer & stocking embroidery pattern – Click HERE for the pattern (Needs to be 4×9 inches)
One, 5 X 6 inch rectangle, red cotton solid by Riley Blake
One, 2 X 5 inch rectangle, pink cotton solid by Riley Blake
One, scrap piece, red polka dot cotton solid from Little Joys collection
Two yards, pink regular pom pom trim by Riley Blake
Two, 13 X 15 inch cotton solid print for envelope backing
One, 16 X 20 inch cotton batting piece
One, 16 X 20 inch light cotton print for front-back
Fusible Web
Water soluble pen
DMC Floss-
Red
Dark Mint
Green
Lime Green
Light Pink
Brown
Light Brown
Yellow
Black
Instructions:
Save and print the embroidery pattern onto copy paper. Tape the pattern to a window and trace the pattern with a water soluble pen onto your 6 ½ X 10 ½ inch white cotton solid.

To make a patchwork border, layout 20 of the 2 ½ inch squares around
the 6 ½ X 10 ½ inch white solid.

Sew the square right sides together into 4 strips of 5. Press seams open Attach the two side strips to the left and right side of the white cotton solid. Press seams open. Lay out the rest of the squares and make 4 rows of 7 squares around your block.
Repeat steps 3 and 4 to create another patchwork border. Now you have your top sewn together.

Print out a few more copies of the embroidery pattern and cut out the stocking, stocking trim, bell and bow pieces. Turn the pattern pieces over and trace on the back side of the pattern onto fusible web. They should mirror the pattern.

Roughly trim around each piece. Take off the backside of the fusible web paper and place on the backside of the red, pink, and polka dot fabric pieces. Cut out. Take the other fusible web paper off and place on the middle square in the proper placement. Press in place. Raw edge appliqué around each piece using dark thread as close to the edge as you can. I go around each piece twice.
Place an embroidery hoop so the deer and stocking trim is centered.

Embroider using a back stitch to outline each area using the appropriate DMC floss color. To fill use a satin stitch or back stitch. The ears, ornaments, stocking trim dots I used a satin stitch to fill. The other areas I used a back stitch.

Use water to remove the pen lines. I use a spray bottle.

Make a quilt sandwich by layering the front, batting and front-back pieces. Hand or machine quilt.

Sew the pom pom trim around the top edges using a 1/8 inch seam allowance.

To make your envelope backing, fold and press the top edge of your 13 X 15 inch cotton print ½ inch down. Then fold it again ½ inch to make a French seam. Stitch two rows, one an 1/8 inch from the edge and another one a ¼ inch from that line. Do the same with your second envelope backing piece.

Place your pillow top and your envelope backing pieces right sides together and pin liberally to secure in place. Make sure your pom pom trim is pinned out of the way. Machine stitch around all edges ¼ inch from the edge. The backing should be larger than the pillow and go over the edges. Let the extra hang over the edges so you have room to work with. After you have stitched around all edges trim the overlap. Since there isn’t a binding, secure it again and stitch around the edges a second time or zig zag stitch the edges.

I hope you enjoyed the tutorial! Have fun stitching!
Xo, Kerri
