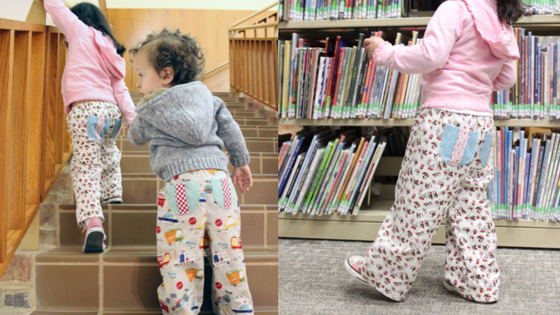
Hi Riley Blake readers! I’m Melissa and I blog over at Sew Like My Mom. I’m so excited to be kicking off the Wednesday tutorials for 2015! I thought we should start the year with a bang, so today I’m sharing a FREE multi-size pattern for pants!
The Pine Cone Pants are a basic, relaxed pant pattern with an elastic waistband and awesome back pockets!
My kids spend their days running, playing, and climbing and pants are often too big in the waist or don’t allow full range of motion of their legs for adequate climbing. I love that these pants allow them to move freely while looking stylish and adorable.
I designed the Pine Cone Pants with a higher back rise to prevent our wee ones from prematurely impersonating plumbers.
I just adore these pockets! And they’re so so easy to make.
Are you ready to start your Pine Cone Pants?!
First you’ll need to download and print off the pattern pieces!
Then check the chart below for accurate sizing, elastic and fabric requirements, and fabric recommendations.
Let’s get sewing!
Once you have your pattern pieces taped together, lay your pattern down on your fabric. I keep it folded in half the way it comes off the bolt, and lay my pieces right on top. They’ll automatically cut as mirror images this way.
Then cut your pocket pieces. You’ll need 2 pocket halves cut mirrored, 1 full pocket piece (for the pocket lining) cut on the fold, and one additional coordinating piece cut 2″ wide by the length of your pocket (use the long straight edge of one of the halves for correct sizing).
Sew the coordinating strip to the long edges of each pocket half.
Then fold the 2 halves to meet each other, created a pleat with the coordinate, creating the pocket front. Sew the pocket back to the pocket front with right sides together, leaving a small opening on one side to turn your pocket through.
Clip the corners and curves of the pocket.
Then turn the pocket right side out and press.
Repeat for the other pocket.
Grab one side of your pants and locate the back half. The back sticks up taller than the front. In this photo the back is on the left.
Fold your fabric in half with the back half facing you and position your pocket. You’ll want it to be about 1-1.5″ from the center back seam, and about centered between the waistband and the bottom curve of the rise. Match the other pant leg up in the same manner. Be careful to pin them evenly so they’re the same height!
Sew the pockets to the pants around the outside edge using at least a 1/8″ seam allowance.
Take one pant leg and iron down the casing .25″, then another 1.25″ Press the hem down .25″ then another 1″. Repeat for the other leg.
Open the ironed casings, match the two pant legs together with right sides facing and sew the front and back rise.
Then open your ironed hems, match pant legs, and sew the entire length of the inseam.
Sew your casing as close to the bottom of the fold as possible.
And stitch down your hems.
Add elastic to your casing based on the measurements above and sew the casing closed. And your Pine Cone Pants are finished!
Thank you so much for having me today, Riley Blake! I hope you all enjoy your pants! Please don’t forget to tag me in your Instagram photos (@sewlikemymom) and use the #pineconepants when sharing!


