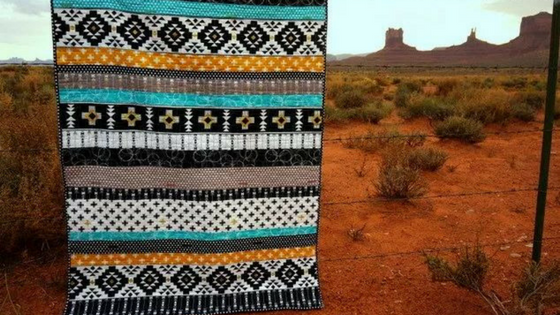

Hi quilting friends, I’m Amy from Diary of a Quilter. I love a simple row quilt. They are a quick way to finish a quilt, and show off and use a lot of pretty fabric at the same time. The graphic, southwest-inspired prints in the new Four Corners fabric by Simple Simon and Co is perfect for a simple but stunning row quilt. Using the rows from the main focus fabric gives it an added flair and even more elaborate design.

I chose the black and white designs with just a little bit of color thrown in. You would have a lot of color variations available with this collection. You could stick to the black and white fabrics, or add a lot more color for a more vibrant design. Four Corners Strip Quilt Instructions Finished size 40″ x 54″

Fabric requirements:
- Four Corners Main Panel (black): 1 1/4 yard
- Four Corners Weave gold: 1 1/2 yards
- Black Triangles: 1/2 yard
- Black Circles: 1/4 yard
- Black Stripe: 1/4 yard
- Gray Triangles: 1/8 yard
- Turquoise Circles: 1/8 yard
- Turquoise Triangles: 1/8 yard
- Black Cross Weave White: 1/6 yard
- Gray Stripe: 1/8 yard
- White Strip: 1/8 yard

I have a tutorial on my blog with tips for cutting strips. You definitely need to square-up the fabric edges before you cut your width-of-fabric strips, otherwise you will have crooked strips or strips in a slight V shape, instead of straight across.
- From main panel cut two strips 6” x 42” with white background motif and one strip 5” x 42” of back background/cross motif and one strip 16 ½” x 42” for backing (see backing image)
- From gold Weave (cross) fabric cut: one strip 3” x width of fabric (wof), one strip 2 ½” x wof, one strip 34” x wof and one strip 11’’ x wof (reserve these last two for the backing)
- From black Triangle print cut 5 strips 2 ½” x wof (set aside for binding), one strip 1 ¾” x wof, and one strip 3 ½” x wof
- From black Circles print cut two strips 3 ½” x wof
- From black arrow stripe cut one strip 2 ½” x wof and one strip 4 ½” x wof
- From gray triangles cut one strip 4” x wof
- From turquoise Circles print cut one strip 2” x wof and one strip 2 ½” x wof
- From turquoise triangles cut one strip 2 ½” x wof
- From black Weave (cross) cut one strip 6” x wof
- From gray arrow Stripe cut one strip 3”x wof
- From white arrow Stripe cut one strip 3 ¼” x wof
In my opinion, one of the things that makes a strips quilt interesting is a variety of strip-widths and a variety of scale in the prints used. So if you use this tutorial with other fabrics, keep that in mind. Quilt Assembly: Sew all seams using a ¼”†seam allowance.

Sew seams in alternating directions to help prevent bowing/arching of the stripes.

I recommend sewing strips together into groups of 2 or 3 first, and then sewing those units together

Pressing each seam as you go will also help keep your quilt straight and square. Sew strips together in this order:

3 ½” Black Circles 2 ½” turquoise Triangles 6″ Aztec panel 3″ gold Weave (cross) 1 ¾” black Triangles 3″ gray arrow Stripe 2 ½” turquoise circles 5″ black Cross panel 3 ¼” white arrow Stripe 3 ½” black Circles 4″ gray Triangles 2 ½” black arrow Stripe 6″ black Weave (cross) 2″ turquoise Circles 3 ½” black Triangles 2 ½” gold Weave (cross) 6″ Aztec panel 4 ½” black arrow Stripe Press all seams one direction. Carefully square off selvage edges and square-up quilt sides. (Tip: Line up horizontal ruler markings on top of seams to keep sides square.) Quilt top needs to measure smaller than quilt back in all directions.

Backing: Piece gold 34″ x wof strip and 11″ wof strip on both sides of 16 ½” x 42″ panel. Press seams toward gold. Baste quilt top, batting, and quilt back together and quilt as desired. I used an all-over square stipple design to echo the geometric designs in the fabrics.

Bind: Trim selvages and sew remaining 2 ½” x wof strips end to end to create binding. For more photos and directions on Binding a quilt there is a binding tutorial here. Click here for a printable PDF version of this pattern. And there you go! A quick quilt and very on-trend in graphic southwest-inspired fabrics.


And here’s a farewell sunset from Monument Valley – not far from the actual Four Corners in the United States. The timing of this post turned out great. We were on a family road trip to the Grand Canyon while I was binding the quilt in the car. Made for some pretty authentic backdrops for staging this quilt! You can see more here.