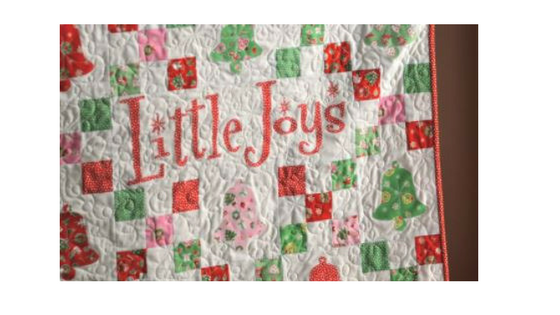
Amanda from Jedi Craft Girl popping in here with a fun little Christmas project!! When I first saw the Little Joys fabric from Penny Rose I was immediately in love! These sweet vintage prints make me think of a simpler time. I love collecting vintage Christmas ornaments and decorations; this quilt is sure to fit into the mix!

This quilt measures 42″ square and is a perfect size to hang on a wall, put at the end of a bed, or center on a table. The quilt is made up of 6″ solid blocks with bell applique and 6″ nine-patch blocks that form a chain. Let’s get started! Supplies: 1/4 yard 9 Little Joys dark background prints 2 yards white/cream fabric 1/4 yard binding 1.5 yards backing Heat n Bond Lite.

First collect the fabrics together and admire them for a while!!!

Cut 2.5″ x WOF strips of 9 dark prints. Cut 2.5″ x WOF strips of 6 solid white/cream fabric.

Cut the strips in half so you have strips that now measure approx. 21″

Match the strips up so you have sets (6) that alternate dark, white, dark and (3) sets that alternate white dark white.

Sew the strip sets together lengthwise using 1/4″ seams. Press toward the dark.

Subcut the strip sets into 2.5″ increments. This will give a random look to the chain. If you want to plan it out you can – I like to fly by the seat of my pants!

Then place the strips in rows to form the 9-patch blocks. You will need 24 of these blocks.

For the applique, cut (22) 6.5″ squares from the white/cream.

I used my Sizzix Fabi to die cut the bell shapes. You can use any applique motif you wish in these blank squares. Cut the applique fabrics 5″ square and cut the Heat n Bond Lite in 5″ squares. Press the Heat & Bond Lite to the wrong side of the applique squares. Cut the desired shape. Peel off baking paper and iron the shape in place. Stitch around each shape with a straight stitch.

For the Little Joys word block, cut the white/cream fabric 6.5″ x 18.5″. Download the Little Joys pattern HERE. I printed the letters on Heat n Bond EZ print sheets.

You can also trace onto iron-on transfer paper. The letters are in reverse. Iron the heat n bond to the wrong side of the letter fabric. Cut out by hand around each letter. Peel off the backing and position on the white rectangle. Heat set in place. Sew around each letter.

Finishing it up…. Lay the quilt out according to the above placement guide. Sew each block together creating rows, pressing toward the applique blocks. Then sew the rows together, pinning at intersections so seams match up.

Make sure your cat approves 🙂

I free motion quilted this with loop de loos and retro style stars. I love how it turned out! Add the binding and you’re finished!


