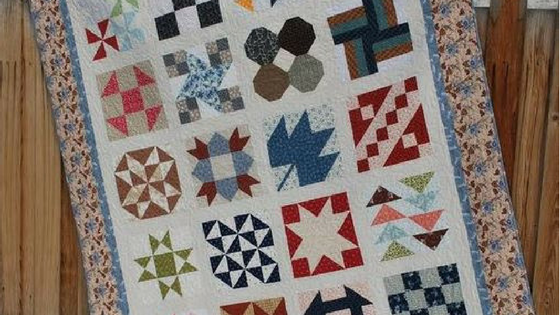

Now that you have all of your blocks made, I want to show you one way that you can stitch them together. Are you as excited as I am to finish this project?

This is the best part – when everything comes together. With this option, the finished quilt will be 76″ x 90″.

Here is what you need to get started:
Blocks: Twenty 12″ quilt blocks
Sashing / First Border: 2 Yards
Second Border: 5/8 Yard
Outside Border: 1 3/4 Yards
Binding: 3/4 Yard
Cut your sashing and border fabrics into the following pieces:
Sashing: Cut twelve 3″ strips x WOF (width of fabric) Cut strips into segments: Thirty-One 12 1/2″, twelve 3″.
First Border: Cut seven 3″ strips x WOF
Second Border: Cut seven 2″ strips x WOF
Outside Border: Cut eight 6 1/2″ strips x WOF

Lay out your blocks as desired in 5 rows of 4 blocks each.

Stitch 3″ x 12 1/2″ sashing pieces on the right side of the first 3 columns of blocks. (You don’t stitch the sashing on the last column of blocks because there will be a long border piece there.)

Press to sashing.

Stitch 4 blocks and 3 sashing pieces together to complete the row. Press to sashing. Repeat for all 5 rows.

Here is my completed bottom row.

Stitch three 3″ x 3″ sashing pieces between four 3″ x 12 1/2″ sashing pieces to make a sashing row. Repeat to make 4.

Press to larger sashing pieces.

Stitch sashing row to block row. Repeat to make 4. (Remember you don’t need sashing on all 5 rows – just in between the rows.)

Press to sashing row.
Stitch 5 block rows and 4 sashing rows together.

The center of your quilt is finished! Now we’re going to work on the borders. First, cut the selvage edges off all of the border rows.

Stitch seven 3″ first border strips together end to end. Press.

Cut into the following segments: Two 70 1/2″, two 61″.

Pin the 70 1/2″ pieces to right and left sides of quilt center.

Stitch seven 2″ second border strips together end to end. Press to border pieces. Repeat to pin, stitch, and press 61″ border pieces to top and bottom.

Stitch seven 2″ second border strips together end-to-end. Press.

Cut into the following segments: Two 75 1/2″, two 64.”

Pin the 75 1/2″ pieces to the right and left sides of the quilt.

Stitch pieces to quilt.

Press to border pieces. Repeat to pin, stitch and press 64″ pieces to top and bottom.

Stitch eight 6 1/2″ strips together end to end.

Cut into segments: Two 78 1/2″, two 76″.

Pin the 78 1/2″ pieces to the right and left sides of the quilt.

Stitch pieces to quilt.

Press to border pieces. Repeat to pin, stitch and press 76″ pieces to top and bottom.

Now it’s time to get the quilting and binding done. Check out the finished project!

It has been so fun to teach you these Traditional Blocks using the beautiful Penny Rose Fabrics!