Instructor: Andy Knowlton

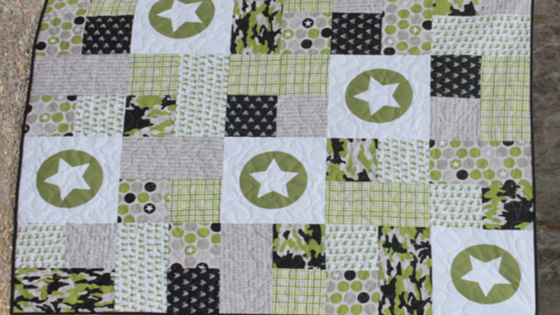
Hi Riley Blake readers, I’m Andy Knowlton from the blog, A Bright Corner. I’m sharing with you today a fun and easy tutorial to make this cute throw size quilt using the Military Max fabrics designed by Bella Blvd.

The finished Military Max quilt measures about 48″ x 60″.
Supplies:
3/8 yard each of 6 prints
3/4 yard solid white
1/2 yard binding fabric
3-1/8 yards backing, or 2 yards of 60″ wide Minky
Circle and Star template
Heat n Bond EZ Print Featherlite sheets (need 5 sheets) OR Heat n Bond Lite or Featherlite (or other similar fusible web)
Cutting:
From one of the prints, cut 1 @ 6.5″ x WOF (width of fabric). Then subcut to 5 @ 6.5″ square.
From the other 5 prints, cut:
1 @ 6.5″ x WOF, then subcut to 3 @ 6.5″ x 12.5″
1 @ 6.5″ x WOF, then subcut to 5 @ 6.5″ x 6.5″
From the solid white cut:
2 @ 12.5″ x WOF, then subcut 5 @ 12.5″ square
You should now have 30 (6.5″) squares, and 15 (6.5″ x 12.5) rectangles.

Step 1: Using a 1/4″ seam, sew all 6.5″ squares into pairs. Press seam to one side.

Step 2: To each pair, sew one 6.5″ x 12.5″ rectangle. Press seams toward the rectangle. Make 15 of these blocks (12.5″ x 12.5″).

Step 3: Print the circle and star template onto 5 sheets of Heat n Bond EZ Print Featherlite OR print one template onto regular paper and trace onto regular fusible web (such as Heat n Bond Featherlite) using a pencil. You will need to trace the circle/star five times.
The EZ Print sheets are so handy because you can print directly onto them using your regular printer – no tracing needed!

Step 4: Cut out each circle, leaving about 1/4″ around the lines. Following the manufacturer’s instructions, press the Heat n Bond Featherlite to the wrong side of the solid green fabric. You will need 5 green circle/stars.

Using sharp scissors, cut out both the circle and the star, directly on the lines.

Step 5: Peel off paper backing. Center the circle/star shapes in each 12.5″ white square. Press in place.

Step 6: Using a coordinating thread, stitch around the edges of the circle/star applique with a straight stitch. Alternatively, a zigzag or blanket stitch could also be used.

Step 7: Lay out the quilt blocks following the diagram. Sew blocks into rows using a 1/4″ seam. Press seams for all odd numbered rows to the left and even numbered rows to the right. Sew rows together. Press seams.

Baste and quilt as desired. For the binding, use the 1/2 yard binding fabric, cut into 2.5″ strips to make a straight grain, double fold binding. You can find a great binding tutorial here.

I quilted mine in a gentle meander with a few stars sprinkled about. And as soon as it was bound, both of my boys claimed it as theirs!
