Hello Riley Blake readers!

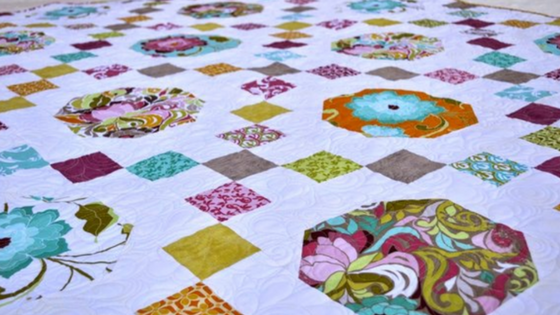
The reason I love adding in the snowball blocks is because it allows you to really highlight focal fabrics. Â And I knew right away that I wanted to use Lila Tueller’s new Halle Rose line because I knew these beautiful large flowering prints would be just perfect for the snowballs 😉 Â Aren’t they just stunning!!
 
So, let’s get to making your own  63″ x 75″ lap size Bonnie Rose Quilt 😉
WHAT YOU WILL NEED:
Quilt Top:
- 1 1/3 Yards of a Focal Fabric
   If you want several focal fabrics like I have done, just be sure to get your fabrics in 1/3 yard cuts. You can get up to 4 squares per block and you will need a total of 15.
- 1 1/3 Yard Chain Fabric
    If you want to have more variety in your chain you will need 3 1/2″ strips or 1/8 Yard cuts. You will need at least 12 strips but can always use more for extra variety.
- 3 Yards of Background Fabric
Backing and Binding:
- 4 Yards Backing Fabric
- 2/3 Yard of Binding Fabric
     If you use extra strips for more variety you can always use the excess from the strips to make a scrappy binding like I have done

STEP 1 – CUTTING
From your Focal Fabric(s) cut:
(15) 9 1/2″ x 9 1/2″ squares. Fussy cutting here will really help to make your snowballs shine.
From your Print Fabric(s) cut:
(15) 3 1/2″ x 20″ strips
(42) 3 1/2″ x 3 1/2″ corner squares
From your Background Fabric cut:
(12) 3 1/2″ x 20″ strips
(71) 3 1/2″ x 9 1/2″ sashing rectangles
(60) 3″ x 3″ squares

STEP 2 – SNOWBALL BLOCKS
Draw a diagonal line on the wrong side of your (60) 3″ x 3″ background squares.

You will be using these squares to snowball the 4 corners of your Focal Fabric blocks. Â If you are new to quilting you might find it helpful to pin your 4 corners as shown below, placing a marked background square in each corner of the focal fabric square. Â If you are feeling confident, you won’t need to bother with pins.

Sew directly on top of the drawn line from corner to corner. Â If you didn’t want to pin, just be sure to keep your background square aligned directly in the corner of your block while stitching.

And now, chain stitch the remaining 14 blocks first corner. Chain stitching is a great way to save time and thread. Rather than clipping threads after each block, simply continue feeding in corner after corner through your machine until you have stitched the first corner of all 15 blocks.

Then, clip the threads between your blocks and stack them up once more 😉

Now repeat the process in the second corner of all 4 blocks, chain stitching one after another.

Continue in this fashion, until you have sewn a 3″ x 3″ Background square to each corner of your 9 1/2″ x 9 1/2″ Focal Fabric squares.

And now it is time to snowball them ;)Â Using your ruler, align the 1/4″ mark along your seam line. Â Trim along the edge of your ruler. Â Repeat for all 4 corners of all 15 blocks.

Press your seam allowances outwards towards your background fabric.

And your Snowball Blocks are done. Simple as that and aren’t they just so pretty!!! Â Set these aside for the moment 😉

STEP 3 – CHAIN BLOCKS
To save time, we are going to strip piece our rows for the Chain blocks and then sub-cut them to the size we need. When strip piecing, I always find it helpful to reduce my stitch length so that when the pieces are sub-cut they don’t come undone.
So we will start by making the A Strip Sets and you will be making 6 of these. Take (2) 3 1/2″ Â x 20″ Print strips and (1) 3 1/2″ x 20″ Background strip laid out as shown below.

To sew these together simply take the first 2 strips and with right sides together, sew a 1/4″ seam along the long edge. Â Then, add the bottom strip to the now sewn 2 top strips using a 1/4″ seam again. And you are going to be sub-cutting these, so don’t worry about pinning or anything. If the ends don’t match up it doesn’t matter 😉

The B Strip Sets are made in the exact same way, only they start with (2) Background 3 1/2″ x 20″ Rectangles and (1) Print 3 1/2″ x 20″ rectangle laid out as shown below. Â You will be making 3 of these strip sets.

Once again, in both the A and B strip sets, it will save a lot of time to chain stitch your sets. Â So sew the first and second strips together on all 9 strip sets, then clip your threads. Then add the third strip to all 9 strip sets and clip your threads. Press the 6 A Strip Sets Outwards towards the Print Fabrics and Press the 3 B Strip Sets Inwards towards the Print Fabric.

And now, you are ready to subcut your rows for your Chain Blocks. Now it will be tempting to speed things up and stack these one on top of another, but you will get much greater accuracy if you spread them out across your mat, rather than stacking them up 😉 Lay your strip sets out aligning them on the Horizontal lines of your mat. Â Now, start by creating a straight edge along your strip sets as shown below. There is wiggle room so move in as much as you need to get a nice crisp straight edge.

Now move your ruler over 3 1/2″ from the straight edge. Cut along the edge of the ruler creating a 3 1/2″ x 9 1/2″ 3 patch row. Continue cutting in 3 1/2″ wide increments creating 5 rows per Strip set. You will have some scrap at the end of the row 😉 Sub-cut each of your 9 Strip sets this way.

Now, take (2) A Rows and 1 B Row and lay the out as shown below. This is the Chain block.

To sew it together, simply place the first row onto the second with right sides together. Align and pin the 2 seams. Stitch a 1/4″ seam along the pinned edge.   Then, place the third row onto the now stitched together first and second row with right sides together.  Again, align and pin the 2 seams. Stitch a 1/4″ seam along the pinned edge.

Once again, I like to save time here by chain stitching. You will be making 15 blocks so pin all of your 2 row sets and then chain stitch them. Then pin the third row to all 15 sets and then chain stitch them.

Now just clip your threads and press your seams to one side or open, whichever your prefer. And your 15 Chain Blocks are done and oh so much fun!!!

STEP 4 – MAKING THE QUILT TOP
And now with your blocks all done, you are ready to sew your quilt top together. Layout your 15 Snowball Blocks and 15 Chain Blocks alternating blocks as shown below. Place a 3 1/2″ x 9 1/2″ Background Sashing Rectangle between the blocks and place a Print 3 1/2″ x 3 1/2″ Cornerstone square between the sashing strips as shown below. Play around with the placement of the blocks and cornerstones until you have a look that is pleasing to the eye.

I like to sew my Sashing rows first. To do this, I simply start at one of the strip and work my way across. Â Place the print square onto the sashing rectangle with right sides together and sew a 1/4″ seam along the edge. Then, place the second print square onto the sewn unit with right sides together and sew a 1/4″ seam along the edge. Continue adding pieces one after another until the row is sewn together. Repeat for all 7 rows.

Next, sew the Block rows together. This is done the same way you sewed the sashing rectangles together, just on a larger scale and as always, using a 1/4″ seam 😉 So start by adding a sashing rectangle to your first block. Then add a sashing rectangle to the other side of the block. Then it’s time to add another block to the row. Â Just keep moving across adding pieces until the row is finished. Repeat for all 6 rows 😉

Now, it’s time to press. Press all of the seams in the rows towards the Sashing Rectangles. This will allow them to nest in the next step 😉

And now, it’s time to sew the rows together 😉 I like to start by sewing all of my Sashing rows to the Block Rows. Â Place the Sashing Rows onto the Block Rows with right sides together. Align and pin each of the seams. Sew a 1/4″ seam along all of the pinned edges.

Press the seams open or to one side, whichever you prefer.

And now, it is just like making the rows but on a much bigger scale. Place the first row onto the second with right sides together. Align and pin each of the seams. Sew a 1/4″ seam along the pinned edge.

Then place the third row onto the now sewn together first and second row. Once again, align and pin all of the seams and then sew a 1/4″ seam along the edge. Continue in this process adding one row after another until all the rows are sewn together. Press the seam allowances open or to one side, whichever your prefer.

And just like that, your quilt top is done!!!! I just love the way the chain highlights those beautiful snowball blocks 😉 So fun, and so easy right 😉

Now all you have left to do is Baste It, Quilt It, and Bind It 😉 Â I know, a lot of work in one sentence. Â If you are are new to quilting and unsure on these steps, Â you can see my Finishing Your Quilt Video Tutorial Series here 🙂 They will walk your through step by step and give you lots of helpful tidbits along the way 😉
I decided to quilt mine using an all over Feathered Swirl design. And I used my favorite color Pearl 402 So Fine Superior Thread. It never ceases to blow me away just how well this blends with white, I love it!!!!

And now you can sit back and snuggle up in your new Bonnie Rose quilt 😉 I hope you have enjoyed this tutorial and love the quilt as much as I do ;)Â If you do make your own, I would love to see it 😉 You can add it to my Flickr Group here or email me a picture at happyquiltingmelissa@gmail.com

And that wraps it up 🙂 When you get a second, I would love for you to pop on over and visit me at Happy Quilting sometime 🙂 I just love being able to share quilty goodness each day 😉
Have a Happy Quilting Day!!!