
Good Morning Riley Blake Readers!! It’s Melissa Corry here from Happy Quilting and I am so excited to be sharing another Riley Blake Design Team Tutorial with you!! Today’s tutorial is for this fun twist on the Half Rectangle Triangle quilt that I have named Diamond Drop 😉


To make your own Diamond Drop Quilt You Will Need:
2 Fancy and Fabulous 10″ Stackers
2 Yards of Fabulous Pattern Mint (C4843) for the Background
1/2 Yard of Fabulous Y Mint (C4844) for the Binding
4 Yards of Backing Fabric – I used Fabulous Breath Mint (C4845)

STEP 1 – CUTTING
The cutting for this tutorial is fairly easy.
From your 10″ Stackers pull 28 pieces. (I used the same 14 prints from each of the 2 layer cakes omitting the Fancy Pattern prints as well as the print I was using for my binding.) Cut the 10″ stackers in half to create (2) 5″ x 10″ rectangles from each piece for a total of (56) 5″ x 10″ rectangles. Keep the halves separated into two piles of 28 rectangles each.
From the Background fabric cut (56) 5″ x 10″ Rectangles
From the Binding fabric cut (7) 2 1/2″ x Width of Fabric Strips. Set aside

STEP 2 – MAKING THE HALF RECTANGLE TRIANGLES
There are lots of way to make Half Rectangle Triangles but this is the method I cam up with. It does have some waste in it later on, but it is super fast.
Start by drawing a diagonal line from the top left corner to the bottom right corner on the wrong side of your first pile of 28 print rectangles. On the second pile of 28 print rectangles, draw a diagonal line from the top right corner to the bottom left corner, making the two sets opposite. You have to draw these in the two different directions to be able to create the diamond shape, otherwise your angles would all go the same direction 😉

From the first pile, place a marked print rectangle on a background rectangle as shown below matching up the corners. From the second set, place a marked print rectangle on a background rectangle as shown below matching up the corners. You will be sewing a seam on either side of the drawn line of all 28 sets of each pile and we will be chain stitching to save time and thread. To do this . . .

Take the first matched pair to your machine. You can pin the two pieces together or you can simply hold the corners in place so they don’t slide while sewing. Stitch a 1/4″ seam along one side of the drawn line .

When you get to the end of the unit, there will be a small part where you are only stitching on one piece of fabric, no worries, that is supposed to happen 😉 Now, stitch off one unit and then feed the next unit right into your machine without cutting threads. That is chain stitching.

Continue this way until you have stitched all 28 units from the first set. Then move right onto stitching a 1/4″ seam along the second set of units, chain stitching as you go. This is the same, except you will be stitching on the one piece of fabric at the beginning of the unit instead of the end.

Once you have stitched a 1/4″ seam along one side of both sets of 28 units, clip the threads between the units and stack them back into your two piles.

Now, repeat the same process, only stitching 1/4″ seam along the other side of the drawn line on all 28 of each of the two sets, chain stitching as you go.

And then once again, clip the threads between your units and separate them back into the two piles. Align a ruler on the drawn line and cut directly on the drawn line to turn each unit into two units.Repeat for all of the Half Rectangle Units to make a total of 112 Half Rectangle Units.
\
And this part is super important!!!! When you go to press, be sure and press your two piles in opposite directions. So press the 56 units in your first piles towards the Background fabric. And press the 56 units in your second pile towards the print fabrics. It doesn’t matter which pile is first or second, just so long as your press them opposite 😉 This will allow us to nest all of the seams down the line.

STEP 3 – MAKING THE V BLOCKS
And now you are ready to turn your Half Square Rectangle units into our two types of V Blocks. You will be using one of the Half Square Rectangles from each pile (one of each of the two different angles) to make each of the V Blocks. Layout 1 HSR from each pile to create a Print V Block as shown on the right hand side. You will be making 24 V Blocks in this layout. Then, layout 1 HSR from each pile to create a Background V Block as shown on the left hand side. You will be making 32 V Blocks in this layout.

ace the right hand side HSR onto the left hand side HSR with right sides together. Align the top and the bottom of the HSR’s and be sure that the diagonal seams nest together so the are directly next to each other. That nesting will ensure your nice perfect points down the line. You can pin them in place if you like and then stitch a 1/4″ seam along the right hand side of your HSR pairs.

Chain stitch all 24 sets of your Print V Blocks followed by all 32 sets of your Background V Blocks. Once you are done stitching, clip the thread between the blocks and press the seams open.

STEP 3 – TRIMMING THE V BLOCKS
And with that, your V Blocks are made and ready for trimming. This is where that bit of waste comes into play that I mentioned at the start 😉 In order for all of our points to all line up, we need to trim approximately 1/2″ from the top and bottom of each V block. I say Approximately, because we are more concerned about where the point will line up, then how much we will be trimming off, but it will be super close to 1/2″ as long as your seams before were 1/4″ 😉
So . . . On to top (which I should have marked bottom, sorry) but lets just call it the pointed end of your V Block, align your ruler so that the point of the V is along the 1/4″ mark on your ruler. Ensure that the sides of the block are straight along the horizontal lines of your ruler, trim the excess from the top of the V block. Repeat for all 56 V Blocks.

Then, on what we are calling the Bottom, or the open part of your V Block, Align your ruler so that your seam meets at 1/4″in and a 1/4″ up. Ensure that the center seam is along a horizontal line on your ruler. Trim the excess. (This one is a little easier to find if you measure up 1/2″ first with another ruler and then look at the seams and ensure the seam is 1/4″ in and 1/4″ up 😉 Repeat this trimming for all 56 V Blocks.

And now you have 24 Print V Blocks and 32 Background V Blocks that all should measure about 8 1/2″ across and 8 3/4″ up and down. It is okay if they are not perfectly at this measurement. These are big blocks so there is room to ease things in when sewing the quilt top, the important thing is that your 1/4″ points are going to come out perfect thanks to your trimming 😉

STEP 4 – MAKING THE DIAMOND BLOCKS
And now you are ready to turn your Trimmed V BLocks into Diamond Blocks!! Layout 2 Print V Blocks to create a Print Diamond Block as shown on the right hand side. You will be making 12 Diamond Blocks in this layout. Then, layout 2 Background V Blocks to create a Background Diamond Blocks as shown on the left hand side. You will be making 16 Diamond Blocks in this layout.

Place the top V Block onto the bottom V Block with right sides together. Align and pin the center seam and be sure that the diagonal seams nest together so the are directly next to each other and pin them in place. Stitch a 1/4″ seam along the pinned edge. Chain stitch all 28 Diamond Blocks.

Once you are finished stitching, clip the threads between your blocks and press the seams open. You will have 12 Print Diamond Blocks and 16 Background Diamond Blocks all ready to turn into your quilt top!!!

STEP 5 – MAKING THE QUILT TOP
Layout your Diamond Blocks, alternating the print and background ones in a 7 x 4 layout as shown below. Play with the placement of the blocks until the color layout is pleasing to the eye. ÂI like to take a picture and then look at it on my camera, that is the easiest way to see that your colors are balanced.

Once you have a layout you like, you are ready to sew the Diamond Blocks into rows. Place the second block in the row onto the first with right sides together. Align, pin, and stitch a 1/4″ seam along the edge. Then, place the third block in the row onto to now sewn together first and second block. Align, Pin, and stitch a 1/4″ seam along the edge. Continue in this fashion until you have sewn the entire row of blocks together.

Take care when aligning that the center seams are align perfectly and pin it in place so it doesn’t shift. Then when sewing your 1/4″ seam, be sure to cross directly over the point in the seams where the print and background fabrics meet. This will give you those beautiful perfect points 😉

Repeat this process for all 4 rows of blocks. Once sewn together, press all of your seams open. There is a lot of bulk where those seams meet and pressing them open will help reduce that bulk.

Then all that is left is to sew the rows into a quilt top. This is just like sewing the blocks into rows only on a larger scale. Place the first row onto the second row with right sides together. Align and pi all of the seams. Stitch a 1/4″ seam along the pinned edge. Then, place the third row onto the now sewn together first and second row. Align, pin, and stitch a 1/4″ seam along the edge. And then repeat for the last row.

Press the three seams open and then give yourself a pat on the back. Your beautiful Diamond Drop Quilt Top is done!!!!


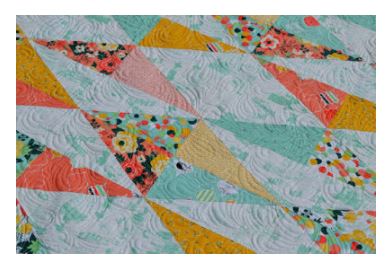
When it came time to quilt mine, I decided to go with an all over echoed paisley design. I haven’t quilted this design in a while and it was so much fun. You can also see a video tutorial here on how I do this quilting design 😉

STEP 7 – ENJOY
And just like that, you are done and you can sit back and enjoy your new Diamond Drop quilt!!! The quilt finishes at 56″ x 65″ so it is the perfect size for snuggling up in with a good book!! I just love how happy and bright this quilt is and how the design has so many wonderful secondary designs that just pop out of the quilt. So fun!!!

I hope you have enjoyed this tutorial and if you make your own Diamond Drop quilt I would love to see it!!! You can email me a picture at happyquiltingmelissa@gmail.com or add it to my flickr group here 😉
