
With Christmas right around the corner, I thought we should finish off our Stitch ‘n Kitchen Blog Tour with some ornament tutorials that can be made in a relatively short period of time, but are of such a quality and design that they will become instant cherished keepsakes.

I originally found the tutorial for this lovely ornament on this Russian blog, however, the instructions were in Russian, and even when translated to English, they were missing all of the measurements, which is such a shame, because this ornament is just stunning and was asking to be made.

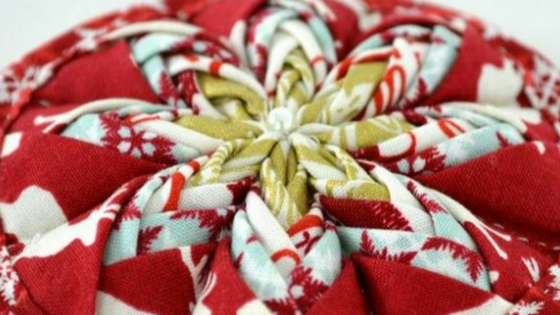
So, after playing around with different sizes for awhile, I came up with this tutorial. I am calling this ornament the “Origami Star” because the lovely three dimensional layers are created by folding and manipulating the fabric. The end result is a beautiful star.

Origami Star Ornament Tutorial
“Making Time”: About 1 Hour
Ingredients:
- Eight 1.5″ x 2″ rectangles in 5 different prints, for a total of 40 rectangles.
- One 4″ square of white or muslin fabric (really anything is fine since it won’t show, but lighter fabrics work better so you can see your lines clearly)
- One 4″ square of Pellon fleece interfacing
- One 4″ square backing fabric
- 1 1/2″ x 16″ strip fabric cut on the bias
- 5-6″ length 1/8″ ribbon or cording
- Circle template

1. With your light colored fabric or muslin 4″ square and a ruler, draw diagonal lines from corner to corner, then vertically and horizontally, so that all lines intersect in the center as shown above. Set aside.

2. Fold over about 1/4″ along one of the 2″ sides of each rectangle.

3. Using an erasable fabric marker, draw a vertical line through the center of each rectangle.

4. Putting it together: To begin, select the print that will be in the center of the star. Place it so the folded edge lines up with the center horizontal line and the line you drew in the center of the rectangle lines up with the vertical center line on the muslin. Now layer the remaining 4 rectangles, folded edge at the top. You will have just a small amount (about 1/4″) fabric showing as you layer each piece. Pin in place.

5. Beginning at the top center, hand stitch the row in place. You may be tempted to use your sewing machine, however, the rows will get very crowded, and hand stitching is really the only way to be accurate with this. It also ads a wonderful handmade touch.

6. Continue adding rows the same way – lining the top piece up with the center horizontal line on the muslin, and aligning the center lines you drew in the rectangles with the vertical line on the muslin, then stitching in place. It will begin to get very crowded in the center of the square. Take your time to make sure everything lines up just right.

7. After you have hand stitched all of the rows in place, you will have something that looks like this.

8. Now we can start to make our star take shape. Begin by locating the top piece of fabric in one of the rows. Fold one side under toward your stitching, forming a triangle, as shown above.

9. Now lay the triangle down against the muslin. You can use an iron to press here if it helps. It will look like this.

10. Now fold it back in half again, toward the seam, like this.

11. Pin in place.

12. Repeat on the opposite side.

13. Pin in place. You now have two folded sides that look like this.

14. For the next layer, repeat Step 8 & 9, folding the fabric to form the triangle. Then lay it over the top layer you folded in Step 13. Pin in place.

15. Repeat again on the opposite side.
16. As you pin new layers in place, remove the pins from the previous layers.

17. Continue folding in this way through each layer.

18. When you fold the final layer, it will look like this. Pin in place.

19. Repeat these same steps, continuing around the circle. You will begin to see the star take shape.

20. Trim around the corners to create a circle. You can use this circle template or you can do it free-form.

21. Cut an identical size circle of fleece interfacing and coordinating fabric for your backing using the circle template or your ornament front as a guide.

22. Layer your front and back with fleece in the middle and run a basting stitch around the edge of the circle, removing the pins as you go. At this point, I noticed my blue marker showing through the center of the star…

23. I decided to hide that by adding a pearl bead at the center.

24. Take your 5-6″ length of ribbon (I used a gold cording) and pin it into place with the loop facing the center of the ornament. Set aside.

25. To make your bias trim, take the 1 1/2″ strip of fabric which has been cut on the bias and press it in half.

26. Now press the top half toward the center.

27. Repeat by pressing the bottom half toward the center.

28. Your bias trim will look like this.

29. Fold your bias trim around the front and back of the ornament and hand stitch in place, making sure to stitch through your ribbon/cording to secure it. *Notice I didn’t use the gold stripe shown in the images above – after beginning to sew it on, I decided it didn’t look right, so I switched over to the red. Don’t be afraid to play around until you find what looks just right to you!

That’s really all there is to it! This ornament is beautiful and not too difficult to put together. It’s not often I make things “the old fashioned way” completely by hand (as you can tell by my uneven stitching), but I found that it felt great to pull out the needle and thread and hand stitch the entire ornament. It gave it so much more character than if it had been done by machine, and makes it that much more of a keepsake. I hope you enjoy making it as much as I did.

Because this is the Stitch ‘n Kitchen Blog Tour, we also had to share with you one of our favorite holiday recipes. This delicious Christmas Snowball Cookie recipe comes from the kitchen of our Marketing Manager, Kristl.

Kristl brought these to the office and they didn’t last very long! Yum!

Christmas Snowball Cookies
Ingredients:
- 1 cup toasted, finely chopped pecans
- 1 cup (2 sticks) butter
- 1/4 teaspoon salt
- 1 cup powdered sugar (1/2 cup for dough, 1/2 cup for dusting)
- 2 teaspoons vanilla
- 2 cups all purpose flour
Directions:
1. Lightly toast pecans and set aside to cool completely. Once cool, chop finely by hand or in a food processor. Be sure not to process too long, or the nuts may become greasy. Pieces should be very small, or they could make the cookies crumble apart after they are cooked.
2. Cream the 1/2 cup of powdered sugar, butter, salt and vanilla on medium speed until fluffy and well blended. Add pecans and beat until well combined. Sift the flour and add 1/2 cup at a time into the mixer until well combined.
3. Use a small scoop or a teaspoon to scoop the dough to make 1″ balls. Place the balls about 1″ apart on cookie sheets. Refrigerate for at least one hour.
4. Preheat oven to 350 degrees and move your oven rack to the top third of the oven. Bake for 12 to 15 minutes, turning the pan halfway through baking. You are looking for a slightly brown tinge on the cookies.
5. Place the cookies on a cooling rack. Place 1/2 cup of powdered sugar in a zip top bag. While still slightly warm, place three cookies gently into the bag of sugar and toss gently.
Enjoy!
Be sure to follow along with our Stitch ‘n Kitchen blog tour for holiday project tutorials and favorite recipes!
12/1 – Riley Blake Designs
12/2 – Simple Simon
12/3 – Mode de Lis
12/4 – One Little Pooh
12/5 – A Bright Corner
12/7 – Quiltscapes
12/8 – Life After Laundry
12/9 – Crafting Chicks
12/10 – Melly Sews
12/11 – Choo Choo Skadoo
12/12 – Jedi Craft Girl
12/14 – Polka Dot Chair
12/15 – Sew Like My Mom
12/16 – Sugar Bee Crafts
12/17 – Fort Worth Fabric Studio
12/18 – Messy Jesse
12/19 – Leigh Laurel Studios
12/21 – The Happy Housie
12/22 – The Flannel Queen
12/23 – Riley Blake Designs
12/24 – Riley Blake Designs
12/25 – Riley Blake Designs