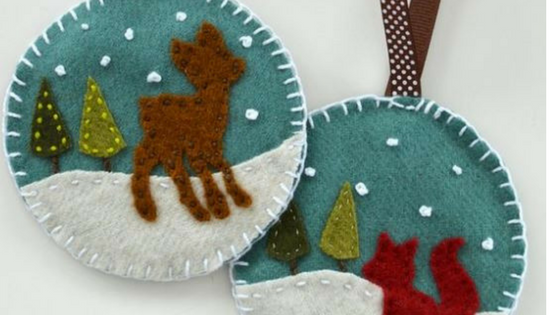

When I came across these adorable fox and deer felt ornaments on Cutesy Crafts, I knew I had to make them in our brand new Penny Rose Wool.
I love the look of the felt, but I also love how the wool adds a richness of color and texture that just looks timeless.

I will walk you through the basic steps here, but you can find the templates on Cutesy Crafts.
Woodland Wool Ornaments
“Making Time”: About 1 Hour
Ingredients:
- Wool
- Embroidery Floss and/or Coordinating Thread
- Fleece Interfacing
- Ribbon

1. Cut out the template pieces. Arrange the white snow piece on the blue sky piece as shown. Because everything in this project is so tiny, you will be using very small stitches, or “pick stitches.” Your stitches don’t have to be perfectly even, especially if you like the very handmade look.

2. Arrange the deer and trees on the background until you have them exactly where you want them. Pin them in place.

3. Stitch the deer and trees in place, again using very small pick stitches. Be very careful around the deer legs, as they are extremely thin and may only be able to handle one row of stitching in some places.

4. Add snowflakes using a french knot. Or, instead of a french knot, you could sew pretty white beads or pearls here.

5. The front of the ornament should now look something like this.

6. Add little tree stumps to your trees.

7. You should now have a front piece, a back piece, and a piece of fleece interfacing (cut about 1/4″ smaller than your front and back pieces). The fleece will be sandwiched in the center.

8. Before sewing the three layers together, you’ll want to stitch a loop of ribbon on the inside of the back piece. *If you want to personalize this by embroidering a name on the back piece, now would be the time to do that as well.

9. Using a simple blanket stitch, sew the three layers together. That’s all there is to it!

I made the deer ornament using embroidery floss. This floss was pretty thick, as I grabbed it from my 12-year-old daughter’s craft stash, so it wasn’t the best quality. I didn’t have floss that matched the trees perfectly, but I have to say, I actually ended up liking how it looked!

For the fox and trees on this ornament, I used regular sewing thread. Notice how the thread really disappeared on the fox, blending nicely. Again, I didn’t have coordinating green thread, so I used the closest match, and again, I did like how it turned out. But you can see what a big difference it makes when you coordinate your thread or floss vs. using something that has contrast. Choose your floss and thread based on your own personal taste.

These were so much fun to make! Thank you to Cutesy Crafts for the fabulous idea!

Now it wouldn’t be the Stitch ‘n Kitchen Blog Tour without a delicious holiday treat! Our amazing office manager, Moana, is kindly sharing this highly addictive recipe, we have aptly named “Christmas Crack.”

The recipe makes up a VERY large batch, perfect for wrapping up and sharing with friends and neighbors.
Moana’s Christmas Crack
Ingredients:
- 1 box Golden Grahams cereal
- 1/2 box each of Rice & Corn Chex
- 1 bag slivered almonds
- 1 cup coconut
- 2 sticks butter (yes 2)
- 1 1/2 cup Karo syrup
- 1 1/2 cup sugar
Directions:
In a large bowl, mix together cereals, almonds and coconut. In a saucepan, melt butter, Karo and sugar. Bring to boil and continue to boil, stirring constantly for 2 minutes. Pour over cereals and mix well. Enjoy!