
The Ohio Star got it’s name in the early 1930’s, after it was published in Capper’s Farmer. It wasn’t a new block, that’s just when the name stuck.

It has many aliases depending on how many fabrics are used and the fabric placement, including: Variable Star, Lone Star, Texas Spangled, Flying Crow, etc. The star layout includes 4 of the hourglass blocks that we learned last week. Ready for a recap?

To begin this block, you will need to cut the following pieces:
Light: Two – 5 1/2″ x 5 1/2″, Four – 4 1/2″ x 4 1/2″
Dark: Two – 5 1/2″ x 5 1/2″, One – 4 1/2″ x 4 1/2″
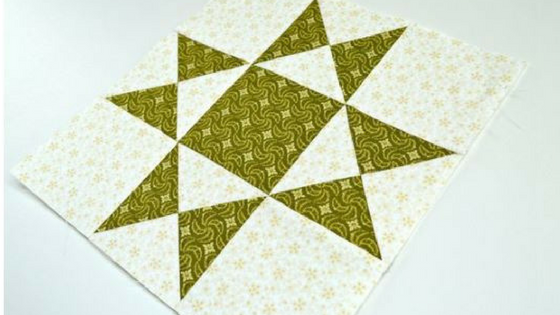
*I used a beautiful Cream and Green from Penny Rose’s Isabella collection.

With a mechanical pencil, mark a diagonal line on the back of the two lighter 5 1/2″ x 5 1/2″ squares.

With right sides together, place the marked square on top of the dark 5 1/2″ square. Stitch 1/4″ from the marked line. Repeat for the other set.

Turn the square around and stitch 1/4″ from the other side of the marked line. Repeat for the other set.

Cut the half square triangles apart on the marked line. You should now have four half square triangles.

Press the half square triangles toward the darker fabric.

Mark a diagonal line on the back of two of the half square triangles you just made, with the line perpendicular to the seam.

With right sides together, place the marked half square triangle on top of one of the unmarked half square triangles – making sure that colors are opposite. You can butt-up the center seams and pin, if desired. Stitch 1/4″ from the marked line. Repeat for the other set.

Turn the half square triangles around and stitch 1/4″ from the other side of the marked line. Repeat for the other set.

Cut apart on marked lines to make four quarter square triangle blocks (hourglass block).

Press quarter square triangles.

Trim quarter square triangles to 4 1/2″ x 4 1/2″. You can place the diagonal line on one of the seams and make sure that the 2 1/4″ mark on the ruler is where the seams intersect. If you don’t have a 4 1/2″ ruler, trim two sides and then turn around.

Trim the other two sides.

Lay out the block as shown. Isn’t it pretty?

You know the drill from here, right? Stitch the block together in three rows.

Press the seams to the plain blocks – it lays so much nicer.

Stitch those rows together.

Press the last seams.

And that’s it! A beautiful Ohio Star!

Add simple sashing.

Change the dark/light placement.

How about adding a couple more colors?

And a scrappy version. Make lots and enjoy!


A special thank you to our sponsor, Baby Lock, makers of our very favorite sewing machines!