
Our last block for our #tbt Traditional Block Thursday is this beautiful Weather Vane Block. This block “dates back to the time when great-grandmother used that commodity to ‘calc’late a change,’ instead of listening to a scientific forecast on the radio. But her pattern, the weather vane, is one of the loveliest of our old-time quilt designs.” – Ruby Short McKim

Our lovely weather vane block has lots of little pieces, but don’t be intimidated! If you have been following along in our series, these steps will come naturally.

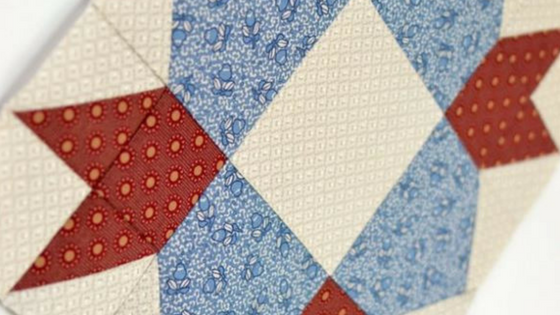
I chose a beautiful blue and red from Penny Rose’s Era of Jane collection designed by Sue Daley.

Start with the following pieces:
Red: Four 3″ squares, Four 2 1/2″ squares
Blue: Four 4 1/2″ squares
Cream: One 4 1/2″ square, Four 3″ squares, Twelve 2 1/2″ squares

We are going to start with the half-square triangles in the corner blocks since we’ve done these a lot before. Mark diagonal lines on the back of the four 3″ x 3″ cream pieces with a mechanical pencil.

With right sides together, place the marked cream square on the 3″ x 3″ red square. Stitch 1/4″ from the marked line.

Turn the block around and stitch 1/4″ from the other side of the marked line. Repeat to make four of these squares.

Cut along the marked line.

Press toward the red fabric. Repeat to make eight half-square triangles.

Trim half square triangles to 2 1/2″ x 2 1/2″.

Okay! We are ready to do our stitch and flip blocks. This is the same technique as the flying geese, only we are using a square instead of a rectangle as our base. Start by marking diagonal lines on eight of the 2 1/2″ x 2 1/2″ cream squares.

With right sides together, place a marked square on one corner of the blue 4 1/2″ x 4 1/2″ square. Stitch ON the line.

Trim 1/4″ from the stitching to remove the corner.

Press toward the corner.

With right sides together, place a second marked square on the opposite corner of the blue square. Stitch ON the line.

Trim 1/4″ from the stitching to remove the corner.

Press toward the corner.

Ready to start assembling? Lay out the 2 1/2″ pieces as shown to make a corner unit.

Stitch the top row together and then stitch the bottom row together. Repeat to make 4.

Press toward the plain squares.

Make sure that your seams are pressed opposite when you put the block together.

Stitch the two rows together, making sure that the seams butt-up against each other to make a perfect corner.

Press. It doesn’t matter which direction you press at this point. Repeat to make four corner blocks.

Lay out your blocks in three rows of three blocks, as shown.

Stitch the rows together.

Press toward the blue blocks.

Here is a diagram of how to press your blocks.

Stitch your completed rows together, making sure to butt-up the diagonal seams and the block seams.

Press the rows. And…

You’re finished. It wasn’t that bad, right? I absolutely LOVE the look of this block. Want to see how versatile it is?

Here is a virtual image of a quilt made from the block we just did.

You could change the coloring and do something like this.

And, of course, I have to see what a scrappy version would look like.
Join us next time for ideas on how to put your completed blocks together.


A special thank you to our sponsor, Baby Lock, makers of our very favorite sewing machines!