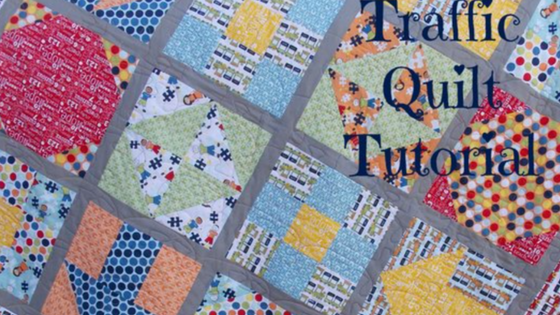
Hi! It’s Katie from ChooChoo Skadoo and I am so excited to be here and share this quilt with you! I am using the Pieces Of Hope 2 collection.
We will be making 4 different blocks; 4 of each. A total of 16 blocks. So lets get started on our Traffic Quilt!

Pieces of hope tutorial
Supplies:
16 fat quarters
1 yard of sashing fabric
1 yard border fabric
3/4 yard binding
3 3/4 yard backing
(Finished quilt is 64″x64″)

Divide your fat quarters into 4 stacks. One stack for each block that we are making. (one of the blocks takes 3 fabrics. So you would need 5 fabrics in that stack. I used scraps from my arrow block for the 3rd fabric. If you don’t want touse scarps you will need 17 fat quarters to make this quilt.)

The first block that we are making is our Arrow block. This block is so fun to make.
Take your first 2 fabrics. (these will be repeated in 2 arrow blocks) From each block you need to cut 2 squares from each fabric 7.5″ square. You will also need to cut 3 rectangles to 4.5″ x 6.5″.

Draw a line down the center of 2 of your 7.5″ squares and lay them on top of each other. I laid my blue on top of my orange.

Sew down each side of the line with a 1/4″ seam allowance.

Cut on the line and press flat. Trim blocks to 6.5″.

Lay them as pictured above to make 2 arrowheads. They should be opposite of each other.

Lay out your 4.5″ 6.5″ rectangles with the long sides touching each other. You want them to be opposite. Mine are blue, orange, blue and then orange, blue, orange. Sew them together pressing seams to your darker print.

Sew bottom section to arrowhead section as pictured above.

Repeat with the other block.

Do the same with your other 2 fat quarters to make a total of 4 blocks. They should measure 12.5″ when done. Aren’t they so stinking cute!?

Block 2 is a 9 patch. I used my yellow scraps from block one for the center of these blocks.

Start by cutting 4 squares 4.5″ each from the yellow or your center fabric. From each of the other 4 fat quarters you need 8 squares at 4.5″.

Lay your blocks out as pictured above.

Repeat with your other 2 fabrics to make a total of 4 blocks. Finished blocks should measure 12.5″.

Next up we have the Stop Sign block. You need 4 fat quarters for this block as well. You can do 2 opposite ones or mix and match as you please. I chose to do the opposite look.

From each fat quarter you need to cut 1 square 12.5″x12.5″ and 4 squares at 4.5″x4.5″.

Draw a diagonal line down each of the 4.5″ square blocks.

Lay the 4.5″ block in the corner of the 12.5″ and sew ON the line that you drew.

Repeat with all 4 corners.

Cut off a 1/4″ above your stitching line.

Repeat with all 4 corners.

Flip them open and press flat. Pressing the seams outwards.

Make 4 blocks. Finished block size should be 12.5″x12.5″

Our last block is the triangle block. For this one I did random pairing of the fabrics. Its hard to do opposites with this block because they will end up looking the same.

From each fat quarter cut 4 squares to 7.5″x7.5″.

Pair up 2 fabrics (2 pieces of each fabric) to make your four blocks.

Draw a line down the middle of 2 of the same prints from each stack.

Make your half square triangles the same way we did in the arrow block. Trim the Half square triangle block down to 6.5″. Lay them out into your block and sew together. Press flat. (see picture above and below on how to lay them out.)

Repeat to make 4 blocks. Blocks should measure 12.5″.
Now that we have all 16 of our blocks done you need to lay them out in an order that you like.

From your sashing fabric cut 4 strips 2″ wide. Sub cut these in strips into 12.5″ strips. Sew them between each block like pictured above. Press towards sashing fabric.
From the sashing fabric cut 4 strips 2″ wide. Sew these end to end on the bias. Sub cut this long strip into 3 strips that are 53″ long. Sew this in between your rows.

From the rest of your sashing cut 6 strips that are 2″ wide. Sew them end to end on the bias. Subcut 2 strips to 53″ and then cut 2 of them to 55.5″. Sew the shorter 2 to each side of the quilt and press flat. Then sew the 2 longer strips on to the other sides and press flat. (measure through the center of your quilt before cutting your strips to make sure those strip lengths will work for your quilt)

From your border fabric cut 8 strips 4.5″ wide. Sew these strips end to end. I sewed them straight not on the bias to avoid stretching when put on the quilting machine. Measure down the center of your quilt (see picture below to see how I do this) and cut 2 strips to that length. Sew them on the sides of the quilt and press flat.

Measure through the center of your quilt again (see above picture) and cut 2 strips. Sew onto the other sides of your quilt and press flat.

Quilt as desired. I had my quilter (my mom) quilt puzzle pieces into my quilt. Then bind. I have a great tutorial on bias binding on my blog; check it out!

Thanks so much for stopping by! Autism is very near to my heart and I loved making this quilt.


