
One of my favorite new fabric lines from Riley Blake Design is Woodland Spring by Dani of Designed by Dani. I fell in love with the deer print at first, then with the whole line. Just the right amount of sweetness without being too cutesy, that’s what I love! As I was looking at the fabric, I had an image of a child sitting on a tree stump and reading somewhere in the woodlands (I know, sometimes my imagination runs wild and goes everywhere) … so I decided to make a floor pillow for little kids by just using one 10-inch stacker.

It is a pretty simple project and you can whip a couple of them out in one afternoon. I will show you how. 🙂 {You will Need} 1 – 10-inch stacker Matching thread Fiberfill for stuffing the pillow {How to} 1. The 10-inch stacker contains 18 squares. To make two floor pillows, I made 4 groups of 4 squares. You will have two leftovers you can use for something else. On this step, there are many ways to do it depending on your preference. I grouped similar color schemes with different patterns together.

2. To piece the squares together, sew the side squares together, then the top and the bottom.


3. The next step might be a bit confusing if you have never done this before, but no worries! I will explain it to you. 🙂 First, lay out a four patch right side up on the table, then another four patch right side down on top of it. Turn the top four patch 45 degree. Upper case alphabets are for the corners and the seams on the top four patch, lower case alphabets are for the bottom four patch. Basically, you want to match the alphabets (ex. A and a, B and b) by pinning them together and then sewing from one point to the next point. When you do this, pin 1/4″ from the edge, that’s where you want to start and end the stitching.


4. Sew (A,a) to (B,b), then (B,b) to (C,c) and so on. Don’t forget to back stitch the beginning and ending of each section. When you are sewing the last seam, sew both sides and leave a 5″ opening in the center for turning the fabric inside out.


5. Pull out the fabric at each point where the three fabrics meet. You will have sharp clean points.

5. Press the seams with an iron. You will have much better result when you do this.

Opening too…

6. It will look like this before you stuff it with fiberfill.

7. When you are stuffing, make sure you stuff each point very well. That way you will have a more defined prettier finish. 8. Close the opening with slip stitch (blind stitch).

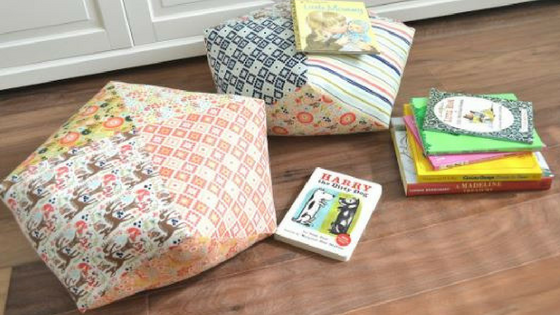
9. Ready to enjoy! With one 10-inch stacker, I was able to make two, but if you want to, you can use the 4 – four patches as a top, and use one solid piece of fabric (19 1/2″ x 19 1/2″) as a back and create four floor pillows.


I hope you enjoyed my post. Happy sewing! 🙂
Â