Instructor: Amanda of Jedi Craft Girl

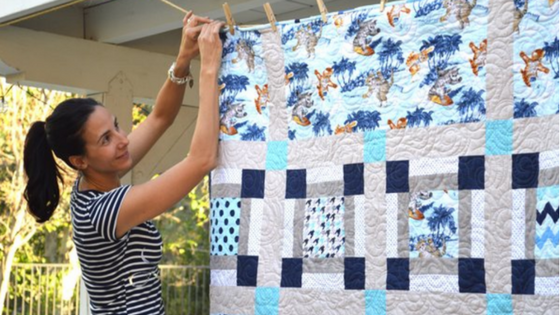
I’m Amanda from Jedi Craft Girl and I can not contain my excitement for sharing my latest quilt pattern over here at Riley Blake Designs. I am a California girl through and through. I spent most of my teenage years at the beach trying to surf but really I was there to watch the cute surfer boys. I am also a crazy cat lady and I have been my whole life. I also have loved quilting and sewing for pretty much my whole life. SOOOOOO when I saw this Surfin’ Cats fabric from Riley Blake Designs – I died! It literally combined three of my passions in one project: the beach, cats, and quilting. BRILLIANT!!
When ever we go to the beach we make sure to always bring sweatshirts and a blanket. It can be 112 degrees at our home and 35 miles away the coast will be a chilly 66 degrees. I thought this was the purrrrrfect blanket to take to the beach on those windy days. I love big theme prints and this pattern is a great way to show off the wonderful design of the fabric without cutting it up to much. You can make this in a day – easy!
Here’s how you can make it:
Supplies:
1.5 yards surfin cats
1.5 yards gray sashing fabric
1/2 yard navy blue
quarter yard cuts of coordinating fabrics – I love the RBD basics – I used the chevron, houndstooth and polka dots
1/2 yard gray basic shades
1/2 yard white small dots
1/2 yard binding – I used the chevron
2 1/2 yards for back
The quilt consists of 8 pieced blocks that are 12″ finished in size and 3 larger sections of Surfin’ cats. All seams 1/4″. Finished Quilt measures 57.5″ x 72.5″

I choose to cut 2″ x WOF strips of the white small dot and the grey basic shades and piece the strips lengthwise. Then I cut the strip sets into 6.5″ increments. Sew the block in rows and the rows together, alternating seems for pressing and matching intersecting seams.

Once you have the 8 blocks finished, begin making the Surfin’ Cats section. I labeled the quilt layout with the cutting measurements – I’m a visual learner & quilter! All the surfin’ cats squares are cut 12 1/2″.

Sew the rows together how they are laid out, pressing seams alternately so they go together nicely.

Make sure your cat helps in each step of the process!

Pin all the rows together and sew. Press the seams to one side.

The quilt top is done! Super easy!!!

Mufasa loves to inspect all sewing work. Then he plays in it and gets it all wrinkly!

I had my friend quilt the quilt with her long arm machine. She did a great job and I love all the swirly waves – it’s the purrrrfect finishing touch.


Mufasa approves!


