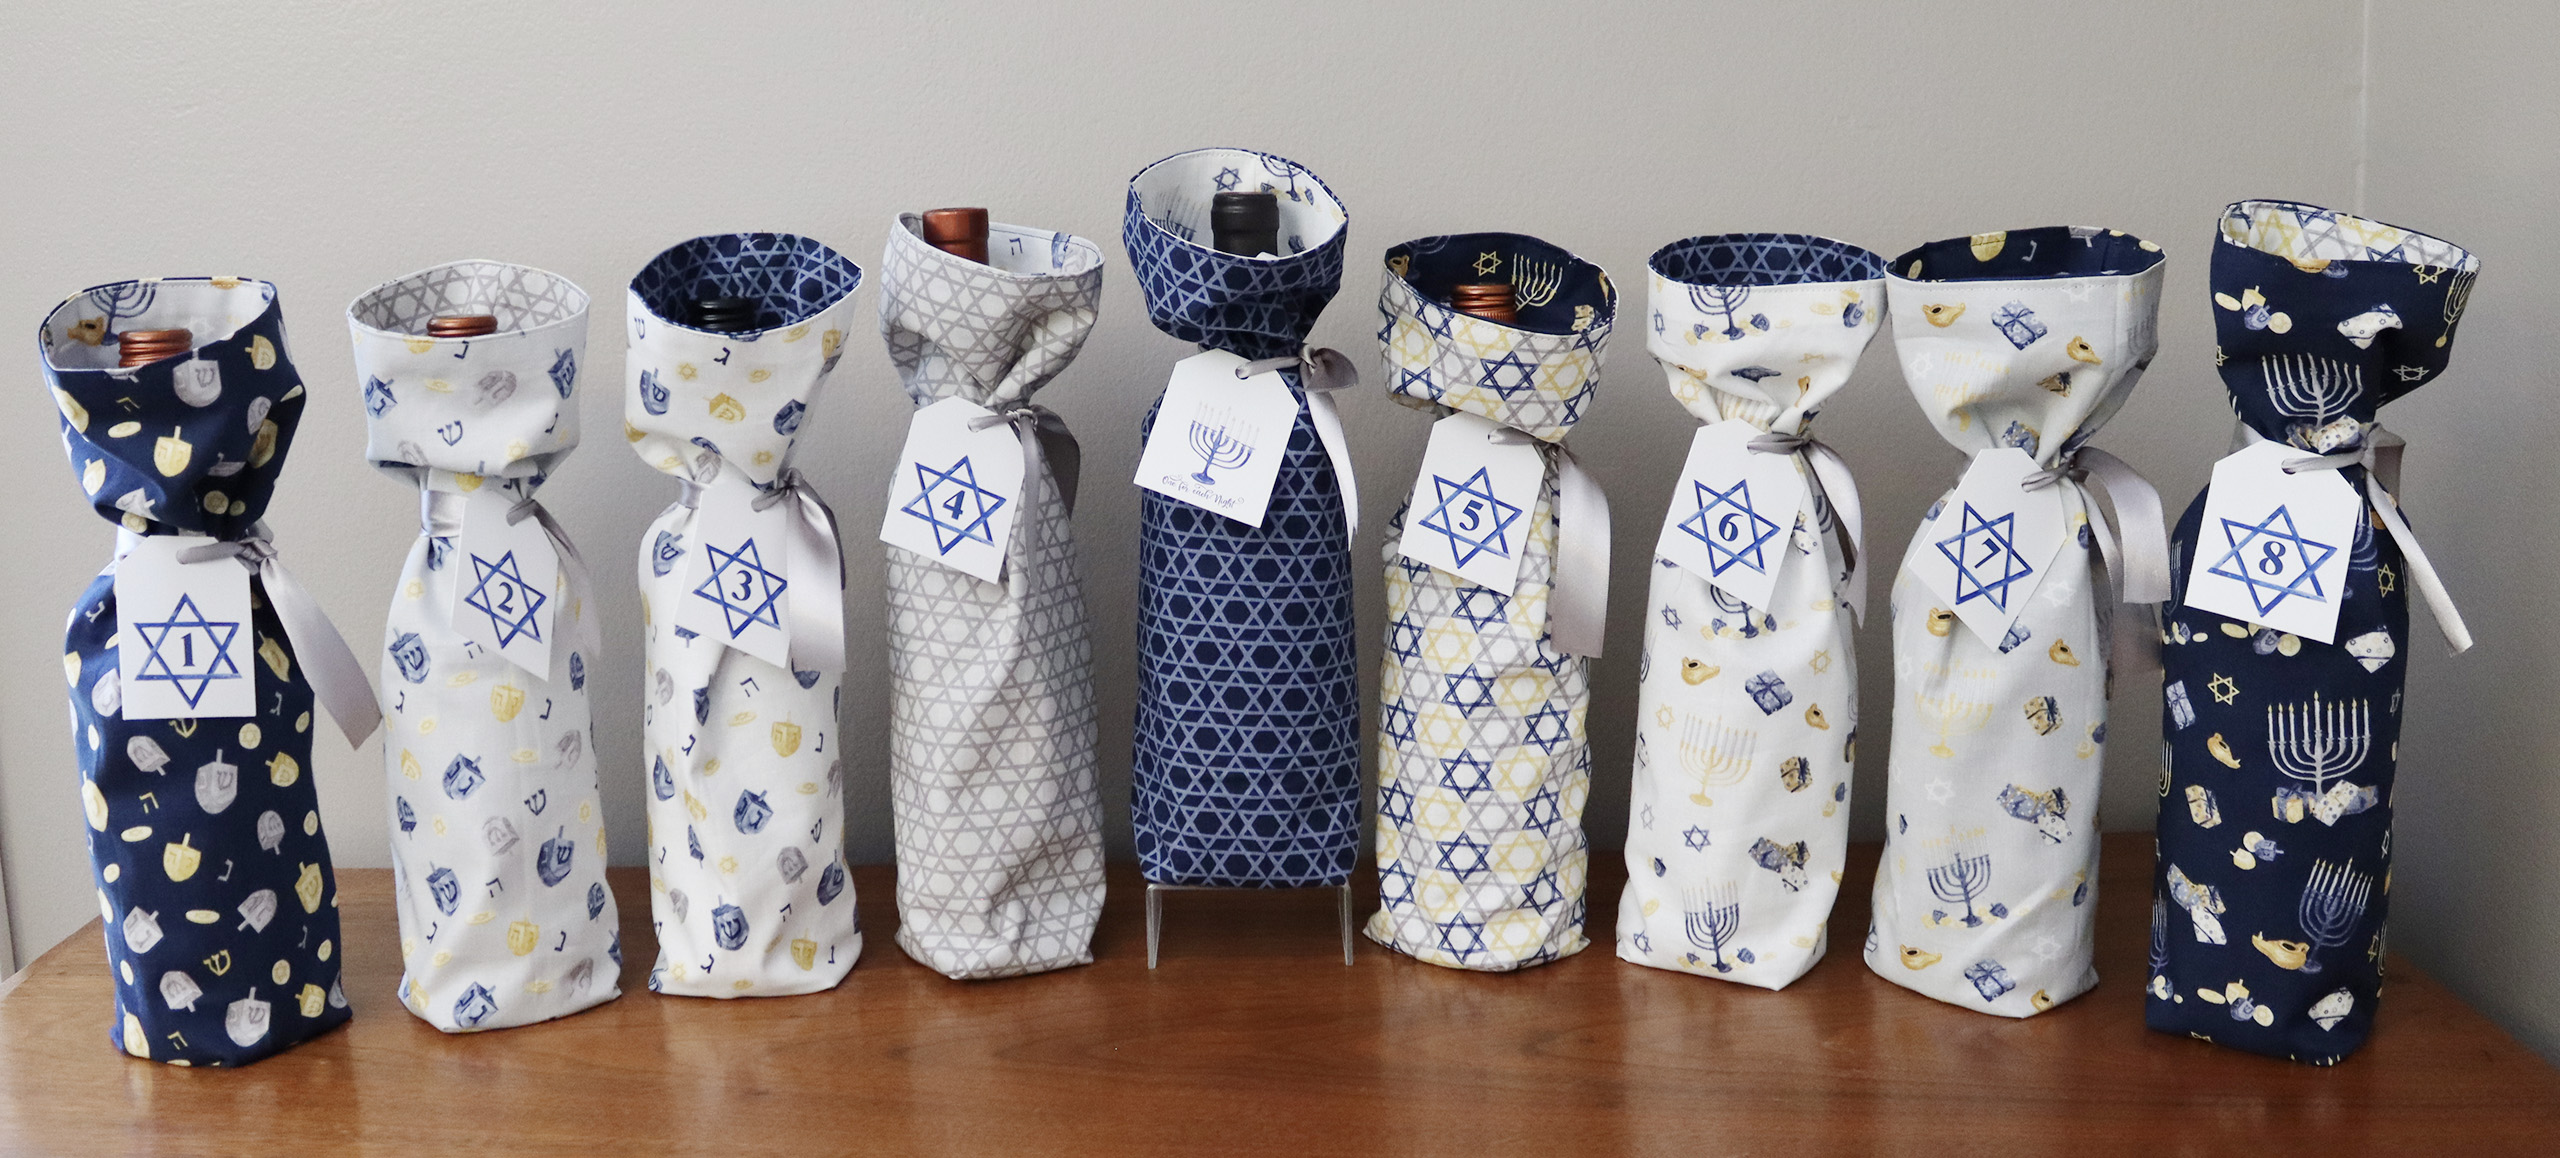
Menorahs come in all shapes, materials and sizes but have you ever considered a consumable menorah? Specifically, a menorah made with a bottle of wine for each night and of course the 9th one in the center – or it wouldn’t be a menorah, right?
This is a fun twist on the 8 nights of Hanukkah for all the wine lovers out there. You can make these wine bags and tags for a gift, to sew and sell or use them in your own home.
If you don’t drink or want a kid friendly version, substitute sparkling cider or another non-alcoholic bottle for wine.
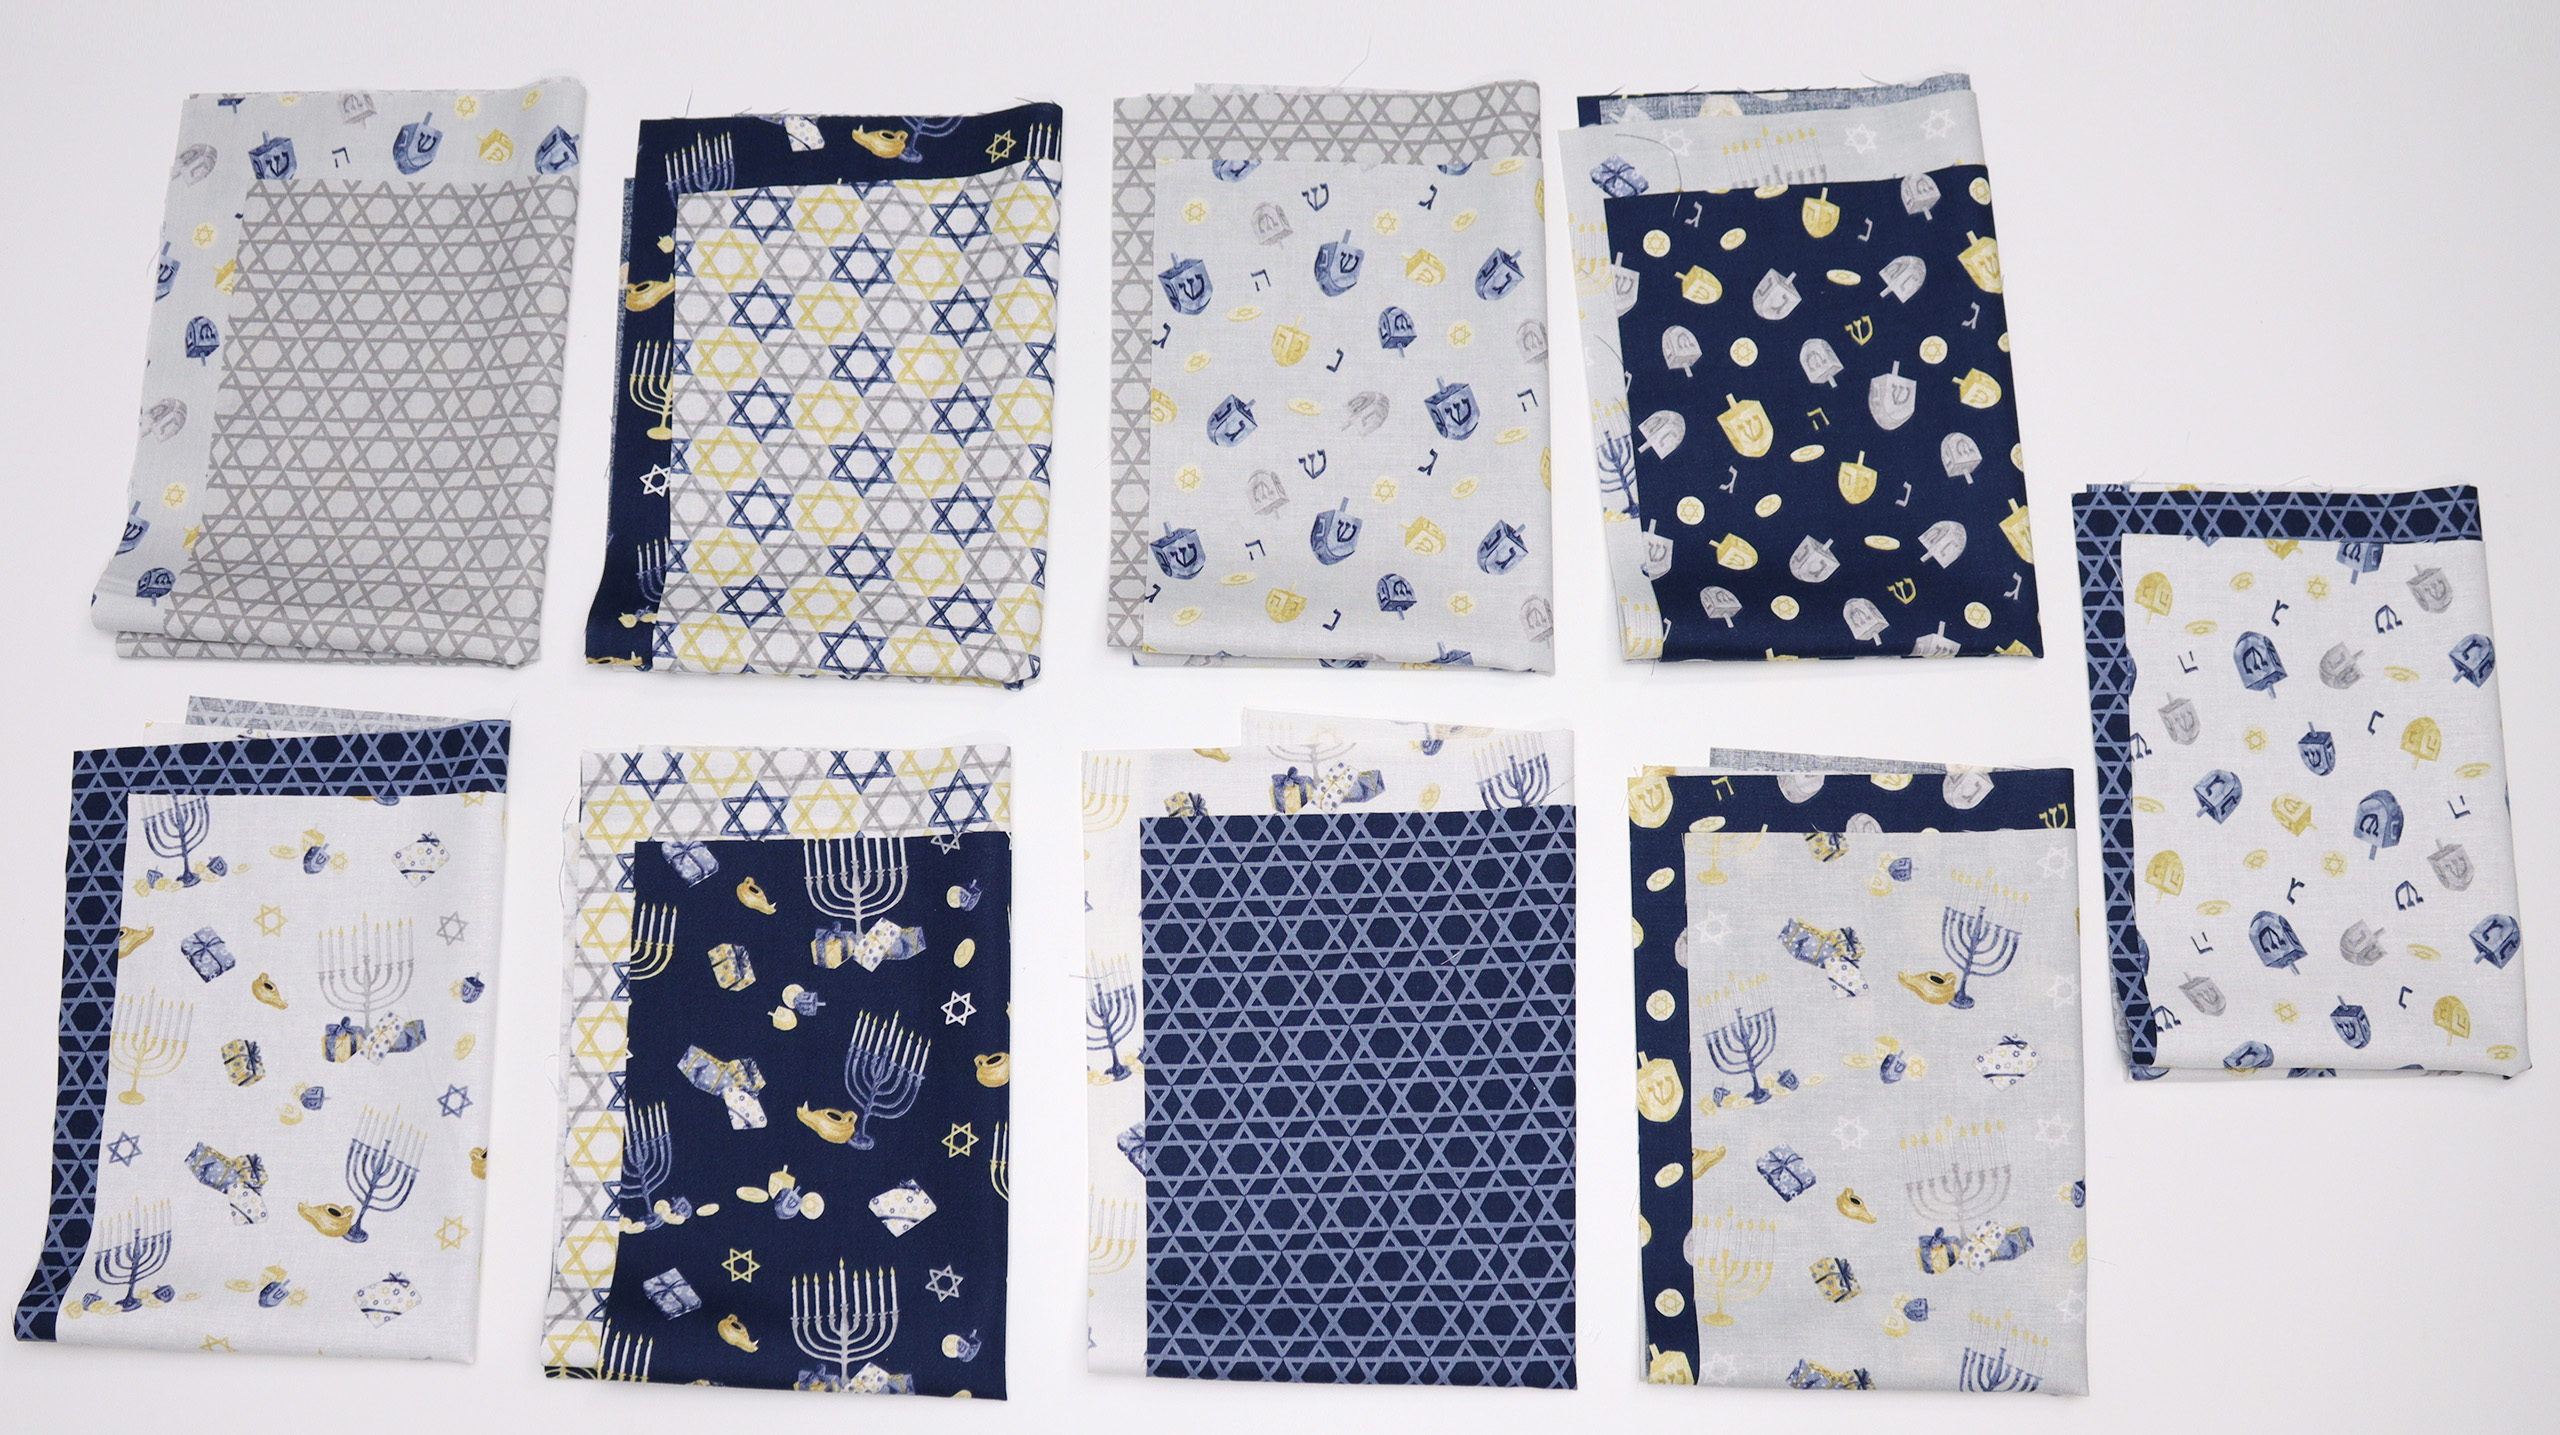
I chose to make my Wine Menorah with all 9 Hanukkah Nights fabrics – pretty perfect that that’s exactly how many prints are in the collection, right? #MeantToBe Of course you can choose whatever number and combination of prints that you’d like.
I started by pairing the fabrics and made sure I kept the pairs together through each step of the process.
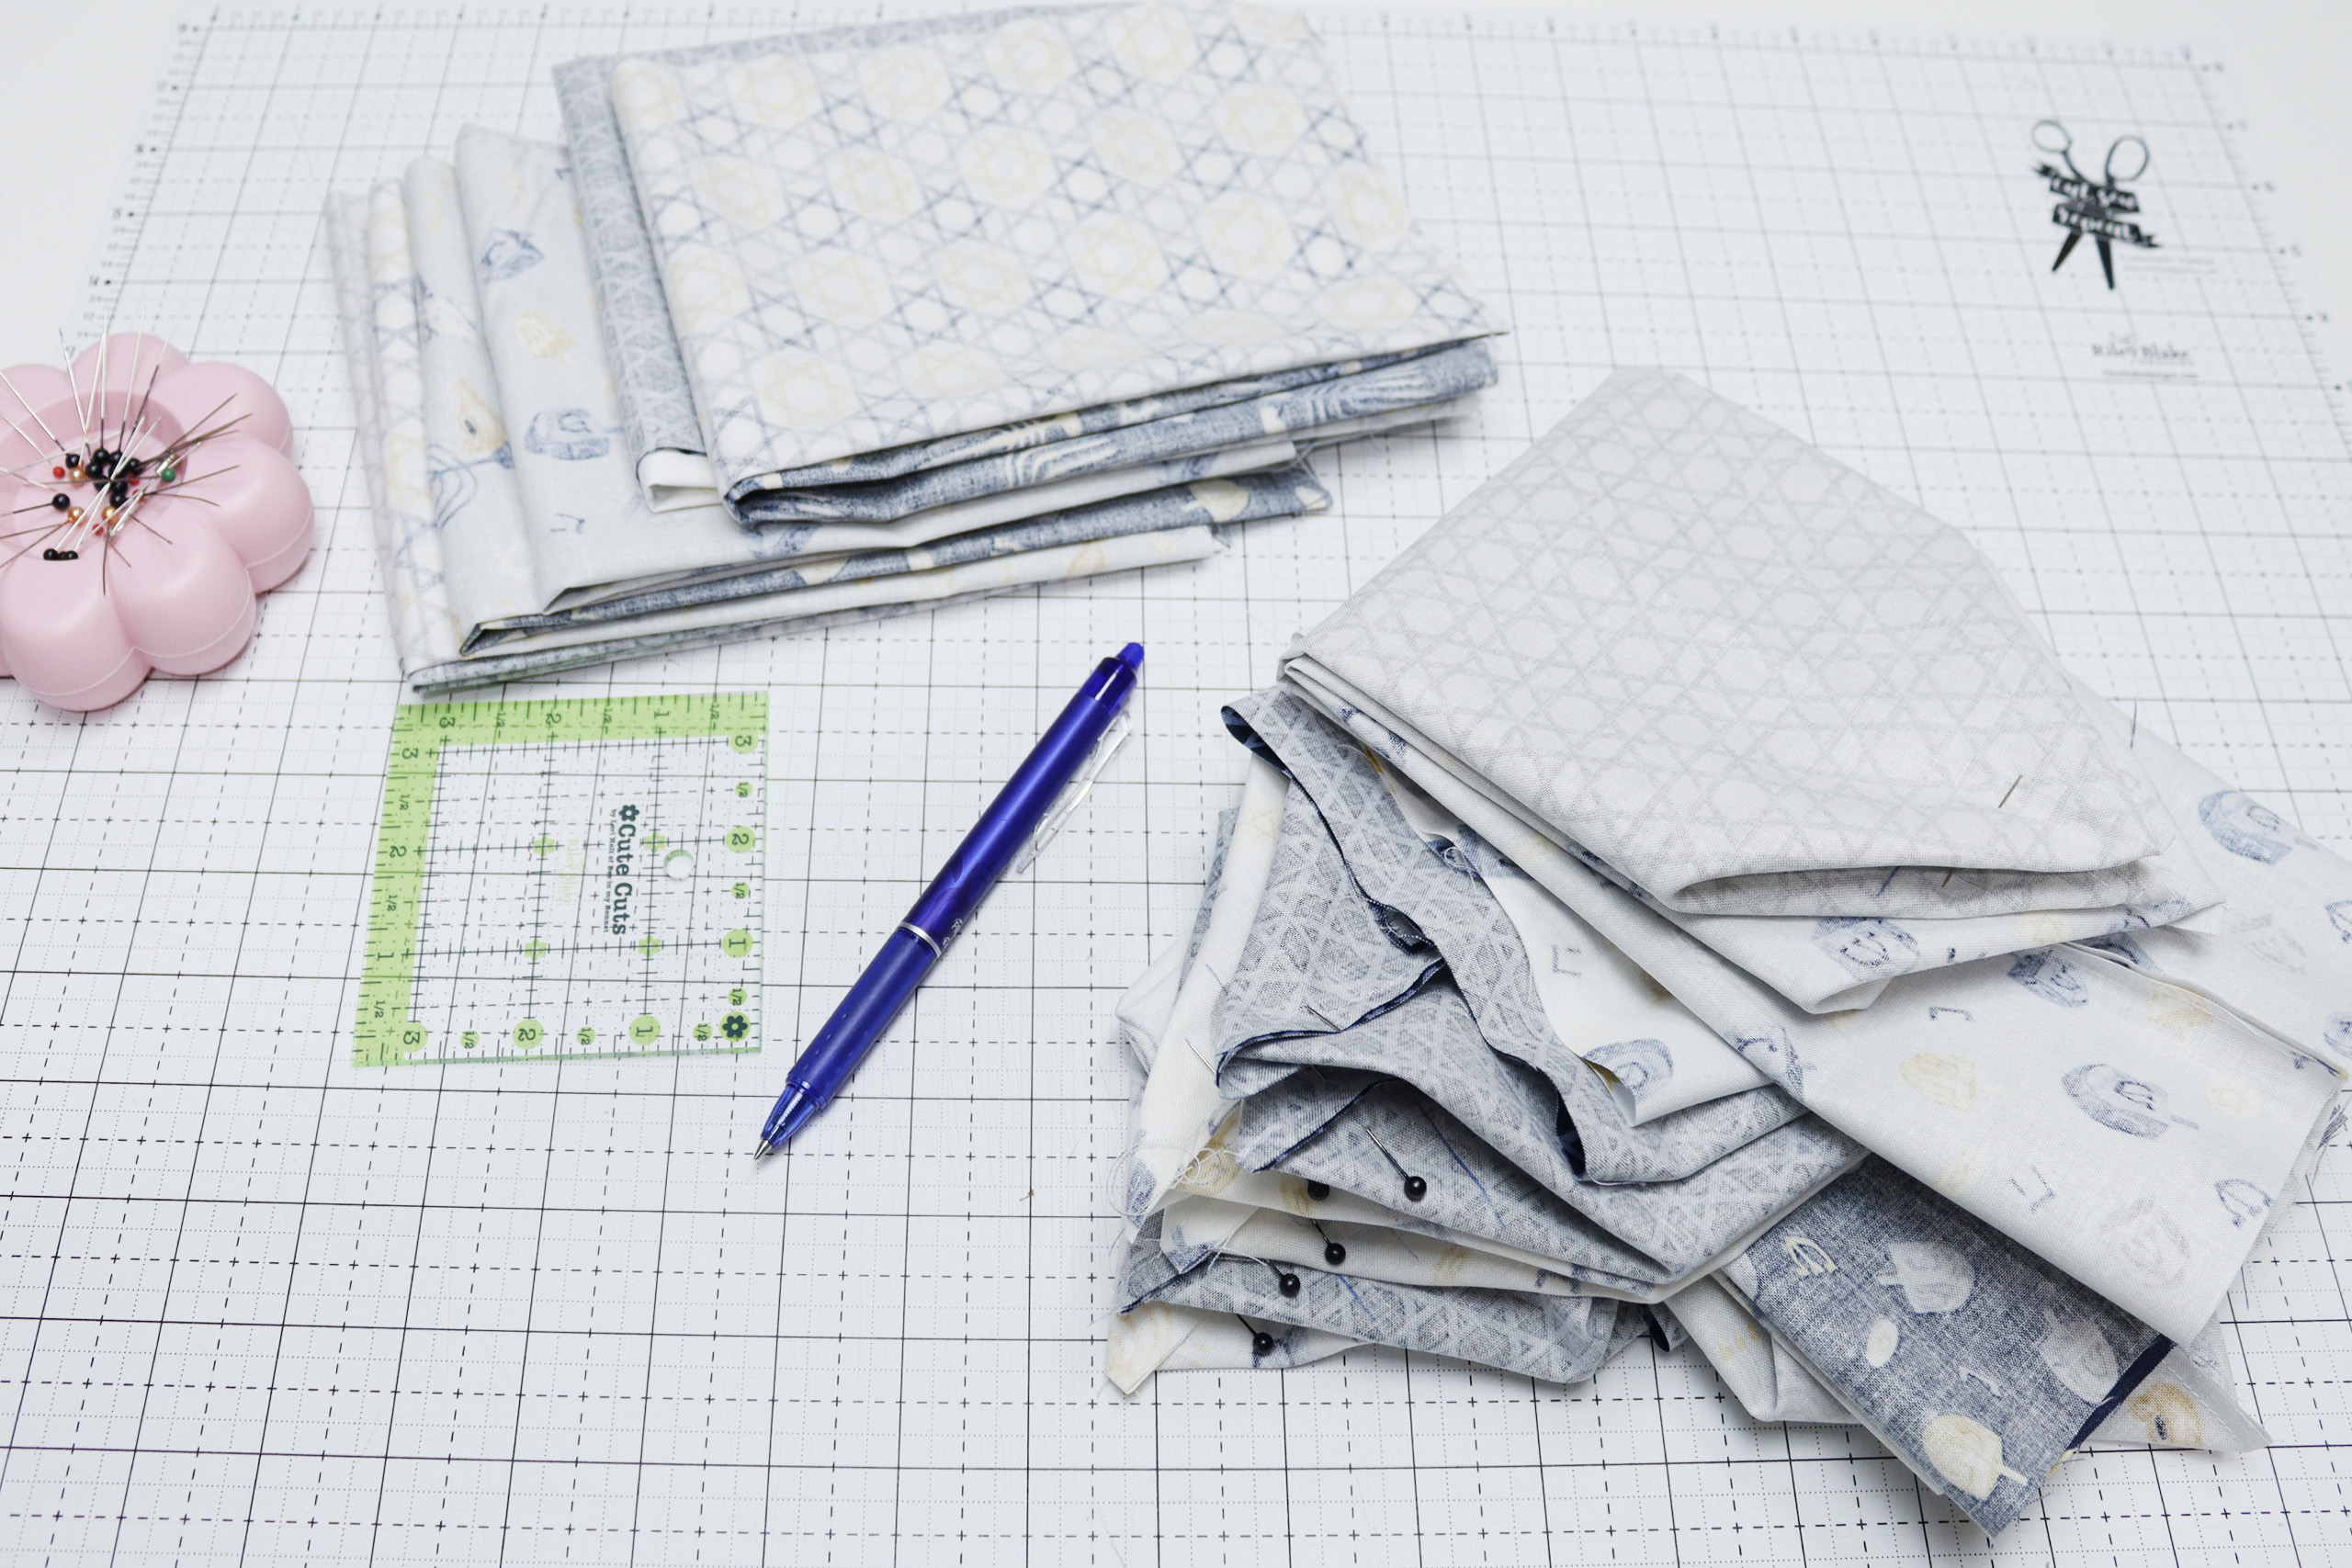
FABRICS
For each bag to hold a standard size wine bottle:
(1) 12″ x 16″ outside
(1) 12″ x 16″ inside
15″ piece of ribbon, twine, etc for the tie
For directional fabrics like the Hanukkah Nights prints, you will need 1/2 yard cuts so the prints are aligned correctly. (fig. 1) For that reason you need 1/2 yard of fabric for each bag. You can cut 3 pieces from each 1/2 yard of fabric.
To make 9 wine bags with all 9 prints, get 1/2 yard of each print. You will then have extra of each print for other projects or you will be able to make an additional 4 bags to use for gifts, hostess gifts, etc.
If you want to use a wider bottom bottle, measure across the bottom of the bottle and double it. So for most champagne bottles for example, you will need 16-18″ x 16″.
You will need (18) 12″ x 16″ pieces of fabric to make all 9 standard wine bottle covers for the menorah.
FOLD & SEW
Fold each 12″ x 16″ fabric in half to be 6″ x 16″ and sew 2 sides with 1/4″ seam. Be sure to sew the side and bottom of directional fabric, not the top, or your print will be upside down and you’ll be grabbing your seam ripper. (I love this one.)
As you sew each pair, fold them in half or clip them together so you won’t have to refer back to a photo or figure out which fabrics you wanted together at the end of each step.
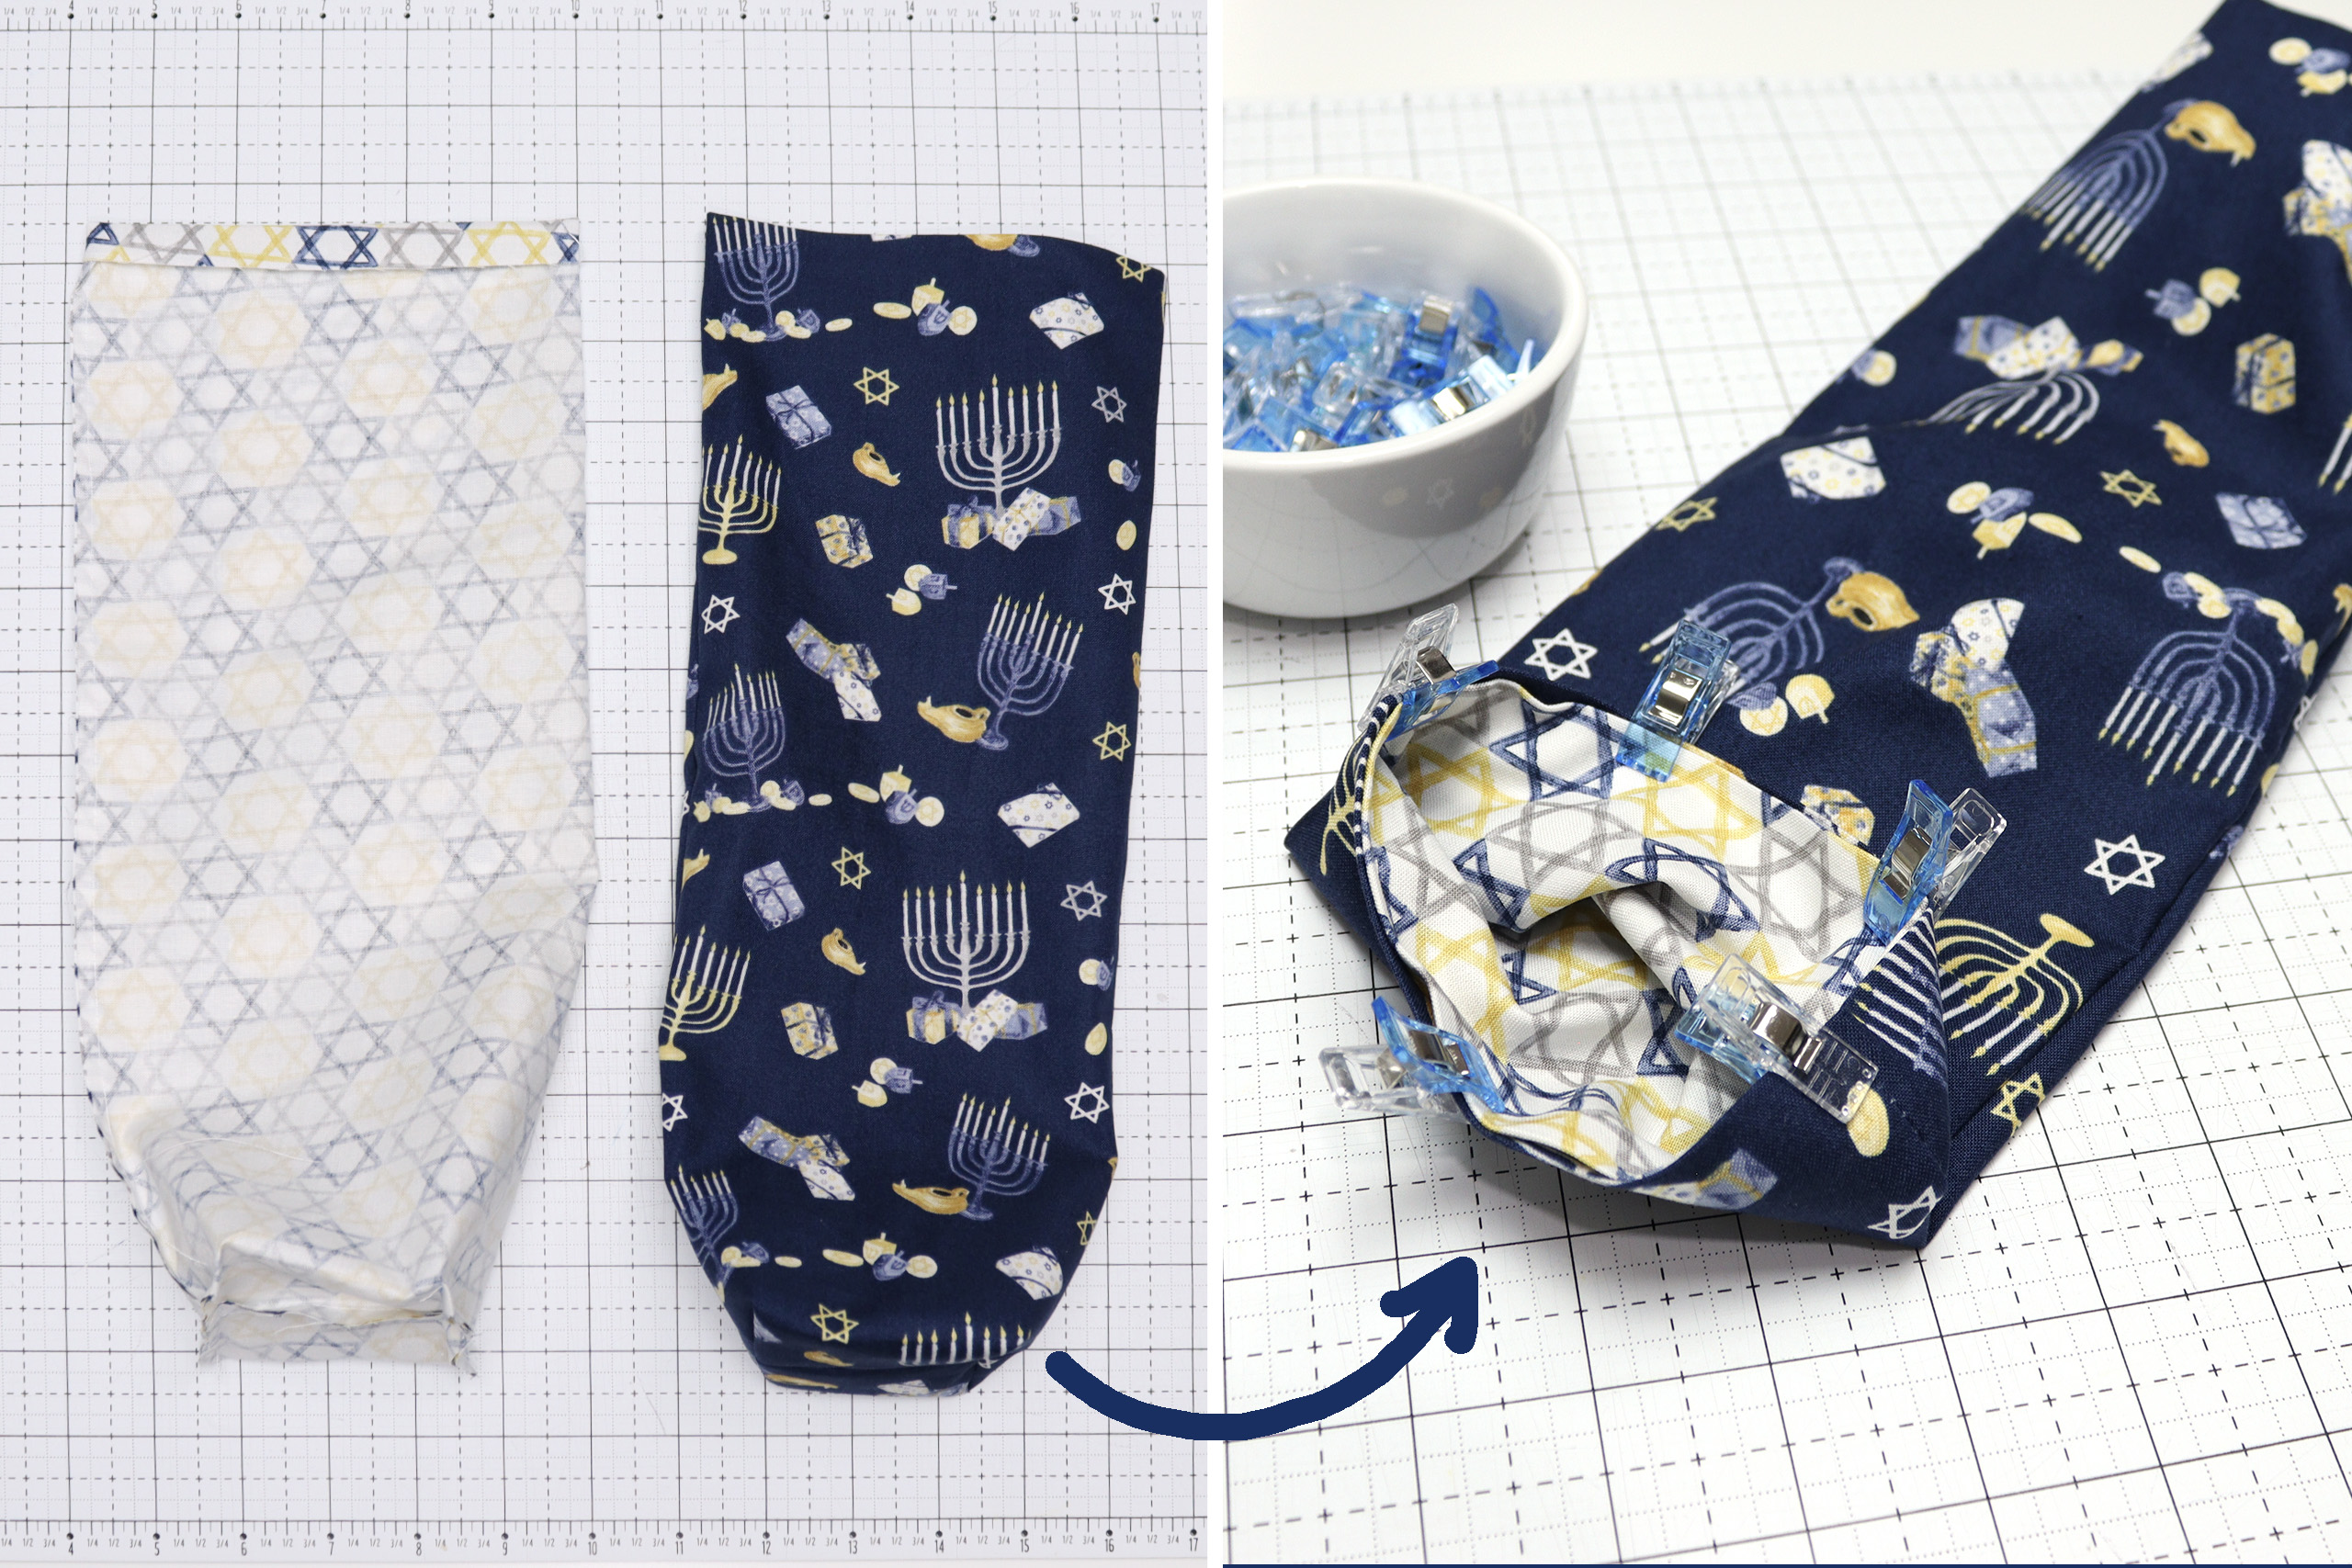
MAKE THE BOX BOTTOMS
MARK & PIN
To make the box bottom you will pinch the corners and sew across each corner horizontally, 1 1/2″ from the point.
After sewing 18 of these I got it down to a system – here are some tips.
- Open the bag and match the long seam to the opposite side (that was the fold) and flatten on your cutting mat. Line the seam up on a grid line, seam side up.
- Fold the bottom seam flat, putting the point on the same grid line and matching the long seam.
- You might need to adjust how the bag is flattened to make sure there is equal fabric on each side of the seam line and that the box bottom points are lined up correctly.
- Taking a minute to line this up makes your box bottoms even and there is less fussing and folding each corner.
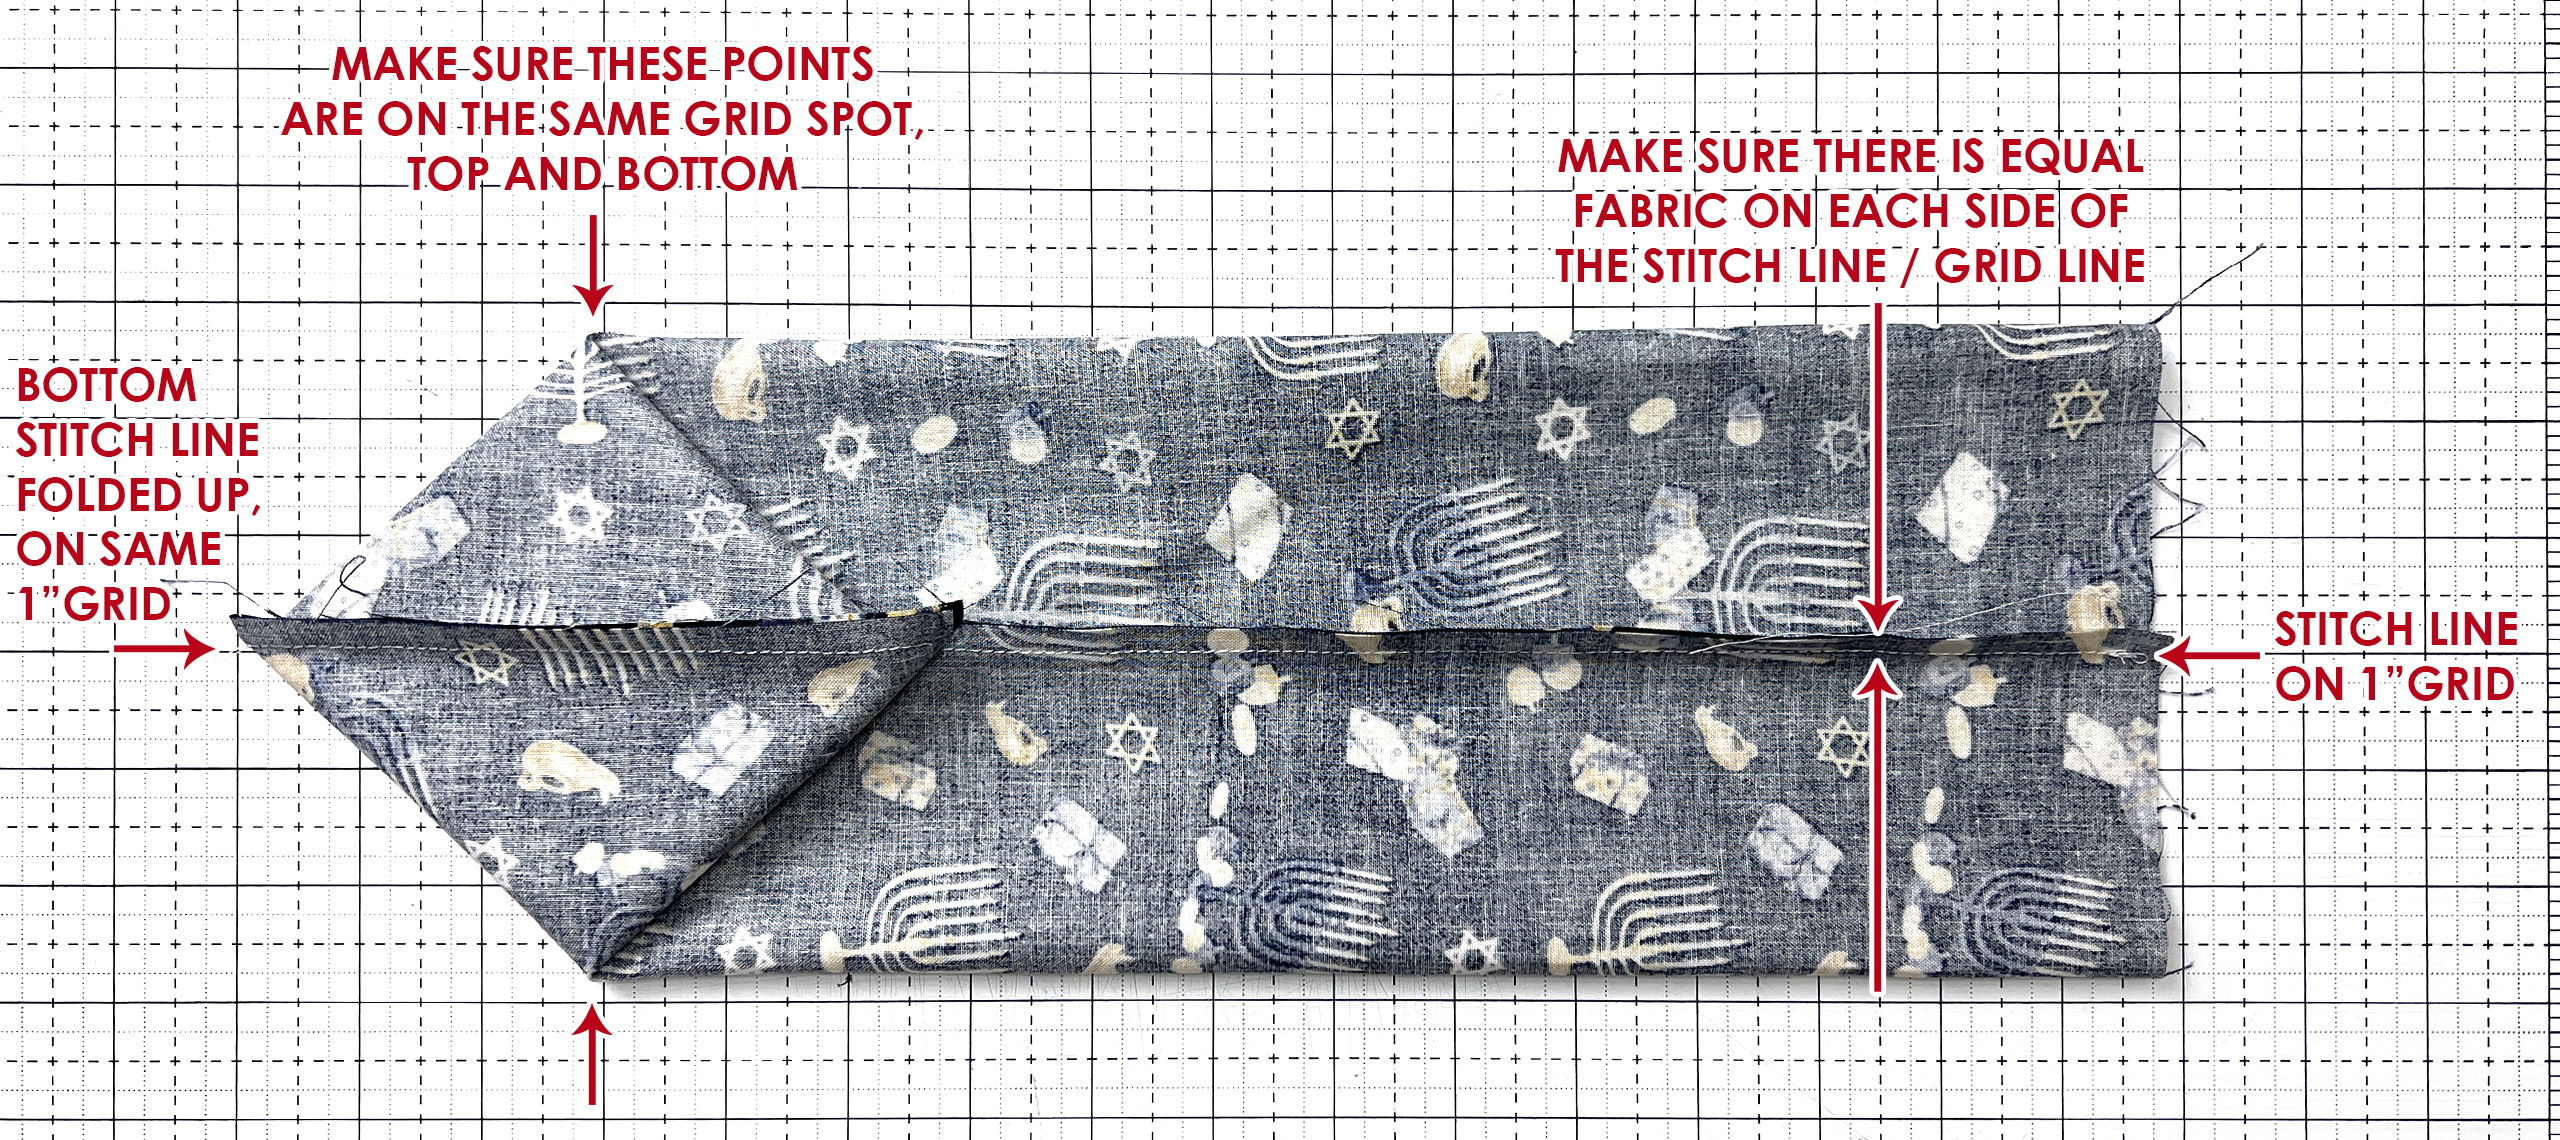
Once you have it laid out, draw a line 1 1/2″ from the point and pin.
Flip the long part of the bag to the opposite side so you can repeat the line & pin the opposite side.
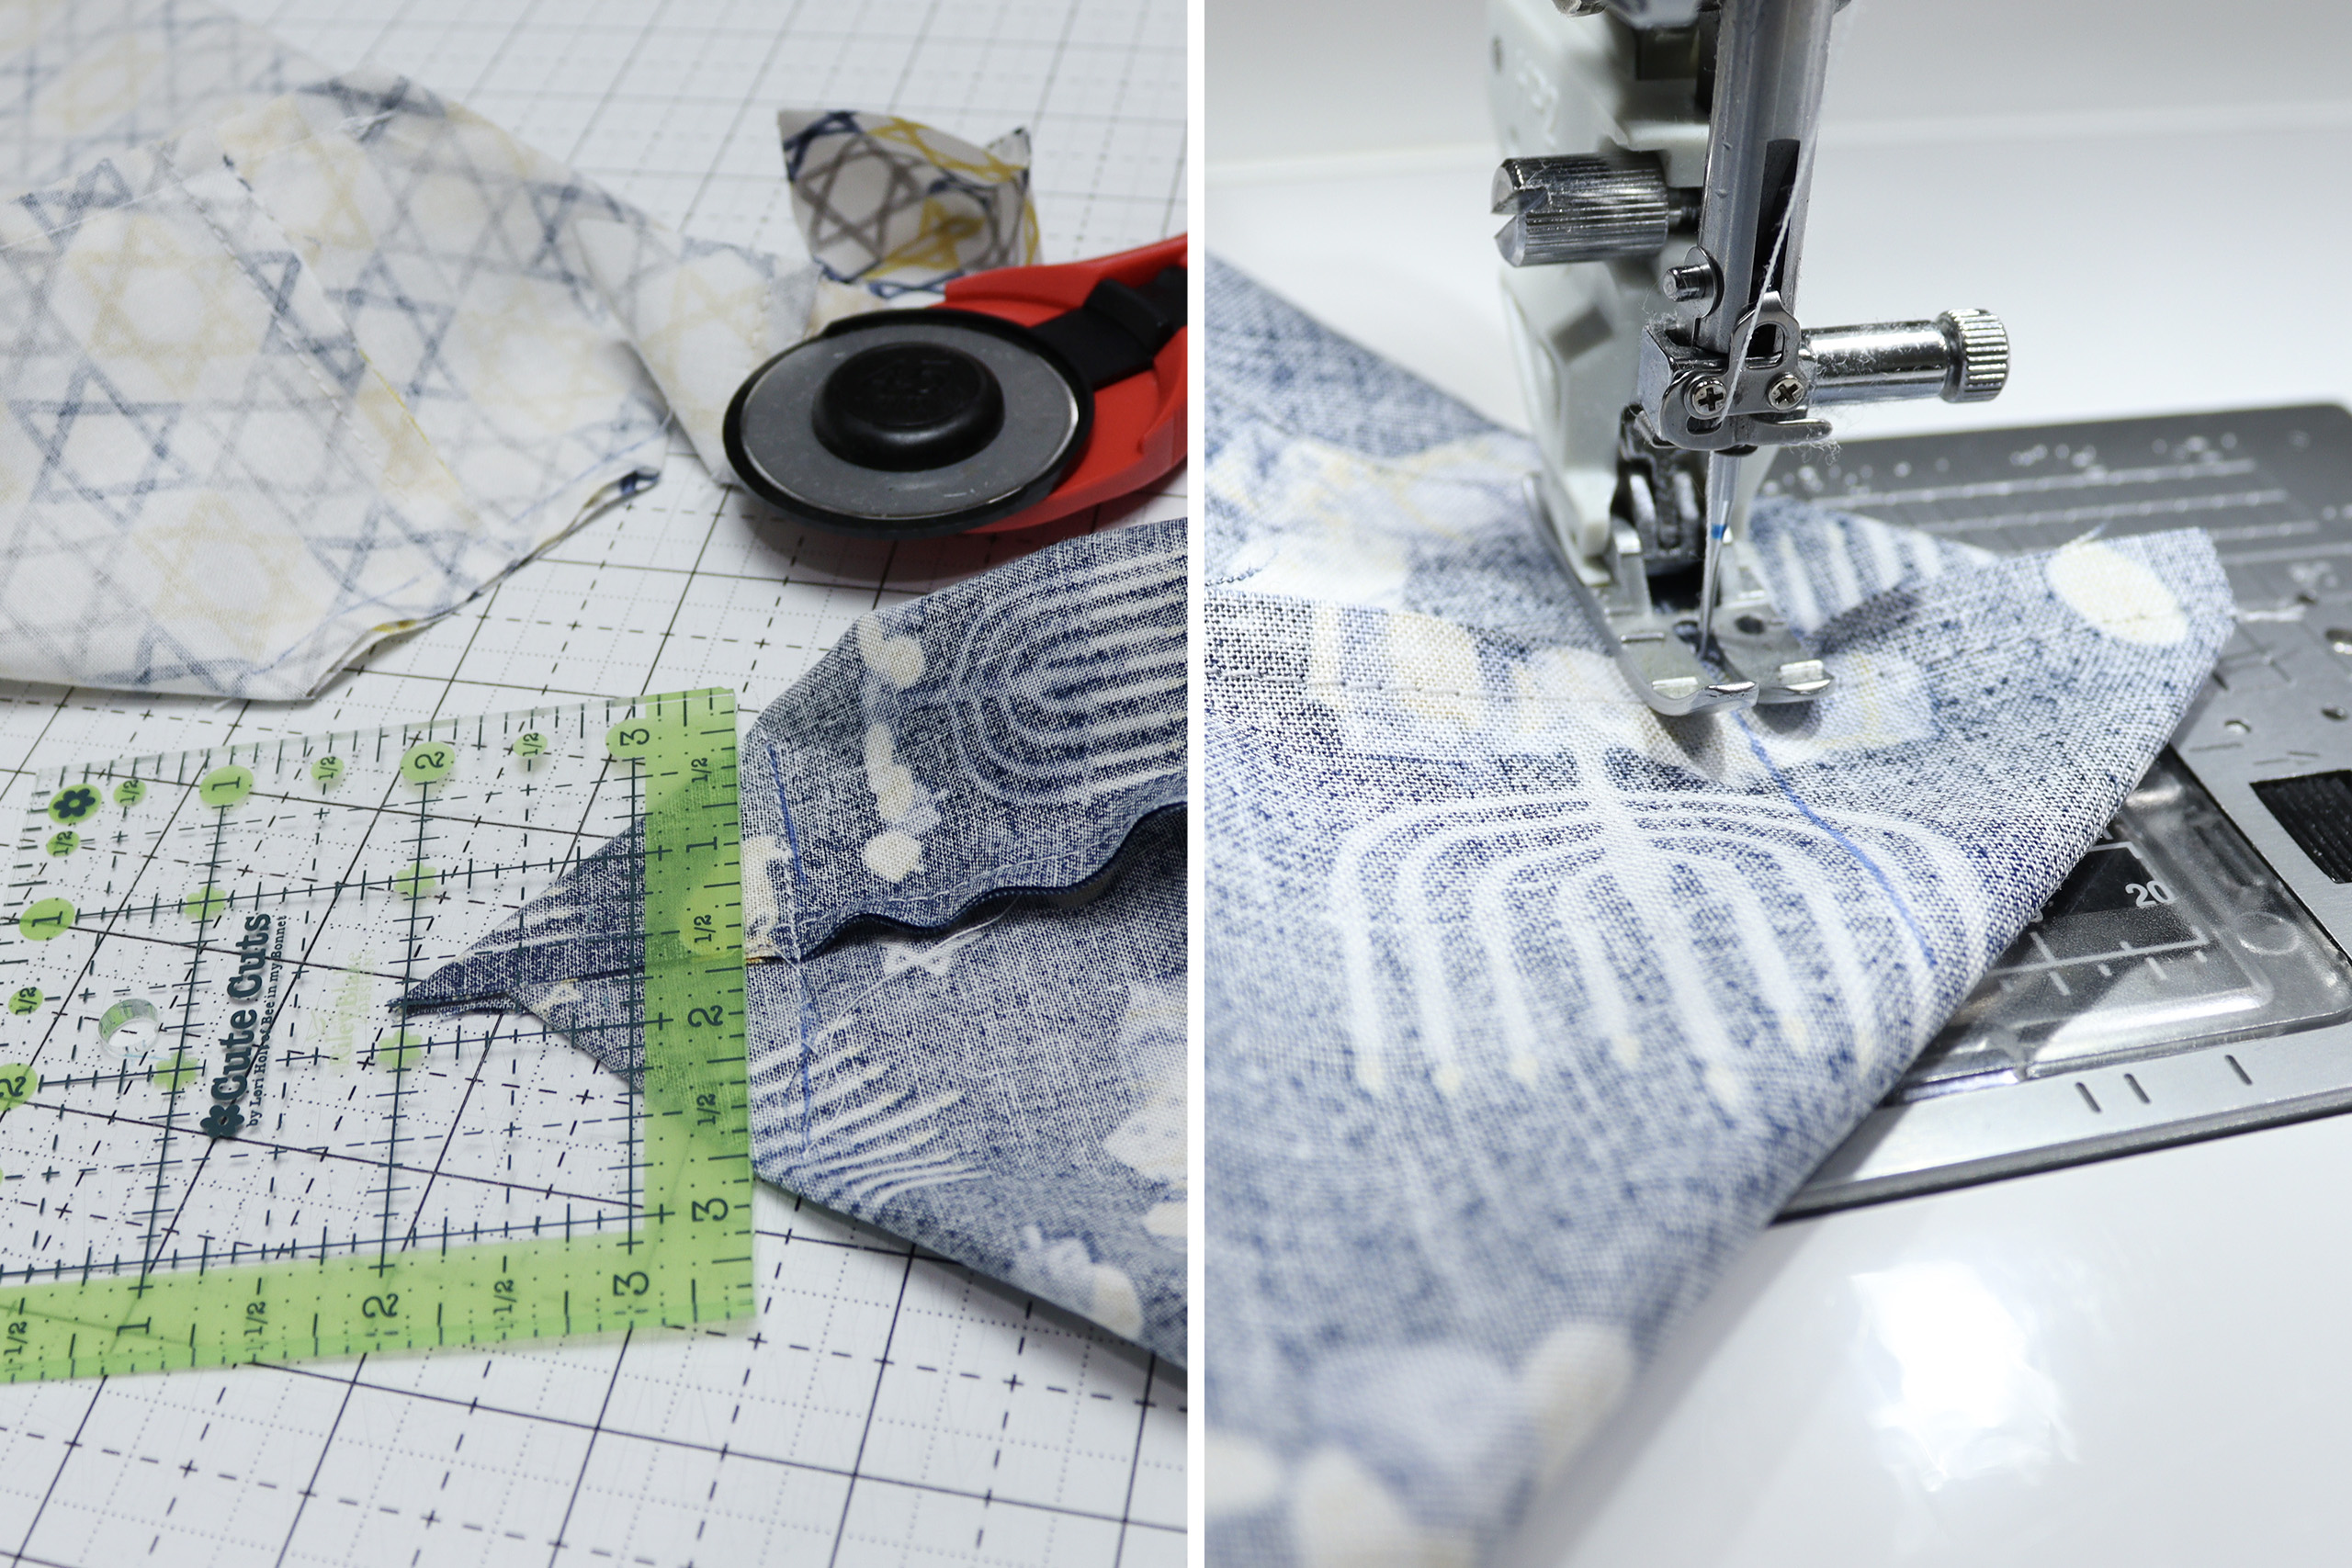
Repeat for all 18, folding pairs together as you work. Trim the corners 1/4″ from the stitch line. (fig. 8) You can use a rotary cutter but in the end I found using fabric scissors to be faster.
TOPSTITCH & FINISH THE BAGS
Before turning any of your bags right side out, press all of the raw edges down 1/2″. It’s easier to do this step when they are inside out. Keep them in pairs!
The next step will be to turn one of each set of bags right side out, but before you do, think about the threads you want to use for topstitching.
I decided to use a navy bobbin and white top thread so even though some of the linings would be navy, I turned all the dark bags right side out. The bags are reversible so it doesn’t matter which way you do this, just that you put them wrong sides together.
Turn 8 of your bags (one from each pair if you’ve been keeping them coupled up) right side out.
Place the lining inside the bag (so the bags are wrong sides together), match the seams and line up the pressed edges.
Pin or clip in place.
Topstitch all the way around, starting by the seam so you don’t have a knot or overlap of stitching in the front of your wine bag.
TAG & TIE
Click here to get the free printable to create your menorah tags. The center label features a menorah from the fabric with the sentiment “one for each night” – in this case referring to wine.
For the most vibrant color, print on glossy photo paper. Cut apart and use a hole punch so you can put the tags on whatever you choose for your bag tie.
Cut (9) 15″ pieces of ribbon, twine or trim of your choice. I got a 7 yard roll of 7/8″ satin ribbon for the ties in the sample. You need just under 45 yards to cut (9) 15″ pieces.
Thread the ribbon through the tags.
Decide what order you want your bags to go in and tie the tags on accordingly.

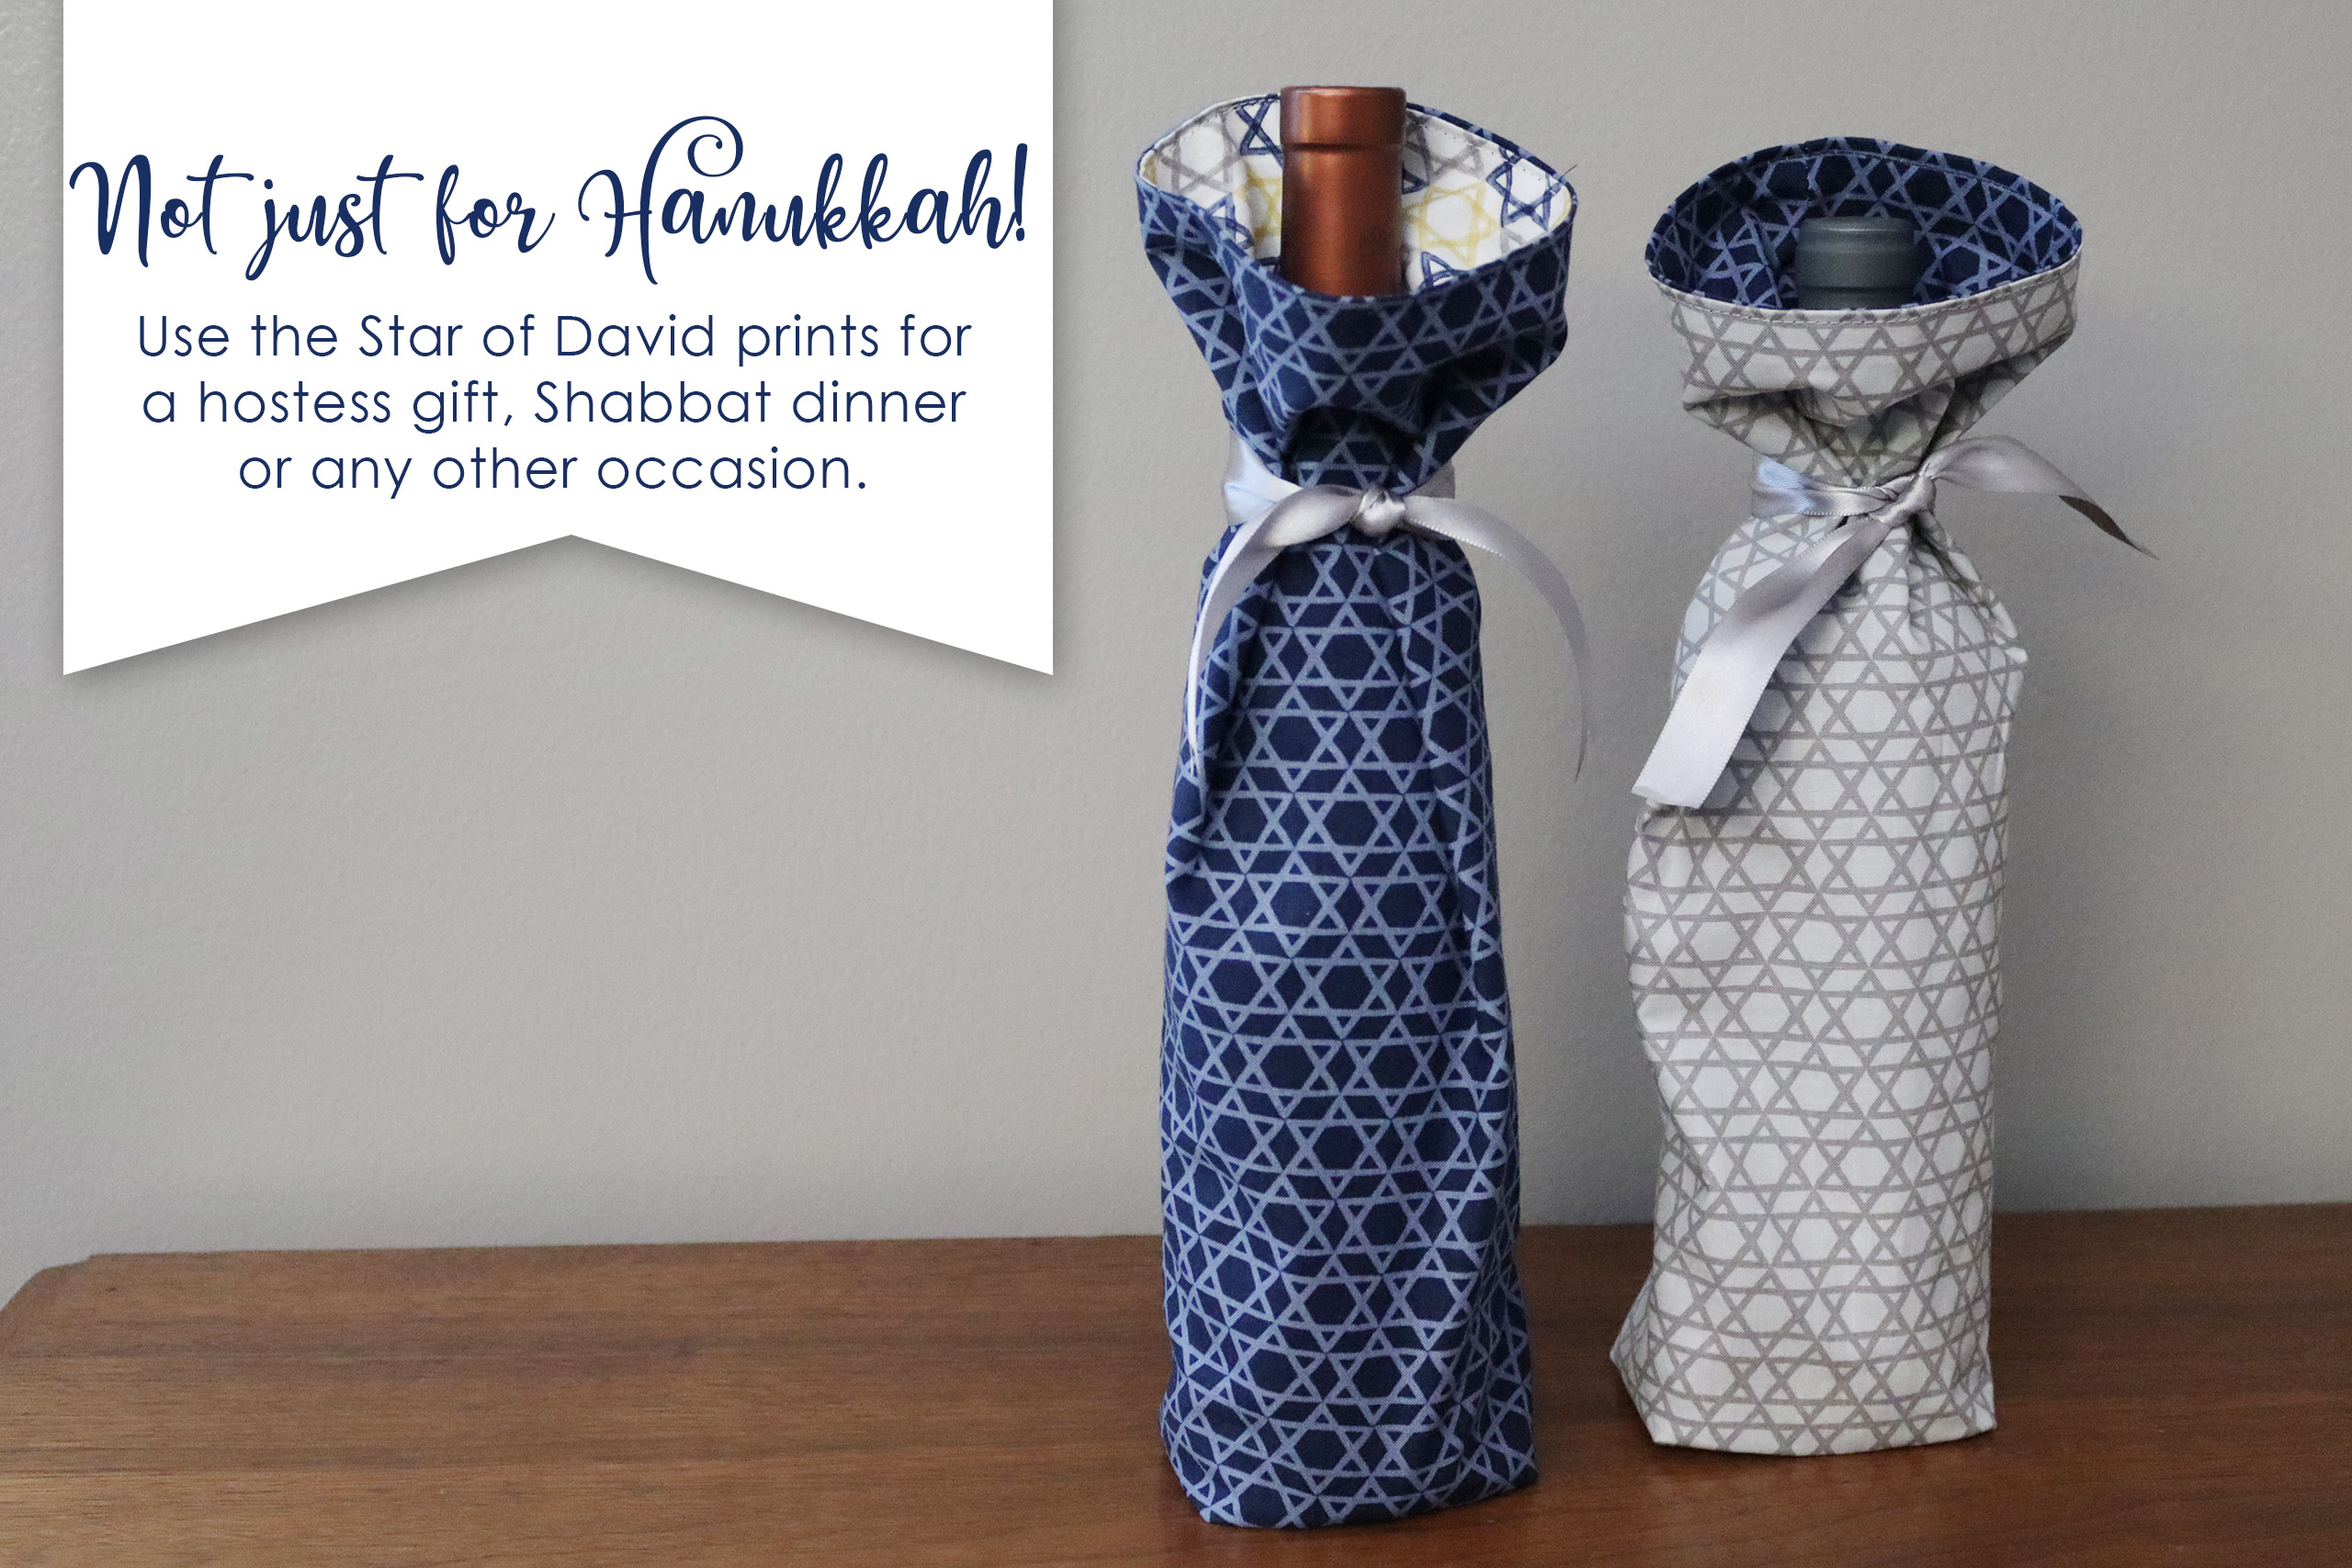
Wine bags aren’t just for Hanukkah! Use the Star of David prints (there are 3 colorways in the Hanukkah Nights fabric collection) and use them any time of the year!
For more projects and sewing fun, please follow me on Instagram or Facebook. Tag me if you make a wine bottle menorah – I’d love to see what fabrics you choose. Happy Sewing & Happy Hanukkah!
🕎 Tara Reed