When Lucy invited us to sponsor and participate in her Lucky Girl Dress blog tour, we were thrilled! We love Lucy’s stuffed animal patterns, so we were excited to try out her brand new dress pattern using ourjersey knit fabrics.

 This pattern has a lot of flexibility to it. As you can see, our two darling models are a few inches apart in height. The older sister is about 3″ taller than her younger sister. I cut out the 6T pattern size for both girls, although I extended the length of the dress about 2″ for the older sister. The dress fit both girls, although if I were to do it again, I would lengthen the bodice and sleeves about an inch as well for the taller sister.

These Lucky Girl Dresses were made with our Jersey Knit fabric, which is a medium-weight knit made from 95% cotton/5% cotton blend, giving it just the right amount of stretch and stability for play, and a perfect thickness for children’s wear.

This version of the dress was made with our brand new knit prints designed by Patty Young.

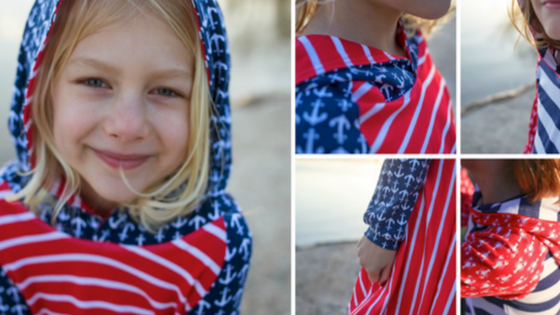
 As the temperatures dropped during this photo shoot, the hoods were put to good use!

The pattern calls for a lot of top-stitching, which gives the dress a lovely finished look.

One of the fun details of this dress is the contrasting lining inside the hood.

We are LOVING our brand new Aztec print paired with our solid Aqua knit!


Here you can see the top-stitching around the neck and sleeves. I actually opted to use my twin-needle here, which meant changing thread colors a little more often, but I think it was worth it.
On the black/aqua Aztec dress, I opted to add a raw edge hem detail. Here’s how:

To add the raw edge contrasting hem detail, arrange the skirt pattern on the contrasting fabric on the fold, the same as you did for the skirt. Mark along the skirt bottom. Now measure and mark a line 1.5″ distance from your skirt bottom markings. Cut. You will have a piece that looks like this. I opted to cut this piece, matching the skirt curve, because I wanted it to lay straight without any pulling or buckles. You could also try just cutting it out in a straight line to save fabric, but it may not lay as nicely along the curve of the skirt.

Turning your fabric so the wrong sides face up, overlap the contrast piece 1/2″ over the edge of the skirt bottom. Pin in place.

Here is what it will look like from the front.

Stitch in place using a zig-zag stitch or a twin-needle, which is what I used. Because jersey knit does not fray, you do not have to finish the raw edge in any way. If you prefer a cleaner edge, you can turn up the edge and stitch both the skirt edge and the contrasting fabric edge and follow the instructions for attaching the contrasting fabric in the previous 3 steps.

We are joining up with Lucy Blaire to give away the fabric to make this fun black and aqua dress + theLucky Girl Dress downloadable sewing pattern. Enter by signing up for Lucy’s newsletter in the box below.
