
Hi friends! It’s Amy from Ameroonie Designs, and I’m here to share a super simple baby quilt.
When I first saw this Saltwater line and especially the cheater print, I just knew I needed to make a quilt for my new baby that will be joining our family this summer. The only thing better than a sweetly pieced quilt for a baby, is one that looks pieced, but isn’t. 😉
Are you ready to quilt?
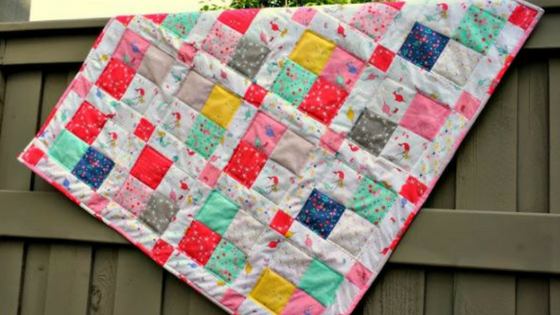
Saltwater “Cheater” baby quilt
This quilt finishes at about 39″ X 39″
Fabric Requirements:
- 1/2 yard Saltwater patchwork in White
- 1 yard Salt water patchwork in Pink
- 1/4 yard each Saltwater Main, Narwal and Turtles in white
- 1/4 yard Turtles in Pink
- 1/4 yard Seahorses in Pink
- fabric for backing
You will also need fabric cutting tools, sewing implements and batting for your quilt.
Cutting Instructions:
- From the patchwork prints you will need 12 squares fussy cut to contain 4 different prints. Take each of these squares and square them up to 7 1/2″. I did half from the patchwork in pink and half from the patchwork in white.
- Cut 1- 2 1/2″ strip from each of the Turtles and Seahorses in Pink. From the strips cut 2 1/2″ squares. You will need 25 squares total.
- Cut 8- 2 1/2″ strips from Saltwater Main, Narwal and Turtles in white. From the strips cut 7 1/2″ rectangles. You will need 40 total.

Sewing instructions:

*All seams are 1/4″
Begin by sewing one white background rectangle to the right side of each of the twelve fussy cut squares. I just grabbed them at random, but you can be more precise if you like.
Once they have one side sewn on, arrange the larger squares in your desired pattern to determine your rows. You will have four rows of four squares.
Take the rest of your white rectangles and sew the light pink squares and dark pink squares to the right side of them. (refer to above picture for visual)
Alternating dark and light pink accent squares, arrange twelve of your white rectangles above the larger squares. Once they are in the correct pattern, sew the pieces to the top of the squares. The pinks should alternate between blocks and from row to row.

On the bottom row of larger blocks, add another strip of white to the bottoms of all four blocks.

Complete your rows by adding the final four white strip pieces to the left side of the far left blocks, line up the pink squares with the top of the block. For the bottom row, you will need to sew on the final pink block to the bottom of the white strip before sewing it onto the larger block. I apologize for the lack of pictures at this point, but refer to the above picture for placement reference. Basically you are building rows of large squares surrounded by white strips with pink squares at the corners. The bottom row will have white around all four sides of the larger squares, the top three rows will not have white on the bottom yet.
It’s time to sew all your blocks into rows and then all your rows together.

See how quickly that top came together? Now just baste and quilt your quilt however you desire. I stitched the center of the large square so it appeared pieced. Then just trim and bind your quilt.
I can’t wait to wrap my sweet baby in it in just a couple months.
I hope you’ll stop by my blog for more fun crafty and sewing ideas anytime!
xoxo,
Amy