Instructor: Shelly Pagliai

Hi, it’s Shelly Pagliai (Polly-Eye), from Prairie Moon Quilts, here again with another quilt tutorial for you.
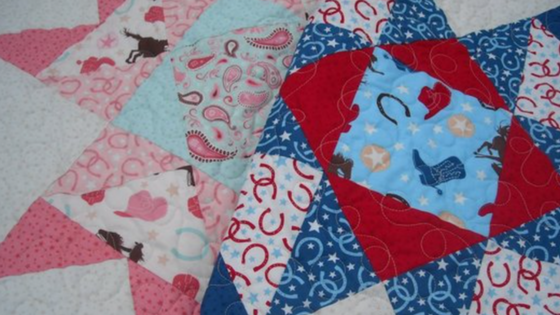
This time, I’ve made a boy version and a girl version of baby quilts using pieces from the Rodeo Rider fabric line by Samantha Walker for Riley Blake Designs.
The pieced block in this quilt is a greatly enlarged version of a traditional block called Western Star. Just four large pieced blocks, it’s bordered on the top and bottom with easy appliqued stars.
The finished quilt measures 48″ x 66″, and it’s a fast project to whip up for all the little rodeo babies in your world.
For a downloadable PDF of the instructions, which includes the star template you’ll need, click HERE. There’s also a complete list of which fabrics I used in which positions included in the PDF file.
Here’s what you’ll need to make one quilt:
Background: 2 1/2 yards
For the focal print centers: 1 fat quarter
For the triangles around the center: 1 fat quarter
For the inner star points: 1/2 yard
For the triangles between the star points: 1/2 yard
For the outer star points: 1/2 yard
For applique stars: scraps leftover from the above
For binding: 1/2 yard
For backing: 3 yards
CUTTING INSTRUCTIONS
I always suggest that you cut and piece one block by itself at first. That way you can tell if everything is going to work out all right before cutting up all your fabric. So, I’m giving instructions here for cutting ONE BLOCK ONLY. You will need to repeat this 4 times to make the blocks needed for the entire quilt.
Each block measures 24″ finished.
Refer to the pictures, and the fabric list in the PDF file, for help with the exact location of each fabric in the block.
Before you begin, cut a length of 50″ from your background fabric. From this 50″ long piece, cut 2 strips 9 1/2″ wide. Set these aside for the top and bottom of the quilt later. Use the remaining background fabric for the pieces in the blocks.
From the background fabric, cut:
One 13 1/4″ square. Cut this square in half twice on the diagonal to make 4 triangles
Four 6 1/2″ squares
From the focal print center fabric, cut:
One 6 1/2″ square
For the triangles around the center, cut:
Two 5 1/8″ squares. Cut these squares in half once on the diagonal to make 4 triangles
For the inner star points, cut:
Four 5 1/8″ squares. Draw a diagonal line from corner to corner on the back side of each of these squares.
For the outer star points, cut:
Four 5 1/8″ squares. Cut these squares in half once on the diagonal to make 8 triangles.
For the triangles between the star points, cut:
One 9 3/4″ square

SEWING INSTRUCTIONS
All seam allowances are 1/4″.
I’m demonstrating using photos from the girl version of my quilt.
First, we’re going to make all the units needed for the block. We need the unit for the center, which will use your focal print center square, and the 4 triangles that go around this square.
Sew a triangle to two opposite sides of the square, pressing seams toward the triangles.

Then sew the other two triangles to the two remaining sides of the square, again pressing seams toward the triangles.

Next we’ll make the units for the inner set of star points, which are simply large Flying Geese units.
This method for making Flying Geese has no waste, and requires no cutting or sewing triangles, and no special ruler.
For these units, use the following pieces:
The 9 3/4″ square
The four 5 1/8″ squares that have the diagonal line drawn on them
Here’s how to do it:
Lay the large square right side up on your work surface. With right sides together, lay two of the smaller squares on top of it with the marked diagonal lines running as shown. They’ll overlap in the center just a bit — this is OK. Pin in place, and then stitch on each side of the marked line, clear across all the pieces.

Cut apart on the drawn line, and press the small triangles out.

You will have two units that look like this:

On each of these, lay one of the remaining small squares, right sides together, with the diagonal line running as shown.

Again, stitch on both sides of the diagonal line, then cut them apart on the drawn line. Repeat with the other set of pieces.

Press the triangles out, and like magic, you have four perfect Flying Geese units (of which I’m only showing two here), with no waste, no special ruler required, and no cutting or sewing triangles.

The last unit we need to make is for the corners. You’ll need your 4 squares of background fabric, and the 8 triangles for the outer star points.
Sew a triangle to one side of the background square, as shown. Press seam toward the triangle.

Then sew another triangle to the adjacent side of the square, as shown, again pressing seam toward the triangle. Make 4 of these units.

Sew a Flying Geese unit to the bottom of each of these corner units, as shown. Press the seam toward the Flying Geese unit.

Now that you have all your units made, you can assemble the block. Lay a corner unit out with two large background triangles as shown. Make sure you have the units turned correctly.

Sew the triangles to the corner unit, pressing seams toward the triangles. Make 2 of these.

Sew a corner unit to each side of the center unit, as shown, pressing seams toward the center unit.

Join these rows together to complete the block. Press the seams to one side, or open, if you prefer.

Now you only need to make 3 more blocks just like this, and it’s time to put the top together!

Sew the blocks together into pairs.
Join the two pairs together to complete the center of the quilt. This portion should now measure 48 1/2″ square.
Now you’ll need the two strips of background fabric that you set aside at the beginning. Cut the two strips to a length of 48 1/2″. Using the star template from the PDF file, prepare 5 stars for each strip. Using your favorite method of applique, attach 5 stars to each strip, spacing them out evenly across the length of the strip. When you are done with the applique, press the strips gently from the back side.
Sew one of these strips to the top of the quilt, and the other strip to the bottom of the quilt. Press seams toward the applique strips.
If you wish, you can applique another star in the center of the quilt where the four blocks meet.

You’re now ready to layer and quilt your quilt. In my quilts, I used Quilter’s Dream Poly Select batting. I outline quilted around the appliqued stars, and did all-over loops in the rest of the quilt.
Here’s a photo of my boy version:

And a shot of the two quilts together, so maybe you can see the quilting a bit better:

I hope you’ve enjoyed this tutorial, and thanks so much for visiting me here at Cutting Corners College!