
We are back again with another Traditional Block Thursday! #tbt
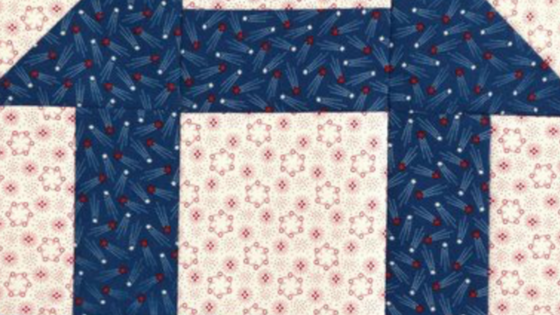
I am excited for this week’s block because we are going to combine two piecing techniques to make the Churn Dash block. I really love the look of this block – and the versatility. The name of the block comes from the resemblance of the ‘dash’ in a butter churn. Anybody ever churned butter?
This is a simple enough block that it was often used for quilt block exchanges and was one of the first blocks that little girls learned to make.
Let’s get started!

Supplies Needed:
Background Fabric: One 4.5″x4.5″ square, two 5″x5″ squares, one 2.5″ strip x width of fabric (WOF).
Dash Fabric: Two 5″x5″ squares, one 2.5″ strip x WOF (won’t use a whole strip)
*I used coordinating fabrics from the Penny Rose “Americana” collection.

We are going to start by making the Half Square Triangles. You should be getting the hang of this if you have been following our other tutorials. Start by marking a line diagonally on the two 5″x5″ background squares. I prefer to use a mechanical pencil.

Stitch a scant 1/4″ from the marked line on both squares.

Turn around and stitch 1/4″ from the marked line on the other side of both squares.

Cut on the marked line of both squares.

Set the seam with the iron and then press toward the Dash fabric.

Place ruler with 45 degree line on the seam, making sure that the block extends past the 4.5″ mark of the ruler. Trim right side and top. Repeat for all for half square triangles.

Turn half square triangle 180 degrees. Place ruler with the 45 degree line on the seam and the bottom left side on the 4.5″ mark of the ruler. Trim right side and top. Repeat for all four half square triangles.

Now we are going to strip piece the other sections of the block. Remember strip piecing? Do you need a refresher course? It has been awhile since we have done it. Place the 2.5″ background strip and the 2.5″ dash strip right sides together and stitch together with a scant 1/4″ seam.

Set the seam with the iron, then press the seam toward the dark fabric.

Place the ruler with a line on the seam. Trim the selvedge edges off.

Turn the strip around and place the ruler with a line on the seam again and the 4.5″ mark on the left edge of the strip set. Cut four 4.5″ pieces from the strip set.

Now you have all of the 9 units for your 9-patch layout. Lay the units out making sure they are all facing the right direction.

Stitch two of the units together from each of the three rows. Notice in the photo that you can ‘chain-stitch’ these units. No need to stop and start for each seam. Just send the next units to be sewn together through the machine right after the one you just finished.

Don’t worry about pressing yet.

Stitch the remaining unit to each of the three rows. See the chain-stitching? I always chain-stitch if there is more than one seam to stitch.

I pressed to the strip set units. Here’s why I made that decision: Each of the units had one seam (except for the center square). However, I find it hard to get the corners to lay nicely when I press to the half square triangles, so I opted to press everything to the units that had a seam in the center instead. It worked nicely. You can experiment and decide what you like the best. Just make sure that the center row’s seams are pressed in the opposite direction from the top and bottom row’s seams.

Stitch the rows together, making sure to ‘butt-up’ your seams to get perfect corners. You can also pin if you desire.

Again, I chose to press to the row that didn’t have the half square triangles because I find that my seams lay nicer. Press both seams to center row.

And there is a beautiful Churn Dash block!

An example of what an entire quilt might look like with this block.

Here is an example of a scrappy version.

What if you add a third color? So awesome!

What if you change up the color placement? It’s a whole new block!
I hope that you enjoyed making your Churn Dash block. See you next time!