Hi everyone! I am Elizabeth from Simple Simon and Company and am happy to be here today with a modern baby quilt tutorial. This cute black and white quilt is perfect because it is gender neutral and makes a darling play mat or a toddler bed quilt as well. And if you have never made a plus quilt—they are some of my favorites because they are simple and fast and you can have one done in an afternoon—my kind of quilting ;). Let’s get started…

Approximate Finished Size of Baby Quilt 33″ by 39″ inches
Fabrics: Riley Blake white 1 and 1/4 yards, Black 1/2 yard, Small Striped binding 1/2 yard, Backing: Riley Blake Small Quatrefoil 1 1/4 yards

BORDERS– 2–6.25 inches by 39.5 inches and 2–6.25 inches by 33.5 inches
BACKING AND BATTING– 39 inches by 45 inches (with 3 inches allowance on all sides for long-arm quilting)

After you have laid out all your rows according to the directions above, take your first white 3.5 x 3.5 inch square and your black 3.5 x 3.5 inch square and lay them on top of each other. Using a 1/4 inch seam allowance, stitch the first two blocks together.

Continue with block #3 from row #1 until you have sewn together all of row #1. Then press your first row, pushing your seams to the darker fabrics.

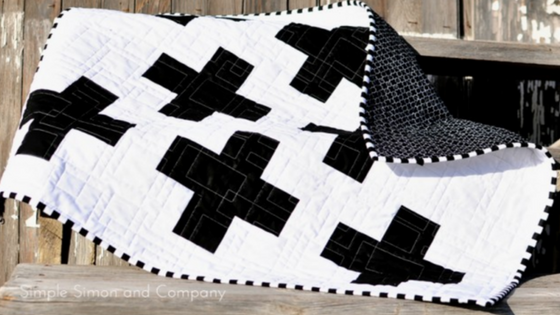
Continue sewing rows #2-#9 according to the layout directions above. Your quilt top should look like this when you have completed all nine rows.

Now it is time to stitch the rows together. Place row #1 right side down on top of row #2 matching seams where necessary and pin. Then stitch using the same 1/4 inch seam allowance as before until you have sewn all 9 rows together to form your quilt top.

After you have your nine rows sewn together you need to add your 3.5 inch border pieces. The 33.5 inch pieces are sewn to the left and right side of the quilt top, and the 39.5 inch pieces are sewn to the top and bottom of the quilt top. Press your borders and your whole quilt top once more and you are done with the quilt top stage! You then need to decided how you are going to quilt your quilt top. I had Melissa quilt my quilt top and she did an amazing job, but you could do straight line quilting at home. This size is the perfect quilt to start if you want to learn about quilting on your home sewing machine.

After your quilt top is quilted you will need to trim the batting and backing so that your quilt is square again….and then you are ready to bind. (Binding is one of my favorite parts 😉 I put up a tutorial for binding your quilt over at Simple Simon and Company today…so that you have a great reference for how I bind my quilts. Head HERE to see the full tutorial if you need one.

And you are done! Thanks Riley Blake Designs for having us here today….and be sure to check out all of our other quilts and quilting tutorials at Simple Simon and Company!
~Elizabeth